Building a Pagekit CMS E-commerce Demo with a Products Extension
"Just try something new."
That's what our content guy told me while pouring his first coffee of the morning. I had just asked him what my next blog post should be. After taking a hot sip myself, I replied:
"How about something with Vue.js? Would be fun to try that framework."
He raised an eyebrow, interested: our last posts on Angular & React had been quite successful. I gave him the TL;DR on what Vue.js was all about. He nodded:
"Awesome. Go for it."
And so I did. I dived into a rabbit hole of Vue.js resources. I stayed down there much longer than I should've. But eventually, I climbed back with what I was looking for: Pagekit CMS.
A few months old, this CMS leverages Vue.js for its frontend, and a bunch of other cool, powerful stuff. Its sexy material UI caught my eye, and I decided to see how well it could play with our own HTLM/JS shopping cart platform.
Today, I'll show you how I built a Pagekit e-commerce demo from scratch. I'm going to share steps, code, and the custom extension I came up with.
Shall we?
A word on Pagekit CMS

Pagekit is an open source CMS crafted by the folks at YOOtheme. It uses modern frameworks like Symfony & Vue.js. Much like Snipcart, it fosters a lightweight, modular approach to web development. The result is a refreshing CMS with a focus on managing content through crisp UIs.
Oh, and Pagekit boasts a cool marketplace for developers to share their own themes & extensions.
New to Pagekit? Read a bit more about in this nice intro on Speckyboy Magazine.
Pre-requisites
If you'd like to reproduce the steps I went through for this integration, you'll need:
Basic PHP skills
A live Pagekit site (installation docs)
A MySQL server
A free Snipcart account (sign up)
Quick notes
Once you create your default website and connect it to your database, you can jump up in the following Snipcart extension. :)
What I created is an MVP e-commerce extension to handle products creation/deletion in your database via Pagekit's dashboard.
I also included a small widget to render products through Snipcart buy buttons. Snipcart products are defined using simple HTML attributes. Learn more about this here.
1. Setting the Pagekit e-commerce extension file structure
First, I created folders needed to build my assets.
In packages/pagekit, I inserted a snipcart folder.
This is my e-commerce extension folder. Anything required for Snipcart goes in it.
I added five folders inside snipcart: css, js, src, views, widgets.
CSS/JS folders are self-explanatory. As for SRC, VIEWS and WIDGETS, they will respectively contain products controllers/models, admin dashboard views, and widget controller.
2. Creating the extension's scaffolding
With this file structure in place, I was ready for some code!
My extension being a Pagekit module, I had to create an index.php entry point to get it registered in the app.
If Pagekit terms like "extension/modules" aren't clear to you, I suggest reading their documentation.
The first piece of code I wrote here:
   <?php

   use Pagekit\Application;

   return [
       //Your extension's name
       'name' => 'snipcart',

       //It is necessary to pagekit so it can register properly our module as an extension.
       'type' => 'extension',

       //Specify a path to your source files
       'autoload' => [
           'Pagekit\\Snipcart\\' => 'src'
       ],

       //To store the api_key we will use later on.
       'config' => [
           'api_key' => ''
       ],

       //Specify a path alias. Since it's empty, it will point to the current directory
       'ressources' => [
           'snipcart:' => ''
       ],

       //Bind your dashboard route to your controller
       'routes' => [
           '@snipcart' => [
               'path' => '/snipcart',
               'controller' => 'Pagekit\\Snipcart\\Controller\\SnipcartController'
           ],
       ],

       //Add your extension to the dashbaord's menu
       'menu' => [
         'snipcart' => [
           'label' => 'Snipcart',
           'url' => '@snipcart',
           'icon' => 'snipcart:icon.svg'
         ]
       ]
   ];
Comments should be sufficient to understand what this does. :)
3. Generating an e-commerce/products database
Before going into controllers/models, I needed a database table to store Snipcart products.
So I lodged a scripts.php in the snipcart folder.
This file is automatically executed when the extension loads.
To create the database, I used the install hook:
    <?php

    return [
        'install' => function ($app) {

            $util = $app['db']->getUtility();

            if ($util->tableExists('@products') === false) {
                $util->createTable('@products', function ($table) {
                    $table->addColumn('id', 'integer', ['unsigned' => true, 'length' => 10, 'autoincrement' => true]);
                    $table->addColumn('sku', 'string', ['length' => 255, 'default' => '']);
                    $table->addColumn('name', 'string', ['length' => 255, 'default' => '']);
                    $table->addColumn('description', 'string', ['length' => 255, 'default' => '']);
                    $table->addColumn('price', 'integer');
                    $table->addColumn('url', 'string', ['length' => 255, 'default' => '']);
                    $table->setPrimaryKey(['id']);
                });
            }
        }
    ];
4. Declaring the extension's core
With a database to store entries, I was ready for the next step.
I opened my src folder and created two new folders: Controller and Model.
I started with the model; the class acting as an ORM to communicate with the database. I called my file product.php:
    <?php

      namespace Pagekit\Snipcart\Model;

      use Pagekit\Database\ORM\ModelTrait;

      /**
       * @Entity(tableClass="@products")
       */
      class Product
      {
          use ModelTrait;

          /** @Column(type="integer") @Id */
          public $id;

          /** @Column */
          public $sku = '';

          /** @Column */
          public $name = '';

          /** @Column */
          public $description = '';

          /** @Column */
          public $url = '';

          /** @Column(type="integer") */
          public $price;
      }
Pretty straightforward.
I then included a SnipcartController.php in the Controller folder set up earlier.
This file handles all my extension's logic.
I started with a simple index route named indexAction(), an entry point to the interactions with my extension:
  <?php

    namespace Pagekit\Snipcart\Controller;

    use Pagekit\Application as App;
    use Pagekit\Snipcart\Model\Product;

    /**
    * @Access(admin=true)
    */
    class SnipcartController
    {
        public function indexAction()
        {
            return [
              '$view' => [
                'title' => 'Snipcart management',
                'name' => 'snipcart:views/admin/index.php'
              ]
            ];
        }
    }
Note the @Access(admin=true): this tells Pagekit the controller should only be used by admin users.
Also, even though I didn't need it at that moment, I imported my Product model since I want to handle database interactions inside this controller.
The last file to generate before rendering anything in the dashboard was index.php, referenced with 'snipcart:views/admin/index.php' in my $view declaration.
Inside the views folder, I created an admin folder, in which I put the index.php file.
To see if my first iteration worked, I put the usual: '<h1>Hello world</h1>' in the template.
Going back to Pagekit's dashboard, I opened the hamburger menu and clicked on the system icon. From there, I accessed the extensions panel, and saw my Snipcart e-commerce extension!

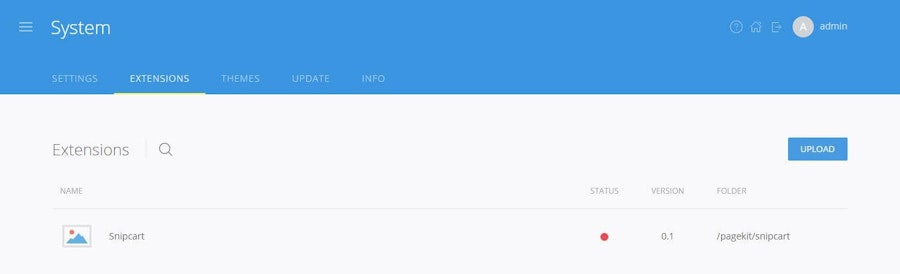
Clicking on the red dot powered up my extension. Once enabled, a Snipcart button appeared in the hamburger menu. Clicking on it brought me to that Hello world page.
5. Putting together an actual controller
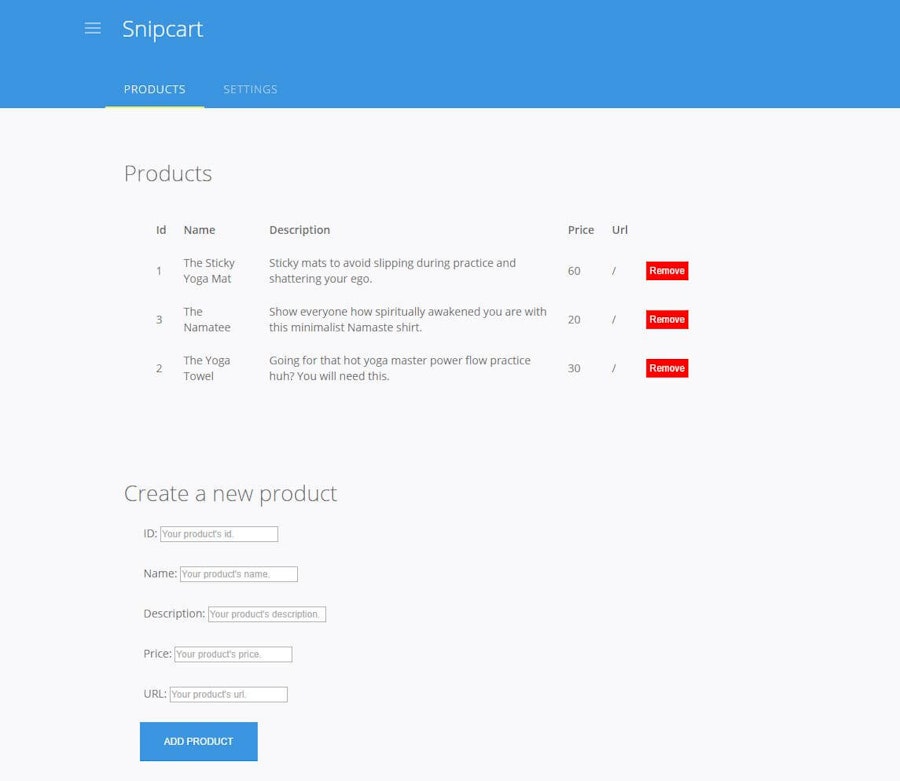
Going back to the index.php file inside the Snipcart folder, I created 2 panels nested inside my extension: Products and Settings.
To do so, I replaced the menu declaration to:
menu' => [
    'snipcart' => [
        'label' => 'Snipcart',
        'url' => '@snipcart',
        'icon' => 'snipcart:icon.svg'
    ],
    'snipcart: product' => [
         'label' => 'Products',
         'parent' => 'snipcart',
         'url' => '@snipcart',
    ],
    'snipcart: settings' => [
         'label' => 'Settings',
         'parent' => 'snipcart',
         'url' => '@snipcart/settings',
    ]
]
The products panel is now the default one, sharing the same path as the hamburger menu icon.
My extension menu now looked like:

With the necessary panels in place, I could tweak my controller to handle these routes. I went back to SnipcartController.php.
For this Pagekit extension to work, I had to be able to:
Access the settings page
Edit settings (only contains Snipcart's API key for my demo)
Create products
Remove products
These four functionalities required four new routes (I won't go into many details here as the routes themselves are pretty simple).
As explained earlier, I used the Product class to interact with the database. ORM documentation for guidance here.
My updated controller:
      <?php

      namespace Pagekit\Snipcart\Controller;

      use Pagekit\Application as App;
      use Pagekit\Snipcart\Model\Product;

      /**
      * @Access(admin=true)
      */
      class SnipcartController
      {
          public function indexAction()
          {
              $products = array_values(Product::findAll());

              return [
                '$data' => $products,
                '$view' => [
                  'title' => 'Snipcart management',
                  'name' => 'snipcart:views/admin/index.php'
                ]
              ];
          }

          public function settingsAction()
          {
              return [
                  '$view' => [
                      'title' => __('Snipcart Settings'),
                      'name'  => 'snipcart/admin/settings.php'
                  ],
                  '$data' => [
                      'config' => App::module('snipcart')->config()
                  ]
              ];
          }

          /**
           * @Request({"api_key": "string"}, csrf=true)
           */
          public function saveAction($api_key="")
          {
                App::config('snipcart')->set('api_key', $api_key);
                return ['sucess' => true];
          }

          /**
           * @Request({"id": "string"}, csrf=true)
           */
          public function removeAction($id="")
          {
                $product = Product::find($id);
                $product->delete();

                return ['sucess' => true];
          }

          /**
           * @Request({"sku": "string", "url": "string", "name": "string", "price": "int", "description": "string"}, csrf=true)
           */
          public function addAction($sku="", $url="", $name="", $price=0, $description="")
          {
                $product = Product::create([
                  "sku" => $sku,
                  "url" => $url,
                  "name" => $name,
                  "price" => $price,
                  "description" => $description
                ]);

                $product->save();

                return ['sucess' => true];
          }
      }
I added a '$data' variable to our index route since I'd also need to list products later.
6. Creating Vue.js views for Pagekit's dashboard
Database interactions logic: check. It was time to set up the frontend, to list products and let users manage them.
I headed back to views/admin/index.php.
Thanks to Pagekit's awesome stack, I had to use Vue.js to handle my frontend.
Since I want to shorten this post, I won't explain the inner workings of this library. I highly suggest reading Ashraff Hathibelagal's intro to Vue.js on SitePoint, and Ryan Chenkie's cool tutorial on the amazing Scotch.io.
Listing products in the dashboard
First, I put together a simple table to list products:
    <div class='snip-main-container' id="snipcart">
      <h1>Products</h1>

      <div class='products-container'>
        <table class="products" cellspacing="20">
          <tr class="header">
            <td>Id</td>
            <td>Name</td>
            <td>Description</td>
            <td>Price</td>
            <td>Url</td>
          </tr>
          <tr v-for="product in products">
            <td>{{ product.sku}}</td>
            <td>{{ product.name }}</td>
            <td>{{ product.description }}</td>
            <td>{{ product.price }}</td>
            <td>{{ product.url }}</td>
            <td><button class='remove' @click="remove(product)">Remove</button></td>
          </tr>
        </table>
      </div>
    </div>
I added a Vue.js component to read the data and populate the table:
$(function(){
  new Vue({
      el: '#snipcart',

      data: {
          products: $data || []
      }
    }
  });
});
This loads the $data variable passed by the controller and makes it available to my component through the products variable.
I wrapped my component declaration inside a document ready function to make sure everything loads before I do anything.
Creating products from the dashboard
Now I could see products, but none showed up as our database is empty.
So I defined a method to create products, and one to remove them.
These methods were declared in a methods object at the same level as data and el:
methods: {
   remove: function(product){
       this.$http.post('admin/snipcart/remove', {id: product.id},
         function(){

           this.products = this.products.filter(function(obj){
             return !(obj.id === product.id)
           });

           UIkit.notify('Product has been removed.');

         }).error(function(){
           UIkit.notify("Oops, something went wrong, product couldn't be removed.");
         })
   },

   save: function(){

       var newProduct = {
         sku: this.sku,
         url: this.url,
         name: this.name,
         price: this.price,
         description: this.description
       }

       this.$http.post('admin/snipcart/add', {sku: newProduct.sku, url: newProduct.url, name: newProduct.name, price: newProduct.price, description: newProduct.description},
         function(){

           this.products.push(newProduct);

           this.sku = "";
           this.url = "";
           this.name = "";
           this.price = "";
           this.description = "";

           UIkit.notify('Product has been added.');
         }).error(function(){
           UIkit.notify("Oops, something went wrong, product couldn't be added.");
         })
   }
These methods are calling the routes previously built to trigger their respective actions and update the database.
Next thing I did was to add a little product creation form in Pagekit's dashboard. This used the save method I just did.
I also had to include the snipcart.js containing our vue.js code:
<?php $view->script('snipcart', 'snipcart:js/snipcart.js', 'vue') ?>
<?php $view->style('style', 'snipcart:css/snipcart.css') ?>

<div class='snip-main-container' id="snipcart">
  <h1>Products</h1>

  <div class='products-container'>
    <table class="products" cellspacing="20">
      <tr class="header">
        <td>Id</td>
        <td>Name</td>
        <td>Description</td>
        <td>Price</td>
        <td>Url</td>
      </tr>
      <tr v-for="product in products">
        <td>{{ product.sku}}</td>
        <td>{{ product.name }}</td>
        <td>{{ product.description }}</td>
        <td>{{ product.price }}</td>
        <td>{{ product.url }}</td>
        <td><button class='remove' @click="remove(product)">Remove</button></td>
      </tr>
    </table>
  </div>

  <div class='form'>
      <h1>Create a new product</h1>
      <p class='entry'>
          ID: <input v-model="sku" placeholder="Your product's id.">
      </p>
      <p class='entry'>
          Name: <input v-model="name" placeholder="Your product's name.">
      </p>
      <p class='entry'>
          Description: <input v-model="description" placeholder="Your product's description.">
      </p>
      <p class='entry'>
          Price: <input v-model="price" placeholder="Your product's price.">
      </p>
      <p class='entry'>
          URL: <input v-model="url" placeholder="Your product's url.">
      </p>
      <button class='save entry' @click="save">Add product</button>
  </div>

</div>
I won't show the whole code, but you can see I also included some CSS.
I placed this asset in the CSS folder.
Going back to my dashboard, I could now add/remove products in my Pagekit demo, through the e-commerce extension. Awesome.

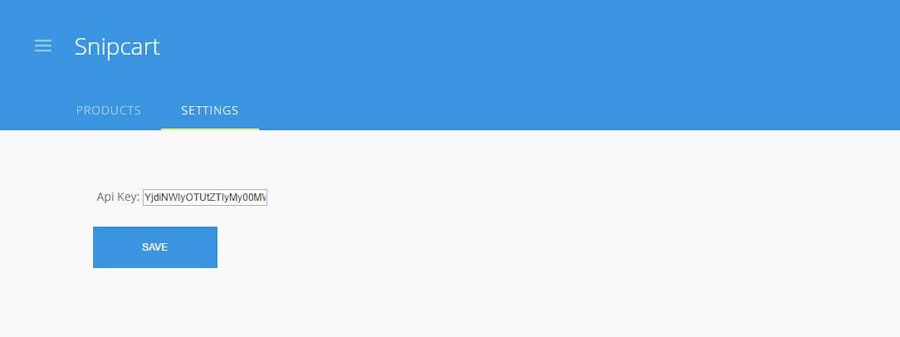
Entering & saving the Snipcart API key
Last step before putting together the templates to render products on the site: a view to save the API key.
Remember the settings panel and settingsAction() route I set up earlier? Well, I just had to generate a new settings.php file in the views/admin folder here:
<?php $view->script('snipcart', 'snipcart:js/widget.js', 'vue') ?>
<?php $view->style('style', 'snipcart:css/snipcart.css') ?>

<div id="widget">
  <div>
      <p class='entry'>
          Api Key: <input v-model="api_key" placeholder="Your snipcart api key.">
      </p>
      <button class='save entry' @click="save">Save</button>
  </div>

</div>
Like with my products, I crafted a Vue.js component to handle frontend interactions here.
This one, even simpler, resides also in my js folder, and I named my file widget.js:
$(function(){
  new Vue({
      el: '#widget',

      data: {
          api_key: $data.config.api_key
      },

      methods: {
          save: function(){
              this.$http.post('admin/snipcart/save', {api_key: this.api_key},
                function(){
                  UIkit.notify('Settings have been saved.');
                }).error(function(){
                  UIkit.notify("Oops, something went wrong, settings couldn't be saved.");
                })
          }
      }
  });
});
The method calls my save route to update the API key. I could now go to my Pagekit dashboard and enter my Snipcart API key:

Displaying products on the site
At this point, my Pagekit e-commerce extension was fully working.
Last thing I had to do? Render products information on my demo site.
There are a couple of ways I could have done this. For this demo, I decided to come up with a handy little widget. Here's my full code commit for it.
Results: Pagekit live demo & code repos

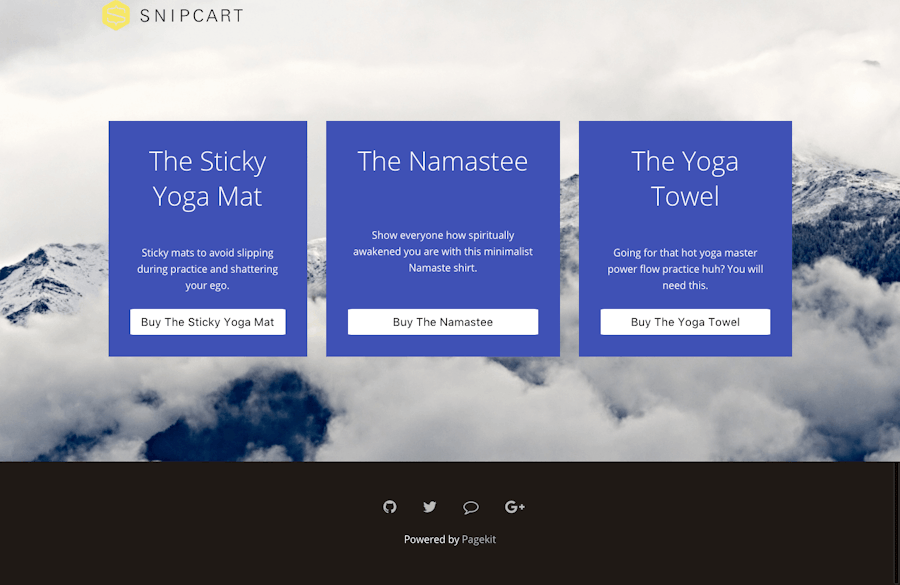
Well, that was something, huh? Go ahead and check out the results:
Conclusion
I won't lie to you: crafting this demo took me way longer than I'd have thought! I spent a good 5-6 hours on it. My PHP skills weren't that sharp when I started this mini project, and my lack of knowledge regarding Pagekit's unique CMS stack slowed my development. For PHP beginners, a little more thorough documentation could go a long way. Their active Gitter community, on the other hand, provided me with some much-needed help a few times!
Honestly, I found Pagekit's modular approach to be very neat. Minimal scaffolding; lots of control. It might make for rougher starts for novices, but the growing extension marketplace will help. All in all, I feel quite positive about my experience with Pagekit. And I loved playing with Vue.js!
I do hope this post encourages developers to work on e-commerce projects with Pagekit and Snipcart. If you do build such a setup, make sure to share it with us!
And of course, we invite you to contribute to Pagekit's open source development!
Found this post entertaining or valuable? Send out a tweet! I'd appreciate that. Questions, comments regarding Pagekit or Snipcart? Hit the section below!


