Ecommerce Integration for Ghost in 10 Minutes
Ghost is a popular open-source blogging platform started by John O'Nolan & Hannah Wolfe in 2013. Its lean UI and WYSIWYG editor make it a clean and easy-to-use solution that simplifies the content creation process.
Ghost is also flexible since it can be self-hosted and used as a headless CMS. Alternatively, you can use Ghost(Pro), an all-in-one solution for a fully hosted blogging platform.
In recent years, the team at Ghost has turned its focus on creators by offering gated content subscriptions built-in the platform. However, for creators wanting to sell their products through their blog, the process is complicated due to the lack of plugins and themes dedicated to eCommerce.
In this blog, we'll go through how to add eCommerce functionalities to your Ghost blog in less than 5 minutes using Snipcart.
Is Ghost a good platform for eCommerce?
Ghost is not an eCommerce platform, but with the right tools, it can become a good solution to turn your blog into a simple eCommerce store. Its SEO-friendly features, great user interface, optimized mobile experience, and scalability make it a great candidate to build an online store.
However, that all depends on your needs. If you are looking for a complete eCommerce platform, Ghost might not answer your needs since it focuses on building creators' blogs. When it comes to building a full-featured online store from scratch, choosing a CMS with built-in functionalities for eCommerce is probably your best bet. But that doesn't mean that Ghost isn't good enough. Just like WordPress, it's a great CMS and blogging platform, but it has not been built to create an online shop.
An eCommerce solution like Snipcart has all the important eCommerce functionalities built-in and it can be integrated into any platform, including Ghost.
4 steps to add eCommerce to Ghost
Here’s a four easy steps tutorial on how to add eCommerce and products to a Ghost blog with Snipcart. With these steps, you can start selling on Ghost in as little as 10 minutes.
Prerequisites
What you need before you get started:
A Snipcart account (free in test mode)
1. Create a Ghost website
You can skip this step if you already have a Ghost website.
Setting up a website in Ghost is really straightforward. Give it a name, select the primary colour and a template, and you’re up and running. Once you’re in the Ghost admin dashboard, you can create your blog post with the WYSIWYG editor.
2. Add Snipcart for eCommerce functionalities
With our Ghost blog created, let’s install Snipcart so we can sell through our blog. For this, in the Ghost admin dashboard, head to Settings > Code injection.

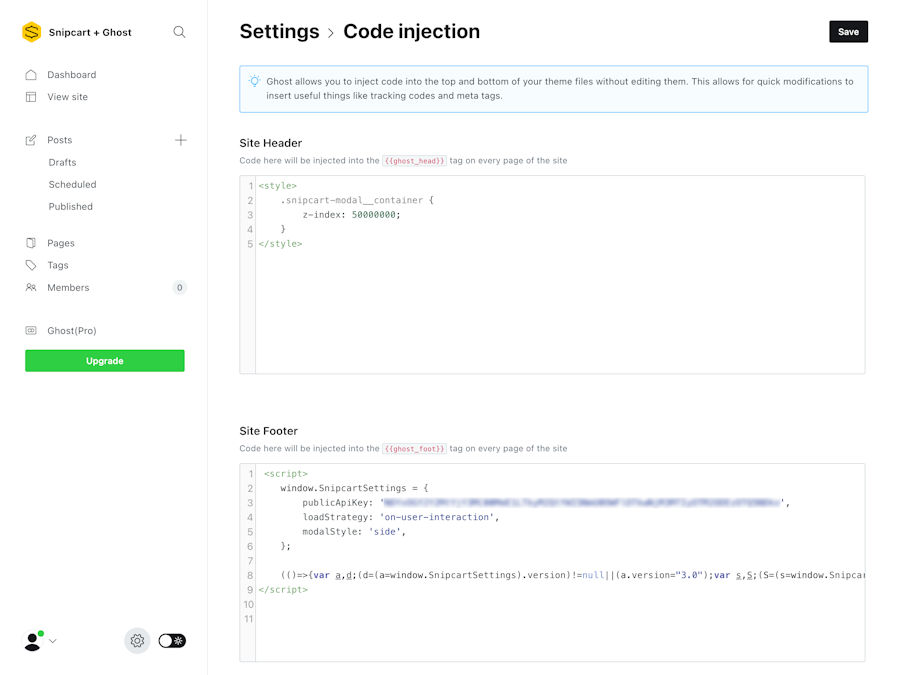
On this page, we’ll need to paste the Snipcart installation script in the Site Footer section:
<script>
  window.SnipcartSettings = {
    publicApiKey: "YOUR_API_KEY",
    loadStrategy: "on-user-interaction",
  };

  (()=>{var a,d;(d=(a=window.SnipcartSettings).version)!=null||(a.version="3.0");var s,S;(S=(s=window.SnipcartSettings).currency)!=null||(s.currency="usd");var l,p;(p=(l=window.SnipcartSettings).timeoutDuration)!=null||(l.timeoutDuration=2750);var w,u;(u=(w=window.SnipcartSettings).domain)!=null||(w.domain="cdn.snipcart.com");var m,g;(g=(m=window.SnipcartSettings).protocol)!=null||(m.protocol="https");var y=window.SnipcartSettings.version.includes("v3.0.0-ci")||window.SnipcartSettings.version!="3.0"&&window.SnipcartSettings.version.localeCompare("3.4.0",void 0,{numeric:!0,sensitivity:"base"})===-1,f=["focus","mouseover","touchmove","scroll","keydown"];window.LoadSnipcart=o;document.readyState==="loading"?document.addEventListener("DOMContentLoaded",r):r();function r(){window.SnipcartSettings.loadStrategy?window.SnipcartSettings.loadStrategy==="on-user-interaction"&&(f.forEach(t=>document.addEventListener(t,o)),setTimeout(o,window.SnipcartSettings.timeoutDuration)):o()}var c=!1;function o(){if(c)return;c=!0;let t=document.getElementsByTagName("head")[0],e=document.querySelector("#snipcart"),i=document.querySelector(`src[src^="${window.SnipcartSettings.protocol}://${window.SnipcartSettings.domain}"][src$="snipcart.js"]`),n=document.querySelector(`link[href^="${window.SnipcartSettings.protocol}://${window.SnipcartSettings.domain}"][href$="snipcart.css"]`);e||(e=document.createElement("div"),e.id="snipcart",e.setAttribute("hidden","true"),document.body.appendChild(e)),h(e),i||(i=document.createElement("script"),i.src=`${window.SnipcartSettings.protocol}://${window.SnipcartSettings.domain}/themes/v${window.SnipcartSettings.version}/default/snipcart.js`,i.async=!0,t.appendChild(i)),n||(n=document.createElement("link"),n.rel="stylesheet",n.type="text/css",n.href=`${window.SnipcartSettings.protocol}://${window.SnipcartSettings.domain}/themes/v${window.SnipcartSettings.version}/default/snipcart.css`,t.prepend(n)),f.forEach(v=>document.removeEventListener(v,o))}function h(t){!y||(t.dataset.apiKey=window.SnipcartSettings.publicApiKey,window.SnipcartSettings.addProductBehavior&&(t.dataset.configAddProductBehavior=window.SnipcartSettings.addProductBehavior),window.SnipcartSettings.modalStyle&&(t.dataset.configModalStyle=window.SnipcartSettings.modalStyle),window.SnipcartSettings.currency&&(t.dataset.currency=window.SnipcartSettings.currency),window.SnipcartSettings.templatesUrl&&(t.dataset.templatesUrl=window.SnipcartSettings.templatesUrl))}})();
</script>
If you used the link above, you’ll see YOUR_API_KEY will be replaced with Snipcart’s public API key.
In the Site Header section, we’ll need to paste the following to make sure the cart always shows up on top of other elements:
<style>
    .snipcart-modal__container {
      z-index: 50000000;
    }
</style>
3. Creating a product and a buy button
Once the Snipcart script is added to your website, it’s time to add your products. For this, head to the blog post in which you’d like to sell a product and add an HTML block where you want the button to be displayed.
In the embed HTML field enter the following:
<button class="snipcart-add-item"
  data-item-id=""
  data-item-price=""
  data-item-description=""
  data-item-image=""
  data-item-name="">
  Add to cart
</button>
You only need to add your product information between the “” of each attribute of your product like this:
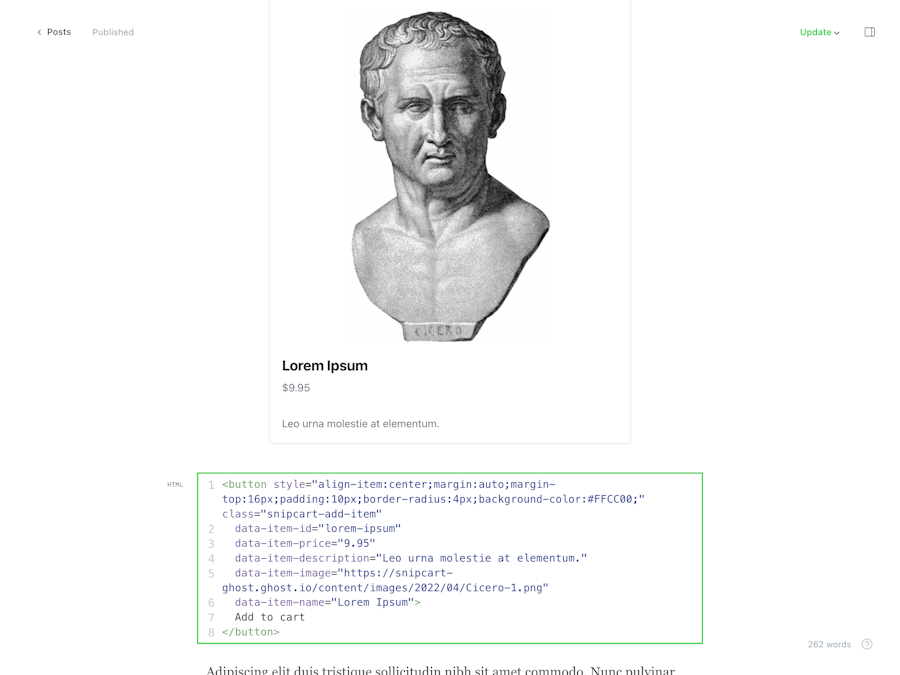
As you can see in the screenshot above, you can also optionally add some inline CSS to style the add to cart button.
If you want you can add multiple products in one blog post.
You can also use an anchor text link or any other HTML element to define your product.
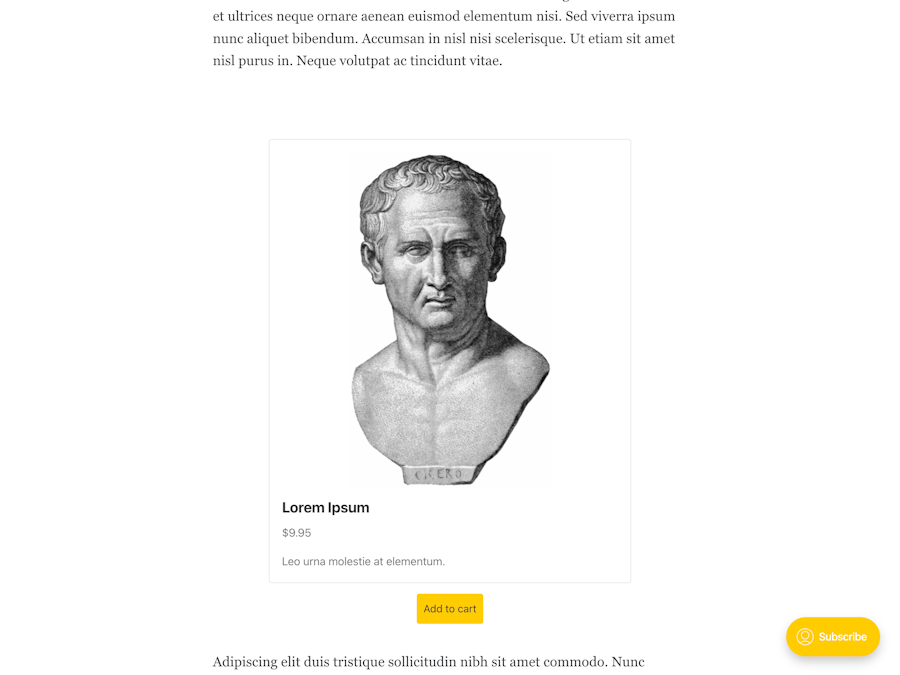
Our product is now defined. If you test a transaction, you’ll see your order displayed in the Snipcart app in the orders tab under test.
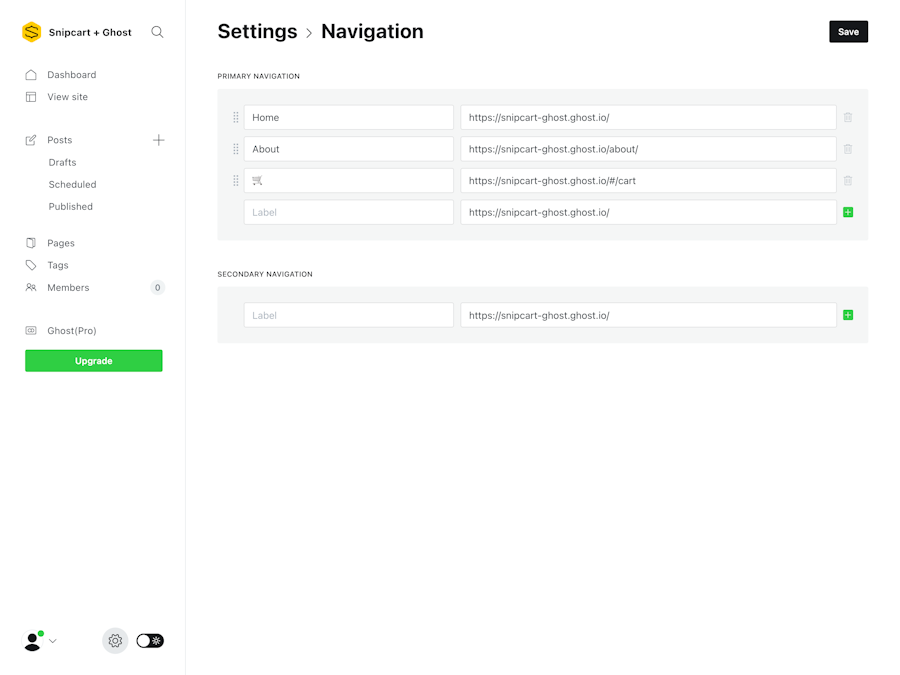
4. Adding a cart summary button
Your Ghost blog has now the ability to sell products. To complete your integration, let’s add a button to display the cart so customers can access the checkout from anywhere on your blog. For this, navigate to Settings > Navigation in Ghost dashboard and add a new navigation link pointing to /#/cart.
Lastly, you’ll need to swap the test API key for the live one once you’re done with testing. That’s it, you have added eCommerce to your Ghost site and can start selling on your blog.
Conclusion
Adding Snipcart to Ghost is a great way to start selling without re-building a new website from scratch. The Ghost + Snipcart combo opens the door to many cool content/commerce scenarios.
If you'd like to take the integration a bit further, you can always download a Ghost theme and customize Snipcart's cart look and feel using the theming feature.
Have you integrated Snipcart or any other solution to sell products on Ghost? Let us know in the comments.


