Angular E-Commerce Project: Build a Web App Easily
In a rush? Skip to the tutorial.
Nowadays, you probably have as many options when building a web app as you have while ordering a drink at Starbucks. And the multitude of JavaScript frameworks is maybe to blame.
Why not build an Angular e-commerce project together?
So, this time let's shifted our focus to TypeScript.
We've first published this article in 2019, but a lot has changed since then. In our first version, Angular 8 was the latest release. We're now at version 12, so why not revisit this post and see what new it has to offer.
The shopping cart & back office will be offloaded to Snipcart, our dev-first e-commerce solution.
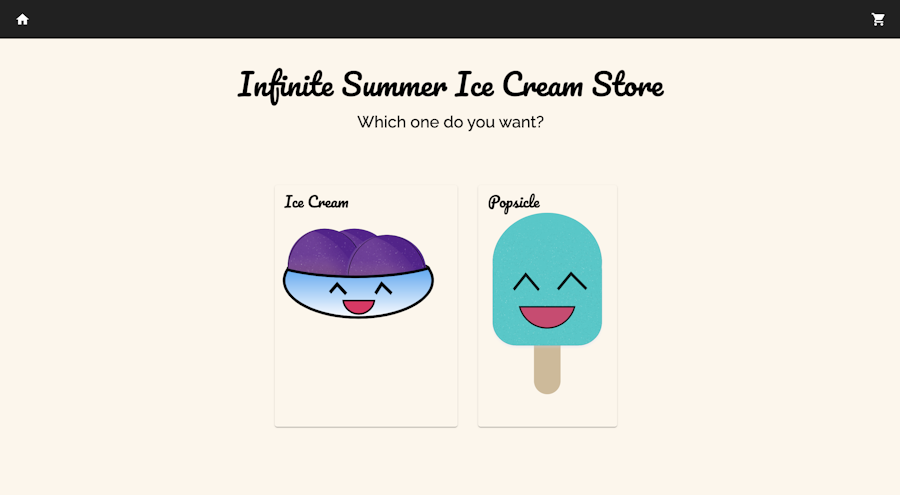
And because summer is coming in Canada and it has been quite a long year, I wanted to replenish my youth memories and make a REPLENISHING ICE CREAM STORE!


So let's get started!
Here's what I'll cover:
What is Angular?

If you're reading this, you probably already have a working knowledge of Angular, but for the few of you who are not particular about it, here's a quick overview.
Angular is a web application framework based on TypeScript. It's open-source and developed by Google.
That said, there have been some new developments in the Angular world that are worth a quick mention. Angular's latest major release is 12, and it boasts loads of bug fixes making it smaller, faster & easier to use. Plus, it now supports TypeScript 4.2.3 and up. It's also starting to drop support for building libraries with View Engine in favor of Angular's compiler/runtime, Ivy. Currently, Ivy is the default compiler, and View Engine will be removed from version 13.
And since this tutorial used Angular 8 before, I was intrigued by its latest release.
Is Angular any good for e-commerce?


And here's a few reasons why:
→ Great Tooling: You'll find tons of awesome tools like Angular CLI, Angular Elements, and Ivy. The point is that when it comes to building your Angular e-commerce app, you'll never be at a lack of intuitive, time-saving tools to get your site up and running as quickly—and painlessly—as possible.
In the world of e-commerce, saving time = saving $.
→ Loads of Helpful Documentation/Articles: Angular is one of the top JavaScript frameworks. As such, it should be no surprise that you have loads of resources to pull from for any updated news, troubleshooting problems, or debugging issues you may encounter while building your e-commerce app.
Apart from Angular's excellent docs, you have countless other active writers in the Angular community. You'll have detailed resources quite literally...
→ SEO Opportunities: Look, if you're entering the world of e-commerce, you need to make sure your site is optimized for SEO. Using Angular (or any other framework) can be scary when considering SEO purposes, but it certainly doesn't need to be! In fact, using server-side rendering with Angular Universal, you can rest assured that your site will be 100% SEO-friendly. Oh, and did I say that Angular was developed by Google?
Angular setup for an e-commerce project

What you'll need:
Let's first install the Angular CLI. It's a neat tool that automates many development tasks. To install it, open a terminal and type the following command:
npm install -g @angular/cli
Once installed, create a new project with the following command: ng new snipcart-angular
A prompt will appear asking you if you want to enable strict mode. Select yes. This will enable a few other settings that will help to catch bugs ahead of time.
In your directory, you now see your project repo. Type the following commands to go in it:
cd snipcart-angular
ng serve --open
ng serve will build the app, while the --open option will open up a browser to http://localhost:4200/. You should now see Angular's generic template page.
Customizing the HTML template
Now that the general project setup is done. Let's start customizing it!
First of all, open the app.component.ts file and change the value of the title property for 'Ice Cream Store'.
Afterward, open the app.component.html file and remove all of the template sections, replacing it with <h1>{{title}}</h1>. The final result should look like this:
<h1>{{title}}</h1>
<router-outlet></router-outlet>
Afterward, the browser should reload instantly, displaying only the new title.
Customizing the stylesheet
To help with our styling, we will use Angular's Material Design components. These components, made by the Material team, are an implementation of Material Design. They will allow us to quickly create a fast, design-tested e-commerce website.
Let's use the following command to install Material UI: ng add @angular/material
You can then replace src/app.component.scss.
Creating mock products
Later in the tutorial, we will use a full InMemoryDbService. For now, let's do something simple and simply create a mock-products.ts file in our root component:
import { Product } from './core/product';
import { Size } from './core/size';

export const PRODUCTS: Product[] = [
  {
    id: 1,
    name: 'Ice Cream',
    imageUrls: ['../assets/ice-cream-prune.svg', '../assets/ice-cream-cherry.svg', '../assets/ice-cream-squash.svg'],
    price: 10,
    flavors: [
      { name: 'prune', color: '#5A188E' },
      { name: 'squash', color: '#F88532' },
      { name: 'cherry', color: '#E91E63' },
    ],
    sizes: [Size.SMALL, Size.MEDIUM, Size.LARGE],
  },
  {
    id: 2,
    name: 'Popsicle',
    imageUrls: ['../assets/popsicle-lime.svg', '../assets/popsicle-lettuce.svg', '../assets/popsicle-cherry.svg'],
    price: 8,
    flavors: [
      { name: 'lime', color: '#00CACA' },
      { name: 'lettuce', color: '#80DC0B' },
      { name: 'cherry', color: '#E91E63' },
    ],
    sizes: [Size.SMALL, Size.LARGE],
  },
];
You will also need to create a core folder that will contain our TypeScript product interface as well as a flavor and size interface we will use to fulfill our ice cream customer's wishes better!
// core/product.ts

import { Flavor } from "./flavor";
import { Size } from "./size";

export interface Product {
    id: number;
    name: string;
    imageUrls: string[];
    price: number;
    flavors: Flavor[];
    sizes: Size[];
}
// core/flavor.ts
export interface Flavor {
name: string;
color: string;
}// core/size.ts
export enum Size {
SMALL = "small",
MEDIUM = "medium",
LARGE = "large",
}Creating a homepage component
Let's now create our website's homepage, where we will display our product header and options.
In your terminal, type the following command: ng generate component homepage.
Then, let's start by adding props to the homepage. It will be used to display our app title on our website. Now, create two properties for our app title and subtitle.
// homepage.component.ts

@Component({
  selector: 'app-homepage',
  templateUrl: './homepage.component.html',
  styleUrls: ['./homepage.component.scss']
})
export class HomepageComponent {
  title = 'Infinite summer ice cream store';
  subtitle = 'Which one do you want?';
}
Then let's add the HTML templating in the corresponding file:
<!-- homepage.component.html -->

<div class="header" fxLayout="column" fxLayoutAlign="center center">
  <h1 class="jumbo">{{ title }}</h1>
  <h2>{{ subtitle }}</h2>
</div>
In order to display the homepage view, add the following line to the component:
<!-- app.component.html -->

<app-homepage></app-homepage>
You should now see the title and subtitle! But what's an e-commerce homepage's header without some product to display?
Display products: introducing directives
Now that we have a cool header and some nice products let's display them on our website! We will do it in a separate component that will improve reusability.
In your terminal, create the product-display component by typing the following Angular CLI command: ng generate component products.
With our components created, we can now import the products that we need. Angular allows us to do so easily. Simply add the following lines in product-display-component.ts:
import { PRODUCTS } from '../mock-products';And then define the attributes in the component class with the following lines:
export class ProductsComponent implements OnInit {
  products = PRODUCTS;
}
At this stage, we're ready to create a product component to give further information to our customers.
ng generate component product.
Open the newly created product.component.ts file and replace its content with the following:
import { Component, Input, OnInit } from '@angular/core';
import { Product } from '../core/product';

@Component({
  selector: 'app-product',
  templateUrl: './product.component.html',
  styleUrls: ['./product.component.scss']
})
export class ProductComponent implements OnInit {
  @Input() product: Product | undefined;
  imageUrl: string = "";

  ngOnInit() {
   this.imageUrl = this.product?.imageUrls[0] ?? '';
  }
}
The @Input decorator we added allows us to declare input properties. This means that the component can now receive its value directly from its parent component.
If we look at what we just created, we can see:
An input property product that binds to the Product object we created in core.
An imageUrl property which we'll use to display our product's images.
With the line this.imageUrl = this.product?.imageUrls[0] ?? ''; we then assign to imageUrl the value of the first image in the imageUrls array if it exists, and do so within the ngOnInit method.
ngOnInit is an Angular lifecycle method that gets called after component initialization. Since the component is initialized, the input props, in our case the product prop, are populated, and we can access it. This is what allows us to populate the property.
Now that our component properties are defined we can add them to our HTML (product.component.html):
<ul>
    <app-product *ngFor="let p of products" [product]="p"></app-product>
</ul>
Notice the *ngFor directive we are using. It allows us to modify the DOM structure by–you guessed it–looping over the elements of the products list and creating the specified HTML node for it (in our case, the app-products node).
Directives such as *ngFor are defined in Angular's official documentation as "classes that add additional behavior to elements". In that sense, components are also directives because they define additional behavior to a standard HTML template.
Create a product page: introducing angular routing
Open app-routing.module.ts and insert the following into routes:
const routes: Routes = [
  {path: "**", component: HomepageComponent},
];
We can now add a dynamic route.
const routes: Routes = [
  {path: "product/:id", component: ProductPageComponent},
  {path: "**", component: HomepageComponent},
];
The "**" path is a wildcard route, generally used for 404 pages. It's important to add the wildcard route last; otherwise, it will override the other routes.
In app.component.html, <router-outlet></router-outlet> will display the component related to the route. So in your browser, you can now go to http://localhost:4200/ and it will point to our homepage!
Create product pages component: discovering services
Components are responsible for data presentation. To improve our application modularity, they shouldn't access the application data directly. Instead, they should interact with services that handle data access.
Let's refactor our products component so that it uses a service to handle data access. For now, this service will use mock data.
In the terminal, enter the following command: ng generate service product.
In the newly created product.service.ts file, add the following content:
import { Injectable } from '@angular/core';
import { PRODUCTS } from './mock-products';

@Injectable({
  providedIn: 'root'
})
export class ProductService {

  constructor() {}

  getProducts(): Product[] {
    return PRODUCTS;
  }
}
The getProducts method simply returns our mock data. Later in the tutorial, we will modify it to make it even more modular. For now, in products.component.ts, replace the mock products assignation by a call from product service:
export class ProductsComponent implements OnInit {
  products: Product[] = [];

  constructor(private productService: ProductService) {}

  getProducts(): void {
    this.products = this.productService.getProducts();
  }

  ngOnInit() {
    this.getProducts();
  }
}
We have done four things here:
We've replaced the value of products with an empty array.
We've injected the productService in our constructor.
We've defined a getProducts method in our component that handles the products' logic.
We've called this method in the ngOnInit lifecycle method.
For our product page, we will need data about a single product. Let's add a getProduct method to our product service to fetch this data:
// product.service.ts

getProduct(id: number): Observable<Product | undefined> {
   const product = PRODUCTS.find(product => product.id === id);
   return of(product);
}
This method returns an observable. They are used in Angular for event handling and, as in our case, asynchronous programming. When designing our product page, we will see how to fetch observable values.
We'll use this method in our product component to display the product content: ng generate component product.
// product.component.ts
import { Component, Input, OnInit } from '@angular/core';
import { Product } from '../core/product';

@Component({
  selector: 'app-product',
  templateUrl: './product.component.html',
  styleUrls: ['./product.component.scss']
})
export class ProductComponent implements OnInit {
  @Input() product: Product | undefined;
  imageUrl :string = "";

  ngOnInit() {
   this.imageUrl = this.product?.imageUrls[0] ?? '';
  }
}
In the TypeScript file, we added a product input property for the inserted product, along with an imageUrl property, which we bind to the component's image src.
<!-- product.component.html -->

<div [routerLink]="'product/' + product?.id">
  <h2>{{ product?.name }}</h2>
  <img [src]="imageUrl" />
</div>
In the HTML, we also added a router link to a product page, which we have not yet defined. Let's do it now.
Add product pages
First, we need to allow our users to select the flavor and size variant they want for their products.
Along with an imageUrl property similar to the one we added to the product component, let's add a getProduct method that will get the dynamic parameter from our route and use it to call the corresponding method we defined in the product service:
// in product-page.component.ts
 imageUrl: string = '';
 product: Product | undefined;

 getProduct(): void {
    const id = Number(this.route.snapshot.paramMap.get('id'));
    this.productService
      .getProduct(id)
      .subscribe((product) => (this.product = product));
  }
We can see that the method calls our product service getProduct method and subscribes to the observable value. When the value from getProduct gets returned, it will be assigned to the product property.
Now that we have all of the required data, it's time to display our product name, image URL, and price:
<h1>{{ product?.name }}</h1>
<img [src]="imageUrl" />
<p>Price: {{ product?.price }}</p>)
<h1>{{ product?.name }}</h1>
<img [src]="imageUrl" />
<p>Price: {{ product?.price }}</p>
<button
class="snipcart-add-item"
[attr.data-item-id]="product?.id"
[attr.data-item-price]="product?.price"
[attr.data-item-url]="'product/' + product?.id"
[attr.data-item-image]="imageUrl"
[attr.data-item-name]="product?.name">
Add to cart
</button>When you click on the buy button, Snipcart's checkout window should now open and you should see your product in it. But if you would deploy in production and try doing a test transaction, you will get a product validation error. Why is that?
Build a product API using Vercel's serverless function
You may have noticed that in our previous step, the attributes we added to a button with the snipcart-add-item class were determining the product attributes (e.g the price) in checkout. Because Angular components are rendered dynamically at runtime and Snipcart's HTML crawler gets the HHTML page before this rendering, the buy button doesn't get crawled. To solve this, we'll create a small API using Vercel serverless function. Snipcart's JSON crawler should then be able to crawl our endpoint.
Vercel makes serverless function implementation pretty trivial. In the project root (not the src folder), simply add an API folder. Inside add another folder called products, and in it, a file called [id].ts. The brackets around id indicate that it is a dynamic parameter. We'll use it to get the relevant product and return its attributes influencing pricing.
To do so, add the following content inside the file:
// <PROJECT'S ROOT>/api/products/[id].ts
import { VercelRequest, VercelResponse } from '@vercel/node';
import { Product } from '../../src/app/core/product';
import { PRODUCTS } from '../../src/app/mock-products';

const findProduct = (id: number): Product | undefined =>
  PRODUCTS.find((product) => product.id === id);

export default function fetchProductInfo(
  req: VercelRequest,
  res: VercelResponse
) {
  const id = Number(req.query.id);
  const product = findProduct(id);
  res.statusCode = 200;
  res.send({
    id: id,
    name: product?.name,
    price: product?.price,
    url: `/products/${id}`,
  });
}
Then install Vercel's node module for type definitions:
npm i -D @vercel/nodeYou can test that the serverless function is working locally by installing Vercel CLI. Then, type the vercel . command in your project root, follow the setup instructions, and then type vercel dev to start the local environment.
If you now go to [https://localhost:3000/products/1](https://localhost:3000/products/1) you should now get the following file:
{"id":1,"name":"Ice Cream","price":10,"url":"/products/1"}This JSON contains the minimum attributes required for Snipcart's JSON crawler price validation (id, price, and URL).
Deploy it to production using either Vercel CLI or GitHub integration
And voilà! You should now be able to complete a test transaction!
BONUS: Customizing customer consumptions with Snipcart's custom field
If you look at the code repo, you will see I added some logic to create Snipcart's custom fields. These will allow our users to select their ice-cream/popsicle flavor and sizes.
First, I made two functions to give us the options separated by | character. We'll use them to populate the buy button's custom option fields.
  get flavorOptions(): string {
    return (
      this.product?.flavors?.map((flavor) => flavor.name).join('|') ?? ''
    );
  }

  get sizeOptions(): string {
    return this.product?.sizes?.join('|') ?? '';
  }
Then, I added a dropdown to select product size and chip components to select flavors...
<!-- product-page.component.html -->
<mat-form-field appearance="fill">
  <mat-label>Size</mat-label>
  <mat-select
    (selectionChange)="
      updateSelectedProductAttributes(
        this.selectedAttributes?.flavor,
        $event.value
      )
    "
    required
  >
    <mat-option *ngFor="let size of product?.sizes" [value]="size">
      {{ size }}
    </mat-option>
  </mat-select>
</mat-form-field>
<mat-chip-list aria-label="Flavors selection">
  <mat-chip
    *ngFor="let flavor of product?.flavors"
    [style.background-color]="flavor.color"
    (click)="
      updateSelectedProductAttributes(flavor, this.selectedAttributes?.size)
    "
  >
    {{ flavor.name }}
  </mat-chip>
</mat-chip-list>
..., along with some logic to keep track of the selected values:
// core/selectedProductAttributes.ts

import { Flavor } from "./flavor";
import { Size } from "./size";

export interface SelectedProductAttributes {
    flavor: Flavor | undefined;
    size: Size | undefined;
}
// product-page.component.ts
export class ProductPageComponent implements OnInit {
imageUrl: string = '';
selectedAttributes: SelectedProductAttributes = {
flavor: undefined,
size: undefined,
};
product: Product | undefined;Now we simply have to add the custom field attributes to Snipcart's buy button:
<button
  class="snipcart-add-item"
  [attr.data-item-id]="product?.id"
  [attr.data-item-price]="product?.price"
  [attr.data-item-url]="'product/' + product?.id"
  [attr.data-item-image]="imageUrl"
  [attr.data-item-name]="product?.name"

  data-item-custom1-name="Flavor"
  [attr.data-item-custom1-options]="flavorOptions"
  [attr.data-item-custom1-value]="this.selectedAttributes?.flavor?.name"
  data-item-custom2-name="Size"
  [attr.data-item-custom2-options]="sizeOptions"
  [attr.data-item-custom2-value]="this.selectedAttributes?.size"
>Add to cart</button>
It's not more complicated than that!

You can see the live demo here
You can see the GitHub repo here
Conclusion
I had a lot of fun writing and building this demo e-commerce store project. I've worked with Angular 8 a couple of years ago and was a bit scared to go back to it, afraid there would be a lot of boilerplate code. However, I became pleasantly surprised to use Angular opinionated architecture, as I found it helped me create a more modular app. Plus, its CLI does make life easier and the Ivy compiler added in version 9 makes for a faster flow.
Of course, we could push the application further, for instance, by making the API even more flexible using Angular's HTTP Client and In-Memory-Web-API service.
I recommend this video if you want a crash course on how Angular works.
If you've enjoyed this post, please take a second to share it on Twitter. Got comments or questions? Hit the section below!


