Django for E-Commerce: A Developers Guide (with Wagtail CMS Tutorial)
In a rush? Skip to the tutorial
"D-J-A-N-G-O. The D is silent."
Man, I love that line. So badass.
But the eponymous character from Quentin Tarantino's masterpiece isn't the only badass Django in town.
So is the popular Python framework of the same name.


Today, we're leaving the realm of JavaScript frameworks for a quick venture into Django e-commerce.
In this post, I'll answer legitimate questions you might have when starting a new e-commerce project, such as:
Is Python the right language for my project? What about Django? Is it the right framework? Which tools or plugins should I use?
Then, I'll show you our homemade recipe for Django-powered e-commerce success with a step-by-step Wagtail CMS and Tailwind CSS tutorial:
Creating a new Wagtail site.
Adding Snipcart configuration settings.
Generating database migrations.
Creating new products for your Django store.
Crafting a Tailwind CSS e-commerce template.
Let's start with the basics.
The State of Python
One of the main reasons to pick the Django framework is its Python foundation.
A general-purpose, dynamic programming language, Python was developed by ex-Googler Guido van Rossum in the late '80s. A fan of Monthy Python, he took one-half of the name to baptize his programming project.
How can you not be fans?
He wasn't joking, though. To say that Python has become "popular" is an understatement.
Today, it's used by hundreds of thousands of developers all over the world. As StackOverflow puts it:
The term “fastest-growing” can be hard to define precisely, but we make the case that Python has a solid claim to being the fastest-growing major programming language.
A few reasons explain the Python love:
Its grammatical readability is awesome.
It has a fast learning curve for newcomers.
It boasts a long-lasting, solid ecosystem of libraries & community
It's now the standard language for data science & machine learning.
It powers great dev tools like Pelican, a neat static blog generator.
Reddit is written in Python. 😉
What about the Django framework?

Django is an open-source, high-level Python web framework. Its emphasis on reusable components makes it faster for developers to build web apps on top of Python. It presents itself as a web framework for perfectionists with deadlines.
Now maintained by the Django Software Foundation, it was originally written by two brilliant Lawrence Journal-World developers. Oh, and while Python draws its name from comedy icons, Django got his from a versatile guitar legend: Django Reinhardt!
As a full-stack framework, it overshadows pretty much any alternative tool out there. It's fast, fully loaded, secure, scalable & versatile. All characteristics you'll probably want to apply to your e-commerce setup!
Why use Django for e-commerce?
While you can do a lot with Django, let's keep the focus on what it brings to e-commerce and the different tools available to put together an online store.
First, here are some Django features to consider if you're looking for the right framework to build a shop.
→ Scalability
Django is perfect for e-commerce startups, as it's a good fit for small websites and can scale perfectly with business growth. You can rely on Django to handle hundreds/thousands of visitors at a time. It's built with independent components you can unplug or replace depending on your needs at any specific time.
→ Security
With e-commerce, you want to make sure merchants and clients alike feel safe through your shopping experience. Django prevents a whole lot of common security mistakes, often weakening traditional PHP CMSs. For instance, Django hides your site's source code from direct viewing on the web by dynamically generating web pages.
→ Feature-rich
Compared to most frameworks, Django comes with way more features out-of-the-box. It allows you to build an app right off the bat. Perfect for supporting your online store with functionalities such as user authentification, content management, or RSS feed. If something seems to be missing, you can count on Django's community and plugins ecosystem to extend your app!
→ SEO-friendly
SEO is paramount for any online business. Django advocates best practices for SEO. Human-readable URLs and sitemap features are sure to please any marketing team.
Oh, and also, it's fast, which is always great for both customer experience and SEO.
→ Reliable
It has been crowd-tested for a while now, and the community surrounding it is widely supportive. Active developers continuously update it; maybe you'll even find yourself contributing.
Django e-commerce tools
There are a few noteworthy e-commerce solutions in the Python/Django ecosystem:
Oscar — Domain-driven e-commerce for Django, open-source.
Saleor — An e-commerce storefront written in Python, open-source.
Django-SHOP — A Django-based shop system.
Shuup — A single and multi-vendor application.
You can explore more options through this extensive list of the best e-commerce packages.
Now let me present you with another cool stack for a complete and custom e-commerce setup with Django.
Wagtail CMS + Snipcart e-commerce

Wagtail is a developer-first Django content management system. Free and open-source, the good-hearted folks at Torchbox developed it. It's elegant, flexible, and, IMHO, kicks ass.
In the following Wagtail tutorial, the CMS will be in charge of creating and managing products that users will then be able to buy through a shopping cart.
By the end of it, you'll have a solid Django-powered e-commerce site up and running.
Let's get practical!
Django e-commerce tutorial with Wagtail CMS

Over my time at Snipcart, I've kind of developed expertise in shopping carts. Why not push it a bit further by creating a shopping cart shop? Let's see how it goes.
Pre-requisites
A Snipcart account (forever free in test mode)
Python and basic knowledge of it
1. Creating a new Wagtail e-commerce site
Make sure you have Wagtail installed. If not, refer to their installation documentation.
Open a terminal and launch a new Wagtail site:
wagtail start snipcartwagtaildemo
cd snipcartwagtaildemo
We have an extra step to complete the Wagtail setup, and it's to install the wagtail.contrib.settings plugin that we'll require later on.
In your new Wagtail project, open the base.py file located in snipcartwaigtaildemo/settings folder. Then, add wagtail.contrib.settings to the INSTALLED_APPS array.
# ./setting/base.py
INSTALLED_APPS = [
    ...,
    'wagtail.contrib.settings'
]
1.1 Models definition
The first thing you need to do is create your Page models. Wagtail uses these Django models to generate a page type.
Open the models.py file located in the home folder of your product. This is where you'll define all your custom models.
Create two different models:
Product: defines the product you're selling.ProductCustomField: defines a single product custom field.
Let's begin by importing the required modules:
# ./home/models.py
from django.db import models

from modelcluster.fields import ParentalKey

from wagtail.core.models import Page, Orderable
from wagtail.admin.edit_handlers import FieldPanel, MultiFieldPanel, InlinePanel
from wagtail.images.edit_handlers import ImageChooserPanel
Now add the Product model:
# ./home/models.py

class Product(Page):
    sku = models.CharField(max_length=255)
    short_description = models.TextField(blank=True, null=True)
    price = models.DecimalField(decimal_places=2, max_digits=10)
    image = models.ForeignKey(
        'wagtailimages.Image',
        null=True,
        blank=True,
        on_delete=models.SET_NULL,
        related_name='+'
    )

    content_panels = Page.content_panels + [
        FieldPanel('sku'),
        FieldPanel('price'),
        ImageChooserPanel('image'),
        FieldPanel('short_description'),
        InlinePanel('custom_fields', label='Custom fields'),
    ]
And ProductCustomField:
# ./home/models.py

class ProductCustomField(Orderable):
    product = ParentalKey(Product, on_delete=models.CASCADE, related_name='custom_fields')
    name = models.CharField(max_length=255)
    options = models.CharField(max_length=500, null=True, blank=True)

    panels = [
        FieldPanel('name'),
        FieldPanel('options')
    ]
2. Adding Snipcart configuration settings
If you need more help with this part, refer to our documentation here and here.
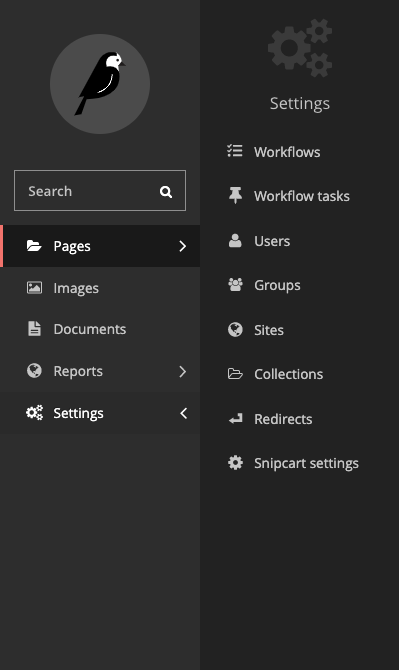
Let's make sure you can update the Snipcart API key directly from Wagtail's dashboard.
You'll need to add site settings to do so.
Site settings are special fields that you can add to your models.py file. They'll appear in the Wagtail Settings section of the dashboard.
Import this module:
# ./home/models.py

from wagtail.contrib.settings.models import BaseSetting, register_setting
Then add these:
# ./home/models.py

@register_setting
class SnipcartSettings(BaseSetting):
    api_key = models.CharField(
        max_length=255,
        help_text='Your Snipcart public API key'
    )
3. Database migrations
Now that your models are created, you'll need to generate database migrations and run them.
In your terminal, use the makemigrations command:
manage.py makemigrationsYou should see the following output:
Migrations for 'home':
  home/migrations/0003_product_productcustomfield_snipcartsettings.py
    - Create model Product
    - Create model SnipcartSettings
    - Create model ProductCustomField
Once the migrations are generated, apply them to your database with the migrate command:
manage.py migrateIt will take a couple of seconds; Wagtail will set up its own database schema along with the models you just defined.
Finally, create your first CMS user with the createsuperuser command:
manage.py createsuperuserIt will ask for an email address, a username, and to create a password. Don't forget the username and password you picked; you will need them to log into Wagtail's dashboard.
4. Creating products
Start by firing up your dev server with the Django dev server command:
manage.py runserverNow open your browser and navigate to http://127.0.0.1:8000/admin. Use the credentials you set up earlier to log in.
Select the Home page in Wagtail's menu. Then click on the Add child page button.
You'll be asked to pick a type of page, select Home page and give it a name.
Go back to the Home page menu and click Add child page button under your newly created page.

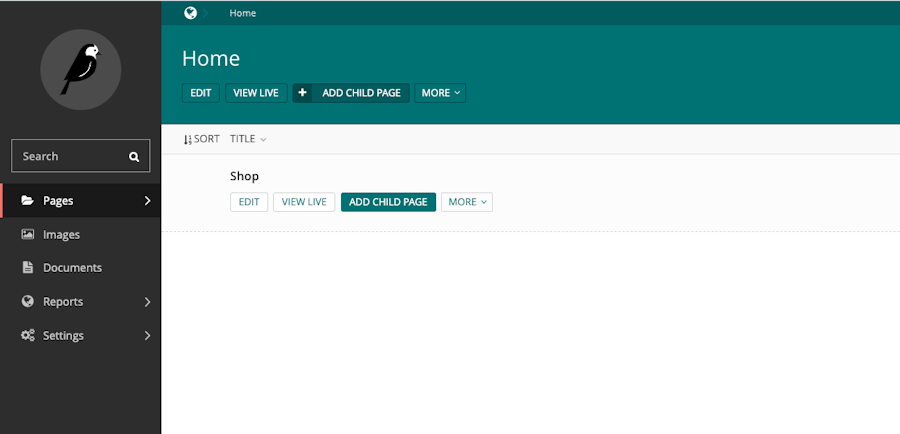
Once again, you'll be asked to pick a type of page, this time select Product.

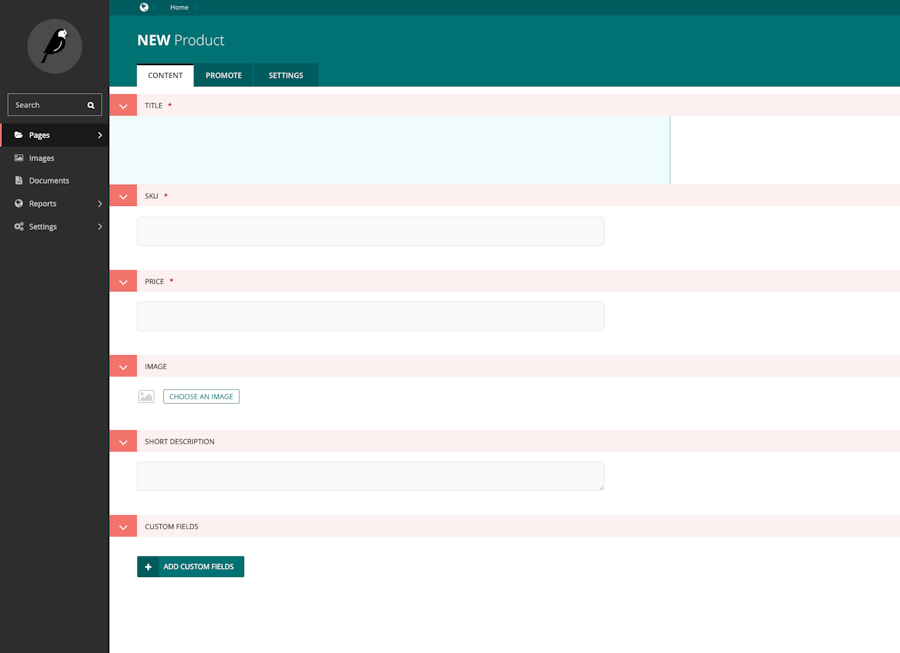
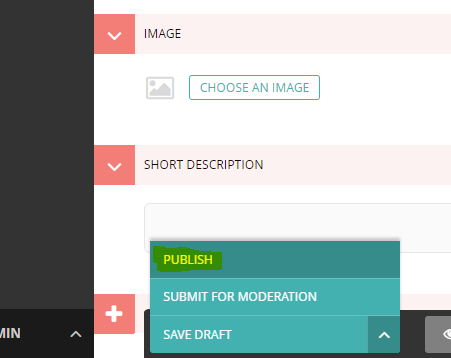
Enter the product details, then publish your new product:

You can create as many products as you wish.
4.1 Adding Snipcart API key
Remember the SnipcartSettings class you created? You'll be able to configure your API key by expanding the Settings menu and going to Snipcart settings.

Open Snipcart's dashboard and get your public API key (Test or Live), go back to Wagtail, and paste it in the API key field.
Save your settings.
5. Templating
Your backend is now ready, your API key is configured, and your first products are created—time to start building the site.
For this demo, I decided to use the Tailwind CSS framework. It enables you to build any design directly in your HTML rapidly.
1 - The Tailwind CSS build process
Create a new directory within your Django project, in which you’ll install Tailwind CSS like in any Vanilla.js project setup:
cd your-django-folder
mkdir jstoolchain
cd jstoolchain
npm install tailwindcss postcss-cli autoprefixer
npx tailwind init
npx touch postcss.config.js
In this postcss.config.js file located in jstoolchain, add:
module.exports = {
    plugins: [
        require('tailwindcss'),
        require('autoprefixer')
    ]
}
Then, run: mkdir css npx touch css/tailwind.css
In this tailwind.css file, add this:
@tailwind base;
@tailwind components;
@tailwind utilities;
Now, add a script in your jstoolchain/package.json (create a package.json if it’s not already there) file to create the build process and specify the output file, such as:
{
  "scripts": {
    "build": "postcss css/tailwind.css -o ../your-django-folder/your-path-to-static/css/tailwind-output.css"
  }
}
Now, run:
npm run-script build
This should run without error, and tailwind-output.css should now be filled with thousands of lines.
Now you can actually use Tailwind CSS classes by including the outputted CSS file into a Django template file along with Django’s call to load the static files:
{% load static %}
<head>
  <link rel="stylesheet" href="{% static "css/tailwind-output.css" %}">
</head>
2 - Handling auto-reload locally
To ease development, what’s missing now is to auto-reload the Django development server when an HTML file is changed and saved. For this, I installed django-livereload-server. Just follow setup instructions. This will work as expected out of the box, without any special configuration.
3 - The purgeCSS process
When you’re ready to deploy, to ensure the CSS output file is not bloated with useless classes, go to jstoolchain/tailwind.config.js file, and add:
  purge: {
    enabled: true,
    content: ['../your-django-folder/path-to-your-templates/**/*.html'],
  },
Your backend is now ready, your API key is configured, and your first products are created—time to start building the site.
Open the base.html file located in snipcartwaigtaildemo/templates
You'll need to add references for tailwind-output.css and Snipcart. Add these lines in the head of your document :
<!-- //snipcartwaigtaildemo/templates/base.html -->
{% load static %}
<link rel="stylesheet" href="{% static "css/tailwind-output.css" %}">
{% load static wagtailsettings_tags %}
{% get_settings %}
{# Global stylesheets #}
{# Snipcart #}
{% if settings.home.SnipcartSettings.api_key %}
<script async src="<https://cdn.snipcart.com/themes/v3.2.1/default/snipcart.js>"></script>
<div hidden id="snipcart" data-api-key="{{ settings.home.SnipcartSettings.api_key }}"></div>
<link rel="stylesheet" href="<https://cdn.snipcart.com/themes/v3.2.1/default/snipcart.css>" />
{% endif %}
The Snipcart API key that you configured previously is available via:
settings.home.SnipcartSettings.api_keyThen, add the navbar and some other tailwind-output.css layout elements.
Replace the body with these lines:
<body class="{% block body_class %}{% endblock %}">
    {% wagtailuserbar %}

    <nav class="bg-white">
        <div class="max-w-7xl mx-auto px-2 sm:px-2 lg:px-2">
          <div class="relative flex items-center justify-between h-16">
            <div class="absolute inset-y-0 left-0 flex items-center sm:hidden">
              <!-- Mobile menu button-->
            <!--
              <button type="button" class="inline-flex items-center justify-center p-2 rounded-md text-gray-400 hover:text-white hover:bg-gray-700 focus:outline-none focus:ring-2 focus:ring-inset focus:ring-white" aria-controls="mobile-menu" aria-expanded="false">
                <span class="sr-only">Open main menu</span>
            -->
                <!--
                  Icon when menu is closed.

                  Heroicon name: outline/menu

                  Menu open: "hidden", Menu closed: "block"
                -->
                <svg class="block h-6 w-6" xmlns="<http://www.w3.org/2000/svg>" fill="none" viewBox="0 0 24 24" stroke="currentColor" aria-hidden="true">
                  <path stroke-linecap="round" stroke-linejoin="round" stroke-width="2" d="M4 6h16M4 12h16M4 18h16" />
                </svg>
                <!--
                  Icon when menu is open.

                  Heroicon name: outline/x

                  Menu open: "block", Menu closed: "hidden"
                -->
                <svg class="hidden h-6 w-6" xmlns="<http://www.w3.org/2000/svg>" fill="none" viewBox="0 0 24 24" stroke="currentColor" aria-hidden="true">
                  <path stroke-linecap="round" stroke-linejoin="round" stroke-width="2" d="M6 18L18 6M6 6l12 12" />
                </svg>
              </button>
            </div>
            <div class="absolute inset-y-0 right-0 flex items-center pl-0 sm:static sm:inset-auto sm:ml-6 sm:pl-0">
              <div class="hidden sm:block sm:ml-6">
                <div class="flex space-x-4">
                  <!-- Current: "bg-gray-900 text-white", Default: "text-gray-300 hover:bg-gray-700 hover:text-white" -->
                  <a href="/shop" class="hover:bg-gray-200 text-black underline px-3 py-2 rounded-md text-sm font-medium object-left items-left">Shop</a>
                </div>
              </div>
            </div>
            <div class="flex-1 flex object-center items-center justify-center sm:items-stretch sm:justify-center px-4">
              <div class="hidden sm:block sm:ml-6">
                <div class="flex-shrink-0 flex object-center items-center">
                  <a href="/"><img class="block lg:hidden h-8 w-auto" src="/media/original_images/The Shopping Cart Shop nobg Small.svg" alt="the shopping cart shop"></a>
                  <a href="/"><img class="hidden lg:block h-8 w-auto" src="/media/original_images/The Shopping Cart Shop nobg.svg" alt="the shopping cart shop"></a>
                </div>
              </div>
            </div>
            <div class="absolute inset-y-0 right-0 flex items-center pr-0 sm:static sm:inset-auto sm:ml-6 sm:pr-0">

              <!-- Profile dropdown -->
              <div class="ml-3 relative">
                <div>
                    <a href="" class="hover:bg-gray-200 underline btn btn-primary snipcart-checkout text-black px-3 py-2 rounded-md text-sm font-medium">
                        <i class="icon icon-apps"></i>
                        View cart 🛒 (<span class="snipcart-items-count"></span>)
                    </a>
                </div>


              </div>
            </div>
          </div>
        </div>

        <!-- Mobile menu, show/hide based on menu state. -->
        <div class="sm:hidden" id="mobile-menu">
          <div class="px-2 pt-2 pb-3 space-y-1">
            <!-- Current: "bg-gray-900 text-white", Default: "text-gray-300 hover:bg-gray-700 hover:text-white" -->
            <a href="/" class="hover:bg-gray-700 text-white block px-3 py-2 rounded-md text-base font-medium">Products</a>

          </div>
        </div>
      </nav>

    <div class="">
        {% block content %}{% endblock %}
    </div>

    {# Global javascript #}
    <script type="text/javascript" src="{% static 'js/snipcartwagtaildemo.js' %}"></script>

    {% block extra_js %}
    {# Override this in templates to add extra javascript #}
    {% endblock %}
</body>
5.1 Listing products
The first template you need is your index, where products will be listed.
You'll have to make your products available in your home page context. In any Wagtail Page, you can override a method name get_context.
You can add the data that the view will receive in parameters. In my case, I want to set the products context variable.
Open the models.py file in the home folder and update the HomePage class:
# ./home/models.py

class HomePage(Page):
    def get_context(self, request):
        context = super().get_context(request)

        context['products'] = Product.objects.child_of(self).live()

        return context
Then, open the home_page.html file located in the home/templates/home folder.
Let's create a simple home page with a button linking to our shop page.
<!-- /.home/templates/home/home_page.html -->
{% extends "base.html" %}
{% load wagtailimages_tags %}
{% block content %}
<div class="relative bg-local bg-cover bg-center h-screen"
style="background-image: url(media/YOUR_IMAGE)">
<div
class="justify-center max-w-2xl mx-auto py-8 px-4 sm:py-8 sm:px-6 lg:px-8">
<h1 class="absolute bottom-80 inset-x-0 text-center text-6xl font-normal tracking-tight text-white">
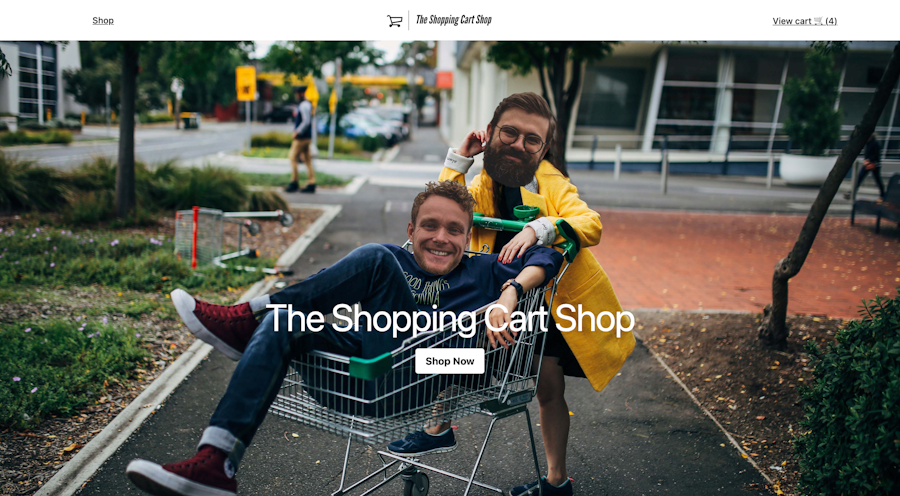
The Shopping Cart Shop</h1>
{% if request.path == '/' %}
<div class="absolute bottom-60 left-1/2 transform -translate-x-1/2 -translate-y-1/2">
<a href="/shop">
<button class="bg-white hover:bg-gray-200 text-black font-bold py-2 px-4 rounded">
Shop Now
</button>
</a>
</div>
{% endif %}
{% endblock %}Now we want to display our products on the shop page with a button linking to the product page.
Add this to the home_page.html before {% endlock %}:
<!-- /.home/templates/home/home_page.html -->
{% extends "base.html" %}
{% load wagtailimages_tags %}

{% block content %}

<div class="relative bg-local bg-cover bg-center h-screen"
  style="background-image: url(media/original_images/CartCoverLudo-Charles.jpg)">

  <div
    class="justify-center max-w-2xl mx-auto py-8 px-4 sm:py-8 sm:px-6 lg:px-8">
    <h1 class="absolute bottom-80 inset-x-0 text-center text-6xl font-normal tracking-tight text-white">
      The Shopping Cart Shop</h1>
    {% if request.path == '/' %}
    <div class="absolute bottom-60 left-1/2 transform -translate-x-1/2 -translate-y-1/2">
      <a href="/shop">
        <button class="bg-white hover:bg-gray-200 text-black font-bold py-2 px-4 rounded">
          Shop Now
        </button>
      </a>
    </div>
    {% endif %}
    <div
      class="justify-items-center mt-6 grid grid-cols-1 gap-y-10 gap-x-6 sm:grid-cols-2 lg:grid-cols-2 xl:gap-x-8">
      {% for product in products %}
      <div class="group relative">
        <div
          class="w-full min-h-80 bg-gray-200 aspect-w-1 aspect-h-1 rounded-md overflow-hidden lg:h-80 lg:aspect-none">
          {% image product.image fill-800x1000 as tmp_image %}
          <img src="{{ tmp_image.url }}" alt="" class="img-responsive object-contain w-full h-full">
        </div>
        <div class="mt-4 flex justify-between">
          <div>
            <h3 class="text-sm text-gray-700 font-bold">

              <span aria-hidden="true" class="absolute inset-0"></span>
              {{ product.title }}

            </h3>
            <p class="mt-1 text-sm text-gray-800">{{ product.description }}</p>
          </div>
          <p class="text-sm font-medium text-gray-900">{{ product.price }}$</p>
        </div>
        <div class="group-hover:bg-opacity-75 relative left-1/2 transform -translate-x-1/2 -translate-y-1/2 pt-14">
          <a href="{{ product.get_url }}">
            <button class="bg-black hover:bg-gray-800 text-white py-2 px-4 rounded">
              More Details
            </button>
          </a>
        </div>
      </div>
      {% endfor %}
    </div>
  </div>
</div>
{% endblock %}
5.2 Product details
The last template is the one showing individual product details along with the Snipcart buy button.
Also, it would be nice to be able to select product options directly on this page before adding them to the cart. So I'll add a way to choose all custom fields with options directly in the template.
Before writing some HTML, you have to update the view context. Django templates don't give us 100% access to all Python methods and objects, so things like splitting a string do not work very well.
I decided to override the get_context method again. Maybe there's a better way to do that—let me know in the comments below! 😉
Also, it would be nice to select product options directly on this page before adding them to the cart. So I'll add a way to choose all custom fields with options directly in the template.
Before writing some HTML, you have to update the view context. Django templates don't give us 100% access to all Python methods and objects, so things like splitting a string do not work very well.
I decided to override the get_context method again. Maybe there's a better way to do that—let me know in the comments below! ;)
Open models.py from the home folder and add this method in the Product class:
# ./home/models.py

class Product(Page):

    def get_context(self, request):
        context = super().get_context(request)
        fields = []
        for f in self.custom_fields.get_object_list():
            if f.options:
                f.options_array = f.options.split('|')
                fields.append(f)
            else:
                fields.append(f)

        context['custom_fields'] = fields

        return context
A custom_fields array will be available in the product.html template.
Create a file named product.html in the home/templates/home folder. This is the template that will be associated with the Product page model.
<!-- ./home/templates/home/product.html -->
{% extends "base.html" %}
{% load wagtailimages_tags %}

{% block content %}
	<div class="min-h-screen flex justify-center items-center">
	    <div class="container flex justify-center h-full w-full">
	        <div class="max-w-lg py-4 px-16">
	            <div class="bg-white relative shadow-lg hover:shadow-xl transition duration-500 rounded-lg">
	                {% image page.image max-400x400 as temp_image %}
	                <img class="rounded-t-lg h-full w-full" src="{{ temp_image.url }}" alt="" />
	                <div class="py-6 px-8 rounded-lg bg-white">
	                    <h1 class="text-gray-700 font-bold text-2xl mb-3 hover:text-gray-900 hover:cursor-pointer">{{
	                        page.title }}</h1>
	                    <p class="text-gray-700 tracking-wide">{{page.short_description}}</p>
	                    <p>
	                        {% for f in custom_fields %}
	                        {% if f.options_array|length > 0 %}
	                    <div class="form-group">
	                        <label class="form-label" for="{{ f.name|lower }}">
	                            {{ f.name }}:
	                        </label>
	                        <select class="form-select custom-field-select" id="{{ f.name|lower }}"
	                            data-field="{{ forloop.counter }}">
	                            {% for opt in f.options_array %}
	                            <option>
	                                {{ opt }}
	                            </option>
	                            {% endfor %}
	                        </select>
	                    </div>
	                    {% endif %}
	                    {% endfor %}
	                    </p>
	                    <button
	                        class="snipcart-add-item btn btn-primary mt-6 py-2 px-4 bg-gradient-to-r from-green-400 to-blue-500 hover:from-pink-500 hover:to-yellow-500 text-white font-bold rounded-full shadow-offset hover:shadow-lg transition duration-300"
	                        data-item-name="{{ page.title }}" data-item-id="{{ page.sku }}"
	                        data-item-url="{{ page.get_full_url }}" data-item-price="{{ page.price }}"
	                        data-item-description="{{ page.short_description}}" data-item-image="{{ temp_image.url }}" {%
	                        for f in custom_fields %} data-item-custom{{forloop.counter}}-name="{{f.name}}"
	                        data-item-custom{{forloop.counter}}-options="{{f.options}}" {% endfor %}>Add to cart</button>

	                </div>
	                <div class="absolute top-2 right-2 py-2 px-4 bg-white rounded-lg">
	                    <span class="text-md">{{page.price}}$</span>
	                </div>
	            </div>
	        </div>
	    </div>
	</div>
{% endblock %}
Then, add some JavaScript to update the Snipcart buy button when a custom field selection is made on the page.
Add the following script snippet before the endblock statement:
<script>
    document.addEventListener('DOMContentLoaded', function () {
        document.querySelector('.custom-field-select').onchange = function (event) {
            if (event.target.dataset.field) {
                document.querySelector('.snipcart-add-item')
                    .dataset['itemCustom' + event.target.dataset.field + 'Value'] = event.target.value;
            }
        };
    }, false);
</script>
This code updates the button data attributes when the select value changes.
You now have pretty strong foundations to start your e-commerce project using Django and Wagtail!
These frameworks are very powerful; you could quickly add search functionalities, product suggestions, reviews, etc.
GitHub repo

See the GitHub repo
Closing thoughts
I really enjoyed working with Wagtail; it's simple and intuitive. I have to say that their documentation feels incomplete at times, though. At first, I wanted to change how routing would work and haven't found anything in their docs.
On the other hand, Tailwind CSS was a joy to work with. Their documentation is beautiful, intuitive, and well documented.
I didn't have the latest version of Python installed on my laptop (a Mac) at the start, so setting up everything and having this demo up and running took me some time. The hosting of the demo was also a bit of a hurdle. I figure it would be way faster for avid Python developers!
For further exploration, I think Wagtail could be a great headless CMS, especially with its built-in API.
Overall I enjoyed my little venture with Django, Wagtail CMS, and Tailwind CSS. I think it could be cool to leverage it and strapping it to tools like Next.js or Gatsby to handle the front end.
Let me know in the comments your experience using these tools.


