Using Laravel for E-Commerce: Tutorial & Live Demo
This is an updated version of an older post. In the first version, we experimented with a shopping cart integration with the Laravel-powered PyroCMS. I’ll do something different here, but if that first iteration sounds interesting to you, you can find the GitHub repo & live demo here.
In a rush? Skip to tutorial steps or live demo.
PHP is, in some ways, the backbone of the Internet. I mean, it is at the core of WordPress, which powers 39.9% of all the websites today. It is also used by the biggest social media; Facebook.
But I have to admit, I’ve never had the chance to explore it fully.
Today is the day I jump into PHP. However, I’ll begin my journey with the darling framework that is Laravel (I’ve heard it makes it easy to build secure, scalable full-stack projects from the start!).

More especially, I’ll try to build a Laravel-powered e-commerce web app.
Hopefully, this will show you the benefits Laravel can bring to your next e-commerce venture.
Here’s what the tutorial will cover:
Project Setup with Sail
Basic product listing generation, migration, and seeding
Using advanced models for product options
Front-end wiring
Integrating Snipcart
Time to put my PHP skills to test!
Laravel & e-commerce: quick context
Laravel is an open-source PHP web framework used to build sites & web apps.
It has a smooth learning curve, removes some quirks of building with PHP, and has many modern built-in libraries. Some say it's the Ruby on Rails PHP equivalent.
With Laravel, you can leverage ComposerComposer to manage dependencies & packages. Many useful packages allow you to fast-track your Laravel development. Think stuff like debugging, authentication, API interactions, etc. Sites like Packagist & Packalyst are great resources to find helpful Laravel packages.
Since September 2020, Laravel 8 is publicly available. It introduces features such as Laravel Jetstream, model factory classes, migration squashing, job batching, improved rate-limiting, dynamic Blade components, Tailwind pagination views, time testing helpers, and more.
Tools for e-commerce on Laravel?
Of course, there are existing e-commerce packages for Laravel. They can help to set up e-commerce functionalities on your Laravel app quickly.
Here’s a curated list of the most popular ones:
Bagisto — Code-driven & multi-featured Laravel package for e-commerce. Free & open-source.
Aimeos — A Laravel e-commerce package and online shop solution. Free & open-source.
AvoRed — A modular and customizable PHP shopping cart. Free & open-source.
Vanilo — This one’s actually an e-commerce framework (like Magento or Prestashop) for Laravel.
GetCandy — An headless Laravel e-commerce API. Free & open-source.
So, where does that lead us?
The three e-commerce options with Laravel are pretty much:
Pick a Laravel-powered CMS and add custom e-commerce to it.
Use e-commerce packages built to extend your app.
Build your own e-commerce application from the ground up.
First one? Fast & easy. That’s what we did for the first version of this post, using PyroCMS and then integrating Snipcart as the custom shopping cart. Link at the top of this post.
Second one? Interesting. We might do it in another post at some point!
Third one? Close to what we're doing here. But building the whole application from the ground up, including e-commerce capabilities, would be highly time-consuming.
Instead, I’ll show you how you can build a store from scratch using pure Laravel and then adding Snipcart to enable e-commerce and shopping cart customization.
All these options have in common the benefits you’ll win overusing a full-on e-commerce CMS—high scalability, easy customization, detached e-commerce functionalities, etc.
I'm thrilled to be operating inside a Laravel project for this demo. Unlike many of our Jamstack/static site tuts, it'll be super easy to handle any backend logic for our store.
Tutorial: building an e-commerce website with Laravel


Prerequisites
I assume you already have a working installation of PHP and Composer running. If not, you can install them here and here.
For this tutorial, we will use Sail.
Introduced with Laravel 8, it is a light-weight command-line interface for interacting with Laravel’s default Docker development environment that will streamline our development environment and database setup. Sail will allow us to quickly setup a development environment and database completely isolated from our local environment.
Since Sail interacts with a Docker environment, that means you will also need Docker Desktop (a great tool for app development these days). If you prefer, of course, you could plug in a local SQL database or use Homestead from Laravel. The latter is an all-in-one vagrant image that allows you to get started quickly.
1. Create an e-commerce Laravel project
Laravel offers a simple command to init (initiate) a project.
First, make it available by running:
composer global require laravel/installerThen create the project:
composer create-project laravel/laravel laravel-project.And
cd laravel-projectto go into the project’s folder.From now on, all commands will run with
artisan. Artisan is the command-line interface included with Laravel, which allows scaffolding of anything in a Laravel project.
2. Create the Sail environment
Laravel Sail comes preinstalled with Laravel 8 projects.
However, if you want to install it to an existing project, run the following commands:
composer require laravel/sail --devphp artisan sail:install
Then, run ./vendor/bin/sail up to start our development environment, including a database and an email server. (Snipcart handles store related emails for you)
Note: I recommend that you set a sail alias in your terminal for ./vendor/bin/sail up. If you use bash, you do so by adding alias sail='bash vendor/bin/sail' in your .bashrc file. For the rest of this tutorial, I will use **sail** alias instead of **./vendor/bin/sail**.
3. Generating a basic product listing
Now that we have our Laravel project setup, let's add our products.
I hope you didn't have breakfast yet because today, we will be creating a premium oatmeal recipe store!
For these recipes, we will first need ingredients, which means we will need a controller and a data model in our app. Let’s create them with the following command: php artisan make:model -a Ingredient
This generates a few files:
A migration, in
database/migrations/{date}_create_ingredients_table.phpA controller, in
app/Http/Controllers/IngredientController.phpA model, in
app/Models/Ingredient.phpA seeder, in
database/seeders/IngredientSeeder.php
In the controller, remove all methods except the index one. The Controller uses Eloquent ORM to fetch all ingredients in the database and returns them as a JSON list. For those who do not know: an ORM stands for object-relational mapper and basically allows us to write database queries in the code language of our choice (PHP, in our case). The JSON list created by the controller that uses Eloquent ORM looks like this:
<?php
namespace App\Http\Controllers;

/**
* Added by the make:model command
* This allows to query the DB for ingredients
*/
use App\Models\Ingredient;
use Illuminate\Http\Request;
/**
* We add this `use` to return our json resonse
*/
use Illuminate\Http\Response;

class IngredientController extends Controller
{
  public function index()
  {
      /**
       * `Ingredient::all()` fetch all ingredients
       * `->jsonSerialize()` format them as a json list
       */
      return response()->json(Ingredient::all()->jsonSerialize());
  }
}
This method will take all of our ingredients in the database and return them in a JSON format.
The only missing thing for our method to be called from an API endpoint is linking this controller method to a route, or, if you prefer, match the method to a URL. In routes/api.php, add the following line: Route::get('/ingredients', [IngredientController::class,'index']);
This maps GET requests on /api/ingredients to our index method on the IngredientController. Having an API will allow us to use Snipcart's JSON crawler in order to setup price dynamically. If, however, you do not need an API, you could go a more traditional (MVC) way, and return a view instead of the json: view('ingredients.list', ['ingredients' => Ingredient::all()]);
You would then need to build a view using Laravel's blade templating language.
Now that our controller is ready, let's define what an ingredient is in the migration file. I changed the up method in mine to be:
Schema::create('ingredients', function (Blueprint $table) {
    $table->bigIncrements('id');
    $table->string('name');
    $table->mediumText('description')->nullable();
    $table->string('category');
    $table->decimal('price_per_gram', 8, 3);
});
This model defines how our database Ingredient table should look. But how can we create that database? Simple! You just have to run that migration with sail artisan migrate.
That command will apply a migration, which basically means it will implement the required changes to our database (which, in this case, means creating our ingredient table, and adding the relevant columns and rows).
Our controller should now work. When fetching at {{YOUR_APP_PORT}}/api/ingredients, you should get an empty list.
I’ve added sample ingredients in a Seeder, in database/seeds/IngredientsTableSeeder.php (created by running php artisan make:seeder IngredientsTableSeeder):
class IngredientsTableSeeder extends Seeder
{
 public function run()
 {
     DB::table('ingredients')->insert([
         [
             'name' => 'Quick Oats',
             'description' => '100% whole grain oats (quick cooking)',
             'category' => 'oats',
             'price_per_gram' => 0.007,
         ],
/* ... many more! ... */
    ]);
 }
}
Seeders can be used either in development to have fake data to play with or to feed initial information in the DB. To put that data in the database, run sail artisan db:seed --class=IngredientSeeder.
You’ll then receive everything as JSON when fetching /api/ingredients.
4. Using advanced models for custom recipes
You could stop there, and you’d have the basis for a headless product API selling ingredients. But as we want to sell oatmeal recipes, we need to have a way to combine ingredients into a custom recipe. Advanced Laravel models will allow us to do just that.
We will add a “Recipe” controller with its model. Our recipe model will be composed of many ingredients, each with a quantity. We can represent this with the following schema (I promise, it’s the only times we’ll use UML):

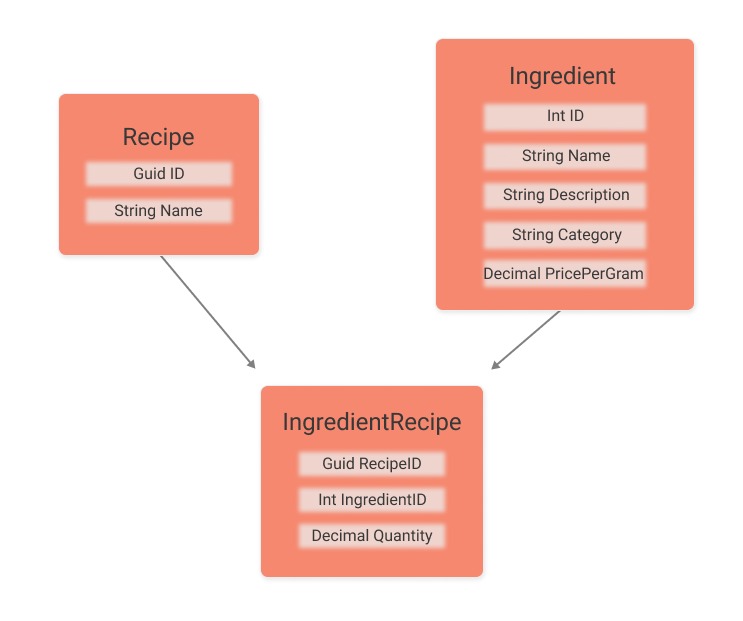
Class Diagram of Ingredients and Recipes
The IngredientRecipe is a relation table. In a many-to-many relationship, meaning, many ingredients can be linked to many recipes, and many recipes can be linked to many ingredients, there’s a special table to represent every link between the two tables.
In this case, I’ve also added a quantity to represent “how much” of each ingredient there is in a single recipe.
Let's generate new tables with the terminal command php artisan make:migration create_recipes_and_relation. Let's now edit {date}_create_recipes_and_relation.php so that it contains the following:
<?php
use Illuminate\Database\Migrations\Migration;
use Illuminate\Database\Schema\Blueprint;
use Illuminate\Support\Facades\Schema;
class CreateRecipesAndRelation extends Migration
{
  public function up()
  {
      /**
       * This is the main table for a recipe
       * created dynamically by a customer on the site
       */
      Schema::create('recipes', function (Blueprint $table) {
          $table->uuid('id')->primary();
          $table->string('name');
          $table->string('size');
          $table->timestamps();
      });

      /**
       * This is the "relation" table which serve to link
       * a recipe to a list of ingredients.
       * That one essentialy have reference
       * to the other tables' ids.
       * But also the quantity of each ingredients
       */
      Schema::create('ingredient_recipe', function (Blueprint $table) {
          $table->bigIncrements('id');
          $table->timestamps();
          $table->uuid('recipe_id')->index();
          $table->bigInteger('ingredient_id')->unsigned()->index();
          $table->foreign('recipe_id')->references('id')->on('recipes');
          $table->foreign('ingredient_id')->references('id')->on('ingredients');
          $table->decimal('quantity', 2, 3);
      });
  }
  public function down()
  {
      Schema::dropIfExists('ingredient_recipe');
      Schema::dropIfExists('recipes');
  }
}
Let's now create a RecipeController with a few methods.
First, a save method to store customized recipes in the database. In RecipeController.php, add the following code:
public function save(Request $request)
    {
        $recipe = new Recipe;
        $recipe->name = $request->input('name');
        $recipe->size = $request->input('size');
        $recipe->save();

        $items = array_map(function ($item) use ($recipe) {
            return [
                'recipe_id' => $recipe->id,
                'ingredient_id' => $item['id'],
                'quantity' => $item['quantity'],
            ];
        }, $request->input('items'));

        IngredientRecipe::insert($items);

        $ingredients = Recipe::find($recipe->id)
            ->ingredients->map(function ($ingredient) {
                $ingredient->quantity = $ingredient->pivot->quantity;
                return $ingredient;
            });

        $price = $this->calculatePrice($ingredients, $recipe->size);

        return response()
            ->json([
                'id' => $recipe->id,
                'name' => 'Recipe ' . $recipe->name . ' (' . $recipe->size . ')',
                'url' => '/api/recipe/' . $recipe->id,
                'price' => $price,
            ]);
    }
Then, let's register that route by adding the following code to routes/api.php: Route::post('/recipes', 'RecipeController@save');.
This method will save the recipe. Only then will the entries in the relation table be inserted, because they depend on both the “Recipe” and each “Ingredient”.
The save method is completed by returning a JSON of a product definition (minimally: ID, name, URL, price) that can be passed directly to the cart in the frontend.
Let's now add a fetch method, with the following code in RecipeController.php:
public function fetch($id) {
   $recipe = Recipe::find($id);
   $ingredients = $recipe->ingredients
       ->map(function($ingredient) {
           $ingredient->quantity = $ingredient->pivot->quantity;
           return $ingredient;
       });

   $price = $this->calculatePrice($ingredients, $recipe->size);

   return response()
       ->json([
           'id' => $recipe->id,
           'name' => 'Recipe '.$recipe->name.' ('.$recipe->size.')',
           'url' => '/api/recipe/'.$recipe->id,
           'price' => $price,
       ]);
}
You could actually go back to the end of the save method to reduce our code by calling fetch. DRY (Don't Repeat Yourself) FTW!
Here again, let's register that route by adding the following code to routes/api.php: Route::get('/recipe/{id}', 'RecipeController@fetch'); .
Finally, let's add a preview method to the controller:
public function preview(Request $request)
    {
        $items = $request->input('items');
        $ingredientIds = array_map(function ($item) {
            return $item['id'];
        }, $items);

        $quantityForId = function($id) use($items) {
            for($i = 0; $i < count($items); $i++) {
                if($items[$i]['id'] == $id) {
                    return $items[$i]['quantity'];
                }
            }
        };

        $ingredients = Ingredient::whereIn('id', $ingredientIds)
            ->get()
            ->map(function($ingredient) use($quantityForId) {
                $ingredient->quantity = $quantityForId($ingredient->id);
                return $ingredient;
            });

        $size = $request->input('size');

        return response()
            ->json([
                'price' => $this->calculatePrice($ingredients, $size),
            ]);
    }
Now if you get the gist, you know we need to add Route::post('/recipes/preview', [RecipeController::class, 'preview']); to routes/api.php.
You’ll notice it’s the route for the product’s URL I’ve returned from the previous endpoint. This allows Snipcart's crawler to validate the price of the purchased oatmeal mix (the saved recipe).
That one is almost exactly like the end of save; fetching each ingredient of a recipe and its quantity.
These controller methods contain some interesting uses of Eloquent. The map method, for instance, allows you to transform queried data cleanly and functionally, and then accessing ingredients to fetch the ingredients associated with the recipe.
All that’s needed to make the ORM (object-relational mapping) understand the relation in our schemas is to add a model for our IngredientRecipe junction table with the following command: php artisan make:model IngredientRecipe. At app/IngredientRecipe.php, let's make it extend Pivot instead of Model:
<?php
namespace App\Models;
use Illuminate\Database\Eloquent\Relations\Pivot;
class IngredientRecipe extends Pivot
{
}
Now let's create a recipe model with the following command: php artisan make:model Recipe :
<?php
namespace App;
use Illuminate\Database\Eloquent\Model;
class Recipe extends Model
{
    public function ingredients()
    {
        return $this->belongsToMany('App\Models\Ingredient')
            ->using('App\Models\IngredientRecipe')
            ->withPivot(['quantity']);
    }
}
And voilà! We now have a JSON API that provides:
An endpoint to list available ingredients
An endpoint to save a Recipe with all of its ingredients quantity
An endpoint to retrieve the saved recipe’s price (as expected by Snipcart’s crawler)
So we have our data, we have our logic, but what's a premium oatmeal store without a little visual flair?
Let's solve that by looking at how to link these API endpoints to an e-commerce frontend.
5. Wiring this all in the frontend
I used Vue.js for the frontend, which we are big fans of at Snipcart. You can add a barebone Vue project with the following commands:
composer require laravel/ui --devphp artisan ui vuenpm install
This will generate basic Vue.js files in the resources folder that can be compiled in “watch” mode with sail npm run watch and served to our root endpoint.
To query our API, I’ve used the Axios library.
The frontend first loads our ingredient list from /api/ingredients. The customer can then select some of them for a recipe, give the recipe a name, have a price preview using the preview method we created earlier, and save it if they want to use the method.
In the code repo linked below, look in the App.vue component at resources/js/components/App.vue. the created method will call our ingredient endpoint.
async created() {
    const response = await axios.get("/api/ingredients");
    this.allIngredients = response.data;
  }
Once that’s done, customers will be able to click a buy button which executes this code:
async buy() {
  const payload = {
      name: this.name,
      size: this.size,
      items: this.ingredients.map(x => ({
          id: x.id,
          quantity: x.quantity,
      })),
  };
  const response = await axios.post('/api/recipes', payload);
  const host = window.location.protocol+'//'+window.location.host;
  Snipcart.api.cart.items.add({
      ...response.data,
      url: host+response.data.url,
  });
It builds the request body expected by POST /api/recipes and will return a product definition we will use to integrate our cart.
6. Integrating Snipcart
So we are now able to create an oatmeal recipe on our website. Let's integrate a cart with Snipcart so that your customers may buy them.
In resources/views/welcome.blade.php, add Snipcart's preconnect hints and default stylesheet in between the <head> Html nodes.
<link rel="preconnect" href="https://app.snipcart.com">
<link rel="preconnect" href="https://cdn.snipcart.com">

<link rel="stylesheet" href="https://cdn.snipcart.com/themes/SNIPCART_MOST_RECENT_VERSION/default/snipcart.css" />
In the <body> Html nodes, add Snipcart's script along with a "snipcart" id attribute and your public API key, that looks as follow:
<div hidden id="snipcart" data-api-key="YOUR_PUBLIC_API_KEY"></div>
        <script async src="https://cdn.snipcart.com/themes/MOST_RECENT_SNIPCART_VERSION/default/snipcart.js"></script>
We can now integrate a Cart summary by adding the snipcart-checkout class to any button in our theme.
<button class="snipcart-customer-signin"
        >Checkout</button
      >
If you look at the repo, you will see that the code is a bit different, as I used Vuetify to style the project.
If you want more information on the above, the documentation goes into full details regarding the installation
The final step in our integration is to add the products using Snipcart's Javascript API.
Let's do that by adding the following code to complete our buy method using our POST /api/recipes returned product definition:
async buy() {
    // rest of the method we made earlier in this tutorial
    Snipcart.api.cart.items.add({
        ...response.data,
        url: host+response.data.url,
        });}
Our cart is now enabled, which means our users can now create and buy their own custom recipes! GG.
Live Laravel e-commerce demo & GitHub repo
C'mon guys, Baby Yoda needs his oatmeal. Have a look at the demo!

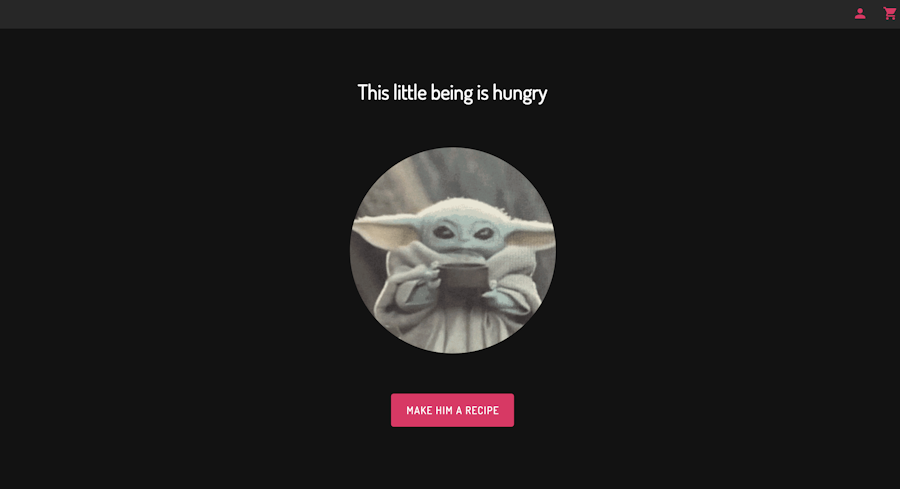
See the live demo here.
See the GitHub repo here.
I’d like to give some thanks to my good friend Pascal for the drawing idea!
Closing thoughts
Having no experience in PHP, when the team asked me to look into Laravel, I was a bit anxious about taming the elePHPant. I must say I was more than pleasantly surprised by the Laravel ecosystem and all it provides. I found the Laravel file structure to be quite intuitive.
Moreover, the Eloquent ORM is capable of modelizing quite complex schemas! Last but not least, the artisan command line really streamlines the development, while the sail command line and built-in docker environment do the same for your development environment. I found they make the development process as seamless as any!
Building an e-commerce site on top of Laravel allows us to take full control over how to manage and handle data. And being a fully-featured MVC framework with first-class support for JSON, adding other integrations such as webhooks would be a breeze. Longer-term, after a couple of updates, Laravel 8 migration squashing would help to give us an easier time maintaining the migration.
As you can guess, I’m sure Laravel’s utilities saved me potential headaches. They have great documentation, but what truly shines is the community that provides so much content for everybody to learn.
Happy PHP coding, folks! Tell us in the comments below how your experience with Laravel was.
If you've enjoyed this post, please take a second to share it on Twitter. Got comments, questions? Hit the section below!


