How to Build a Headless WordPress Site With Frontity
In recent years, we've been exploring a lot of trendy stacks and frameworks. They all brought performance upgrades and ease of use, but we haven't talked about the OG of the modern web for a long time. I'm talking about WordPress, of course.
Even though WordPress powers 42% of all websites on the internet, it sometimes feels like WordPress didn't evolve enough to compete with new frameworks like Next.js, Vue.js, Gatsby, and others.
What if I told you that it's possible to build a headless WordPress site by exploiting the power and functionality of React to build your frontend? Well, thanks to Frontity, quickly building a state-of-the-art WordPress website is accessible.
Let's explore this new framework and see how we can take advantage of it to build an e-commerce headless website.
What is Frontity?
Frontity is an open-source framework based on React. It uses your WordPress site as a headless CMS and renders it in a React framework. It enables you to build a fast headless WordPress static website quickly.
It works like a static site generator by compiling and building the HTML pages and serving them when there's a client request. React' serverless pre-rendering takes care of the dynamic content of the page as any other static site would.
Frontity manages bundling, transpiling, routing, server rendering, managing states, managing CSS, retrieving data from WordPress, etc. It's a zero-set-up framework that supports TypeScript as well as Emotion for CSS styling in JavaScript. It also supports Google AMP with the same codebase.
This framework also offers application state management via its state manager called Frontity Connect. The JavaScript object containing all the states exposed by your package is merged with the settings. This way, packages can access the state exposed by other packages.
Developing a modern WordPress website is now a breeze. And for someone like me, who’s not a developer, it makes my life easier.
The features Frontity brings are similar to the ones you would get from another static site generator.
But what makes it a no-brainer pairing choice with WordPress is how fast it is. Seriously. Since it’s server-side rendered, everything is fast and loads almost instantly.
How does it work?
Frontity uses WordPress REST API to fetch the data from your WordPress site (PHP server) and renders it in your React frontend (Node.js server). Frontity then renders the pages in HTML or AMP. Frontity can be hosted in a regular Node.js server or a serverless service like AWS, Netlify, or Vercel.
That's great, but what about their street creds? Well, Frontity is trusted by TikTok to build their creator portal, CNBC Africa and Forbes Africa, to name a few.
How does it compare to Gatsby?


Gatsby also offers a frontend to build a static website using a WordPress instance as a headless CMS. So let's explore how Frontity compares to it.
For a start, the two frameworks are React-based.
Both Gatsby and Frontity bring faster initial page load times thanks to static pages. These frameworks also handle app routing out-of-the-box, so we don't have to set that up.
Both frameworks also benefit from code splitting, which optimizes them for better performance scores in Lighthouse.
However, as we've seen earlier, Frontity is a ready-to-play framework where everything is set up for us. It is developer-friendly (or, in my case, beginner-friendly), there's no complex configuration needed, tools such as APIs queries are pre-configured.
Frontity also removes the need to deal with GraphQL by providing the data via its state manager.
Now enough talking; it's time to dive into it. Let's see for ourselves what this React-based framework can do!
Tutorial: Build a headless WordPress e-commerce site with Frontity
For this tutorial, let's build a simple e-commerce site using Snipcart to sell hot sauces.
Prerequisites
A WordPress instance hosted
Snipcart account (free to test forever)
Step 1: Creating our pages in WordPress
The first step we'll need to do is create our pages in WordPress. We'll make a simple e-commerce site with two pages (excluding our products pages). The first one will be our home page and the other an about us page.
To create them, simply go into Pages in the admin menu of WordPress and click on 'Add New' to create our pages. Our homepage will be named 'Hottest Hot Sauce Sauce' and the about us page named 'About Us'. Once done, make sure to go in Settings/Reading and select 'static page' and select the homepage from the dropdown menu.

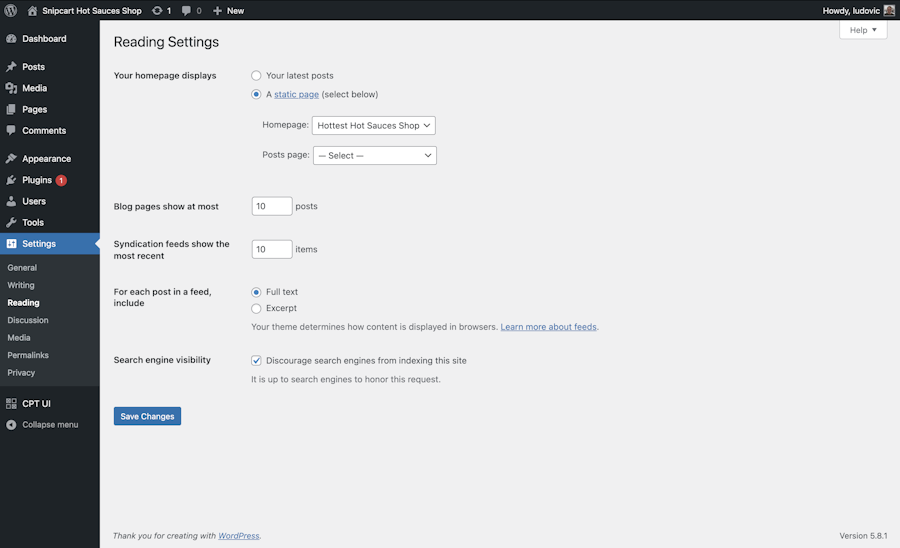
While the settings, make sure to activate the Post name permalink in Settings/Permalinks to make sure Frontity will function properly.
Step 2: Create Products in WordPress
Now that we have a WordPress instance up and running with our pages created let's create our products.
To create our products, we'll first need to install the Advanced Custom Fields plugin. Once installed and activated. Let's create a new field group containing the following.

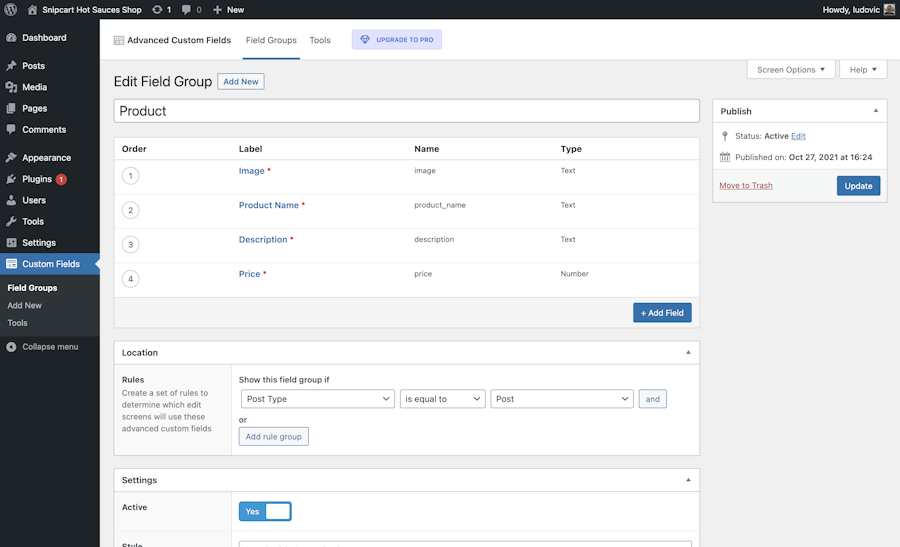
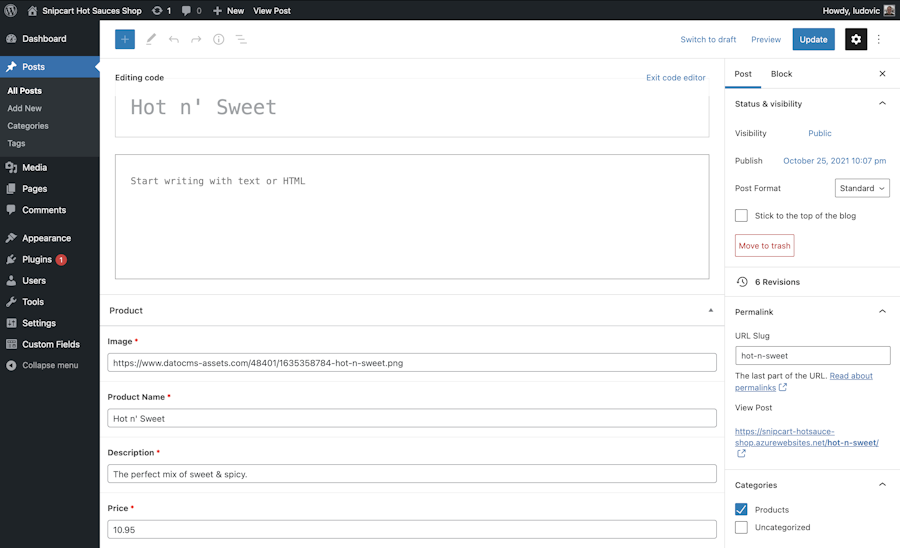
After, select 'Posts' from the WordPress dashboard menu and click on 'Add New'.
Give it a name, and then select enter the data in the custom fields we just created.
We'll also need to add ACF to a REST API plugin to be able to fetch our advanced custom fields later on in Frontity.
Step 3: Create Frontity project
Now that we've set up everything we needed in WordPress, it's time to dive into Frontity.
We'll need to create our project. To do so, run the following command:
npx frontity create my-first-frontity-projectThe Frontity CLI will prompt you to select a theme. For this demo, let's choose @frontity/twentytwenty-theme.
Once done, you'll have everything needed to start developing, and we'll be ready for the next step.
Step 4: Connect Frontity to WordPress REST API
To have our data in Frontity, we'll need to connect to WordPress REST API. For this, open frontity.settings.js and replaceYOUR-WORDPRESS_SITE.com (in the const settings) with the URL of our WordPress site. This will tell Frontity where to find our website content.
In the same constant, we'll change the value of "title" and "description". These will be rendered in the header of our site.
We'll also need to connect the REST API. for this, simply replace YOUR-WORDPRESS_SITE.com/wp-json with your WordPress URL followed by /wp-json.
Note that this route may change depending on how you set up your homepage and whether you are using WordPress.org or WordPress.com.
We'll also configure the menu name and their routes, the site title, and the description. "title" and "description" we'll be used for our site meta.
const settings = {
  "name": "wordpress-frontity-snipcart",
  "state": {
    "frontity": {
      "url": "<https://snipcart-hotsauce-shop.azurewebsites.net/>",
      "title": "Snipcart Hot Sauce Shop",
      "description": "The Hottest Hot Sauce Shop!"
    }
  },
  "packages": [
    {
      "name": "@frontity/twentytwenty-theme",
      "state": {
        "theme": {
          "menu": [
            [
              "Shop",
              "/"
            ],
            [
              "About Us",
              "/about-us/"
            ]
          ],
          "featured": {
            "showOnList": false,
            "showOnPost": false
          }
        }
      }
    },
    {
      "name": "@frontity/wp-source",
      "state": {
        "source": {
          "api": "<https://snipcart-hotsauce-shop.azurewebsites.net/wp-json>"
        }
      }
    },
    "@frontity/tiny-router",
    "@frontity/html2react"
  ]
};

export default settings;
We also need to add connect Frontity to the custom fields data and fetch our product info. To do so, let's replace the content of packages/twentytwenty-theme/src/index.js with the following:
import Theme from "./components";
import image from "@frontity/html2react/processors/image";
import link from "@frontity/html2react/processors/link";

// Custom handler for ACF options
const acfOptionsHandler = {
  pattern: "acf-options-page",
  func: async ({ route, state, libraries }) => {
    // 1. Get ACF option page from REST API.
    const response = await libraries.source.api.get({
      endpoint: `/acf/v3/posts`
    });
    const option = await response.json();

    // 2. Add data to `source`.
    const data = state.source.get(route);
    Object.assign(data, { ...option, isAcfOptionsPage: true });
  }
};

const twentyTwentyTheme = {
  name: "@frontity/twentytwenty-theme",
  roots: {
    /**
     *  In Frontity, any package can add React components to the site.
     *  We use roots for that, scoped to the `theme` namespace.
     */
    theme: Theme,
  },
  state: {
    /**
     * State is where the packages store their default settings and other
     * relevant state. It is scoped to the `theme` namespace.
     */
    theme: {
      colors: {
        gray: {
          base: "#6D6D6D",
          light: "#DCD7CA",
          lighter: "#F5EFE0",
        },
        primary: "#0aa7f5",
        headerBg: "#ffffff",
        footerBg: "#ffffff",
        bodyBg: "#f1f2f4",
      },
      // Whether to show the search button in page header
      showCartInHeader: true,
      // Menu links to display in the header
      menu: [],
      // State for the menu on mobile
      isMobileMenuOpen: false,
      // State for the search modal on mobile
      isSearchModalOpen: false,
      // Whether to show all post content or only excerpt (summary) in archive view
      showAllContentOnArchive: false,
      // Settings for the featured media (image or video)
      featuredMedia: {
        // Whether to show it on archive view
        showOnArchive: true,
        // Whether to show it on post
        showOnPost: true,
      },
      // Whether to auto-fetch links on a page. Values can be "no" | "all" | "in-view" | "hover"
      autoPrefetch: "in-view",

      /**
       * At the moment, we only include the ascii characters of Inter font.
       * Values can be "us-ascii" | "latin" | "all".
       */
      fontSets: "all",
    },
  },

  /**
   * Actions are functions that modify the state or deal with other parts of
   * Frontity like libraries.
   */
  actions: {
    theme: {
      beforeSSR: async ({ state, actions }) => {
        // This will make Frontity wait until the ACF options
        // page has been fetched and it is available
        // using state.source.get("acf-options-page").
        await actions.source.fetch("posts");
      },
      openMobileMenu: ({ state }) => {
        state.theme.isMobileMenuOpen = true;
      },
      closeMobileMenu: ({ state }) => {
        state.theme.isMobileMenuOpen = false;
      },
      openSearchModal: ({ state }) => {
        state.theme.isSearchModalOpen = true;
      },
      closeSearchModal: ({ state }) => {
        state.theme.isSearchModalOpen = false;
      },
    },
  },
  libraries: {
    source: {
      handlers: [acfOptionsHandler]
    },
    html2react: {
      /**
       * Add a processor to `html2react` so it processes the `<img>` tags
       * and internal link inside the content HTML.
       * You can add your own processors too.
       */
      processors: [image, link],
    },
  },
};

export default twentyTwentyTheme;
We should be able to see our WordPress content by building our project. Run the build command in the terminal:
npx frontify devOnce built, your web browser should automatically launch the local host. If not, simply go to http://localhost:3000.
Step 5: Install Snipcart
In packages/twentytwenty-theme/src/components/index.js add Snipcart preconnect hints and stylesheet in the <head> element:
<Head>
  //..
	<link rel="preconnect" href="<https://app.snipcart.com>"/>
	<link rel="preconnect" href="<https://cdn.snipcart.com>"/>
	<link rel="stylesheet" href="<https://cdn.snipcart.com/themes/v3.2.2/default/snipcart.css>" />
</Head>
In the same file, let's add Snipcart to our site by pasting these two lines under the <Footer /> element:
<script async src="<https://cdn.snipcart.com/themes/v3.2.2/default/snipcart.js>"></script>
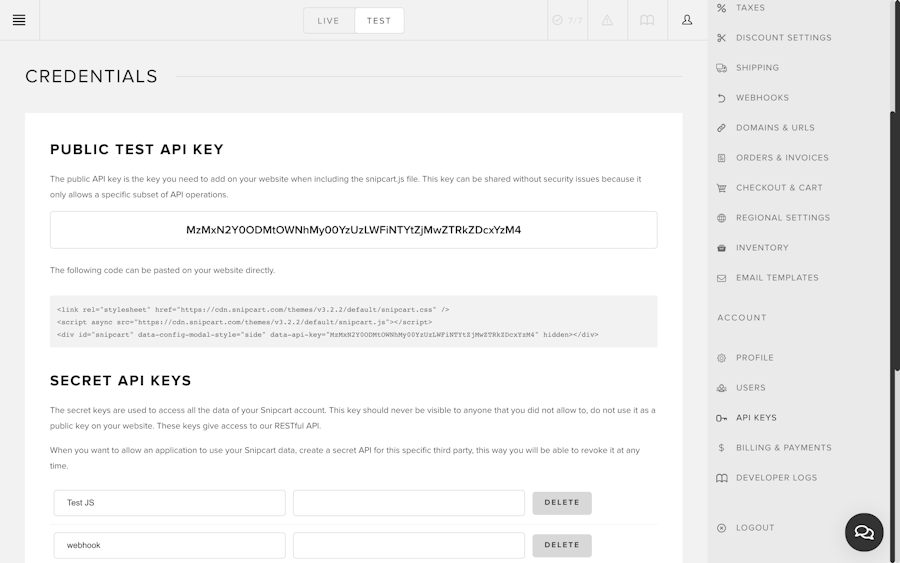
<div hidden id="snipcart" data-api-key="YOUR_PUBLIC_API_KEY"></div>Reminder to replace
YOUR_PUBLIC_API_KEYwith your public API key. You can find it in the Snipcart Dashboard under the test mode.

Step 6: Create a Snipcart buy button & product card component
Now that Snipcart has been installed, it's time to connect our products' custom fields we've created earlier with the Snipcart buy button. At the same time, this will enable Frontity to show the products information we entered in WordPress.
To do so, we'll create a new folder in packages/twentytwenty-theme/src/components named ecommerce and create two new files in it. One name product-card.js and the other one named snipcart-button.js.
In product-card.js, let's create a new component named ProductCard that will receive the WordPress posts (our products info) as a prop. This component will also call the SnipcartButton component will create after. To do so, add the following to the file:
import SnipcartButton from "./snipcart-button";

const ProductCard = ({post}) => {
    const product = {
        name: post.acf.product_name,
        id: post.id,
        price: post.acf?.price,
        image: post.acf?.image,
        description: post.acf?.description
    }

    return (
        <article>
            <img src={post.acf.image} />
            <div> {post.acf.description} </div>
            <div>
              <strong> ${post.acf.price} </strong>
            </div>
            <SnipcartButton product={product} />
        </article>
    )
}

export default ProductCard;
Now lets create our SnipcartButton component by adding the following in snipcart-button.js:
const SnipcartButton = ({product}) => {
    return (
        <button className="snipcart-add-item"
            data-item-name={product.name}
            data-item-price={product.price}
            data-item-image={product.image}
            data-item-id={product.id}
            data-item-description={product.description}>Add to cart
        </button>
    )
 }

 export default SnipcartButton;
Step 7: Adding our components to our pages
Now that we've created in the last step to our homepage and product page. To do so, let's replace the content of packages/twentytwenty-theme/src/components/post/post.js with the following:
import { styled, connect } from "frontity";
import { useEffect } from "react";
import FeaturedMedia from "./featured-media";
import {
  EntryContent,
  Post as _Post,
  PostHeader,
  PostInner,
  PostTitle,
  PostCaption,
  SectionContainer,
} from "./post-item";
import ProductCard from "./../ecommerce/product-card";

/**
 * The Post component that the TwentyTwenty theme uses for rendering any kind of
 * "post type" (posts, pages, attachments, etc.).
 *
 * It doesn't receive any prop but the Frontity store, which it receives from
 * {@link connect}. The current Frontity state is used to know which post type
 * should be rendered.
 *
 * @param props - The Frontity store (state, actions, and libraries).
 *
 * @example
 * ```js
 * <Switch>
 *   <Post when={data.isPostType} />
 * </Switch>
 * ```
 *
 * @returns The {@link Post} element rendered.
 */
const Post = ({ state, actions, libraries }) => {
  // Get information about the current URL.
  const data = state.source.get(state.router.link);

  // Get the data of the post.
  const post = state.source[data.type][data.id];

  // Get the html2react component.
  const Html2React = libraries.html2react.Component;

  const isProduct = (post) => {
    return !!post.acf.price;
  }

  /**
   * Once the post has loaded in the DOM, prefetch both the
   * home posts and the list component so if the user visits
   * the home page, everything is ready and it loads instantly.
   */
  useEffect(() => {
    actions.source.fetch("/");
  }, [actions.source]);

  // Load the post, but only if the data is ready.
  return data.isReady ? (
    <PostArticle>
      <Header>
        <SectionContainer>
          {/* If the post has categories, render the categories */}
          <PostTitle
            as="h1"
            className="heading-size-1"
            dangerouslySetInnerHTML={{ __html: post.title.rendered }}
          />
          {/* If the post has a caption (like attachments), render it */}
          {post.caption && (
            <PostCaption
              dangerouslySetInnerHTML={{ __html: post.caption.rendered }}
            />
          )}
        </SectionContainer>
      </Header>

      {/*
       * If the want to show featured media in the
       * list of featured posts, we render the media.
       */}
      {state.theme.featuredMedia.showOnPost && (
        <FeaturedImage id={post.featured_media} isSinglePost={true} />
      )}

      {/* If the post has a description (like attachments), we render it */}
      {post.description && (
        <PostInner size="thin">
          <EntryContent
            dangerouslySetInnerHTML={{ __html: post.description.rendered }}
          />
        </PostInner>
      )}

      {/* If the post has content, we render it */}
      {post.content && isProduct(post) && (
        <PostInner size="thin">
          <EntryContent>
            <ProductCard post={post} />
          </EntryContent>
        </PostInner>
      )}

      {post.content && !isProduct(post) && (
        <PostInner size="thin">
          <EntryContent>
            <Html2React html={post.content.rendered} />
          </EntryContent>
          {/* If the post has tags, render it */}
          {post.tags && <PostTags tags={tags} />}
        </PostInner>
      )}
    </PostArticle>
  ) : null;
};

export default connect(Post);

const Header = styled(PostHeader)`
  background-color: #fff;
  margin: 0;
  padding: 4rem 0;
  @media (min-width: 700px) {
    padding: 8rem 0;
  }
`;

const PostArticle = styled(_Post)`
  padding-top: 0 !important;
`;

const FeaturedImage = styled(FeaturedMedia)`
  margin-top: 0 !important;
  position: relative;

  > div {
    position: relative;
  }

  &:before {
    background: #fff;
    content: "";
    display: block;
    position: absolute;
    bottom: 50%;
    left: 0;
    right: 0;
    top: 0;
  }
`;
As you can see, we've imported our ProductCard component and added a small helper function to help us identify if the post has product properties. We're using this function to display either the product card or the regular WordPress post.
We'll also need to change the content of packages/twentytwenty-theme/src/components/post/post-item.js to display our product card on the homepage.
import { connect, styled } from "frontity";
import Link from "../link";
import FeaturedMedia from "./featured-media";
import ProductCard from "./../ecommerce/product-card";

/**
 * Article Component.
 *
 * It renders the preview of a blog post. Each blog post contains:
 * - Title: clickable title of the post.
 * - FeaturedMedia: the featured image/video of the post.
 *
 * @param props.state - The Frontity state.
 * @param props.libraries - The Frontity libraries.
 * @param props.item - The post entity.
 * @param props.showExcerpt - If the post excerpt should be rendered.
 * @param props.showMedia - If the featured media should be rendered.
 *
 * @returns React element.
 */
const PostItem = ({
  state,
  libraries,
  item,
  showMedia = true,
}) => {

  const post = state.source[item.type][item.id];
  const { Component: Html2React } = libraries.html2react;
  return (
    <Post>
      <PostHeader>
        <SectionContainer>
          {/* The clickable heading for the post */}
          <PostLink link={item.link}>
            <PostItemTitle
              className="heading-size-1"
              dangerouslySetInnerHTML={{ __html: item.title.rendered }}
            />
          </PostLink>
        </SectionContainer>
      </PostHeader>

      {/*
       * If the want to show featured media in the
       * list of featured posts, we render the media.
       */}
      {state.theme.featuredMedia.showOnArchive && showMedia && (
        <FeaturedMedia id={item.featured_media} />
      )}

      {post && post.content && (
        <PostInner size="thin">
          <EntryContent>
            <ProductCard post={post} />
          </EntryContent>
        </PostInner>
      )}
    </Post>
  );
};

// Connect the Item to gain access to `state` as a prop
export default connect(PostItem);

// All styles :)

export const Post = styled.article`
  &:first-of-type {
    padding: 4rem 0 0;
  }

  @media (min-width: 700px) {
    &:first-of-type {
      padding: 8rem 0 0;
    }
  }
`;

export const PostHeader = styled.header`
  text-align: center;
`;

// Header sizes bases on style.css
const maxWidths = {
  thin: "58rem",
  small: "80rem",
  medium: "100rem",
};

/**
 * Return a CSS size depending on the value of the `size` prop received (see
 * {@link maxWidths}).
 *
 * @param props - Component props, including a `size` one.
 * @returns Size in CSS units.
 */
const getMaxWidth = (props) => maxWidths[props.size] || maxWidths["medium"];

export const SectionContainer = styled.div`
  margin-left: auto;
  margin-right: auto;
  width: calc(100% - 4rem);
  max-width: ${getMaxWidth};

  @media (min-width: 700px) {
    width: calc(100% - 8rem);
  }
`;

export const PostItemTitle = styled.h2`
  margin: 0;
  @media (min-width: 700px) {
    font-size: 6.4rem;
  }
`;

export const PostTitle = styled.h1`
  margin: 0;
`;

export const PostCaption = styled(SectionContainer)`
  /* .section-inner.max-percentage */
  margin-left: auto;
  margin-right: auto;
  max-width: ${getMaxWidth({ size: "small" })};
  width: 100%;

  /* .singular .intro-text */
  margin-top: 2rem;
  font-size: 2rem;
  letter-spacing: -0.0315em;
  line-height: 1.4;

  @media (min-width: 700px) {
    margin-top: 2.5rem;
    font-size: 2.6rem;
  }
  @media (min-width: 1000px) {
    font-size: 2.8rem;
  }
  @media (min-width: 1220px) {
    font-size: 3.2rem;
    letter-spacing: -0.03125em;
    line-height: 1.375;
  }
`;

const PostLink = styled(Link)`
  color: #000000;
  text-decoration: none;
  display: inline-block;
  &:hover {
    text-decoration: underline;
  }
`;

export const PostInner = styled(SectionContainer)`
  padding-top: 5rem;
  @media (min-width: 700px) {
    padding-top: 8rem;
  }
`;

export const EntryContent = styled.div`
  line-height: 1.5;
  max-width: 58rem;
  font-family: "Hoefler Text", Garamond, "Times New Roman", serif;
  letter-spacing: normal;

  @media (min-width: 700px) {
    font-size: 2.1rem;
  }

  > *:first-of-type {
    margin-top: 0;
  }

  figure {
    margin: 2em 0;
    max-width: 100%;
  }

  h1,
  h2,
  h3,
  h4,
  h5,
  h6,
  cite,
  figcaption,
  table,
  address,
  .wp-caption-text,
  .wp-block-file {
    font-family: "Inter", -apple-system, BlinkMacSystemFont, "Helvetica Neue",
      Helvetica, sans-serif;
  }

  h1,
  h2,
  h3,
  h4,
  h5,
  h6 {
    margin: 3.5rem auto 2rem;
  }

  @media (min-width: 700px) {
    h1,
    h2,
    h3 {
      margin: 6rem auto 3rem;
    }

    h4,
    h5,
    h6 {
      margin: 4.5rem auto 2.5rem;
    }
  }
`;
And now you should be able to view your products, and the 'Add to Cart' button directly from the homepage.
Step 8: Add a view cart button
Now let's add a button in the header to view the cart.
With the theme Frontity installed, we have two views; mobile and desktop. We'll take advantage of predefined search component styling to create our button.
First, let's create a cart-button.js file in packages/twentytwenty-theme/src/components/ with the following content in it:
import { connect, styled } from "frontity";
import {
  BaseToggle,
  ToggleWrapper,
} from "./navigation/nav-toggle";

const CartButton = ({ state, actions }) => {

  return (
    <HeaderToggle>
      <ToggleWrapper>
				<BaseToggle className="snipcart-checkout">
          🛒
        </BaseToggle>
      </ToggleWrapper>
    </HeaderToggle>
  );
};

export default connect(CartButton);

const HeaderToggle = styled.div`
  display: none;

  @media (min-width: 1000px) {
    display: flex;
    flex-shrink: 0;
    margin-right: -3rem;
    margin-left: 3rem;
  }

  @media (min-width: 1220px) {
    margin-right: -4rem;
    margin-left: 4rem;
  }
`;
We'll then add our mobile cart button in packages/twentytwenty-theme/src/components/mobile by creating a cart-button.js containing this code:
import { connect, styled } from "frontity";
import {
  CartToggle,
  ToggleWrapper,
} from "../navigation/nav-toggle";

const MobileCartButton = ({ state, actions }) => {

  return (
    <ToggleWrapper>
      <ShowMobile>
				<BaseToggle className="snipcart-checkout">
          🛒
        </BaseToggle>
      </ShowMobile>
    </ToggleWrapper>
  );
};

export const ShowMobile = styled.div`
  display: inline-block;

  @media (min-width: 1000px) {
    display: none;
  }
`;
export default connect(MobileCartButton);
With these components created, we'll need to define them in the header components:
packages/src/components/header.js

import { connect, Global, Head, styled } from "frontity";
//..
import CartButton from "./cart-button";
import MobileCartButton from "./mobile/cart-button";

return (
    <PageHeader bg={headerBg} id="site-header">
      <HeaderInner>
        <TitleWrapper>
          {/* Cart button on mobile */}
          <MobileCartButton />

          {/* Heading and Description of the site */}
          <TitleGroup>
            <SiteTitle>
              <StyledLink link="/">{title}</StyledLink>
            </SiteTitle>
            <SiteDescription>{description}</SiteDescription>
          </TitleGroup>

          {/* Mobile menu button and modal */}
          <MobileMenuButton />
          <MobileMenuModal />
        </TitleWrapper>

        <HeaderNavigationWrapper>
          {/* Desktop navigation links */}
          <Navigation />
          {/* Desktop cart button */}
          <CartButton />
        </HeaderNavigationWrapper>
      </HeaderInner>
    </PageHeader>
  );
};

//..
const HeaderNavigationWrapper = styled.div`
  display: none;

  @media (min-width: 1000px) {
    align-items: center;
    display: flex;
  }
`;
If you refresh, you should now be able to see the show cart button in the header.
Step 9: Adding some style
The last step will be to add style to our site and components.
When we built our Frontity project, we installed a predefined theme, but I would like to customize the store a bit more and add some styling to the component we've created.
Let's add some styling to the "Add to cart" button and our products.
To do so, add a new constant named snipcartStyled in the global styles file located at packages/twentytwenty-theme/src/components/styles/global-styles.js:
const snipcartStyle = (colors) => css`
  .snipcart-add-item {
    padding: 10px;
    border-radius: 4px;
    cursor: pointer;
    transition: .2s ease-out;
    transition-property: color,border-color,background-color,box-shadow;
    cursor: pointer;
    color: white;
    background-color: #1a4db3;
  }
  .snipcart-add-item:hover {
    box-shadow: var(--shadow-buttonPrimary-hover,0 10px 4px -8px rgba(0,0,0,.5));
    background-color: #0d59f2;
  }

  .snipcart-checkout {
    padding: 5px;
    cursor: pointer;
    background: none;
  }

  .product-price {
    display: flex;
    align-items: center;
    font-size: 1.5em;
  }

  .SectionContainer {
    display: flex;
    justify-content: center;
  }
`;

const productStyle = (colors) => css`
  img {
    display: block;
    margin-left: auto;
    margin-right: auto;
    width: 50%;
    max-width: 100px;
    padding: 10px;

  }
  article {
    text-align: center;
    padding: 5px;
  }
  `;

//..

const globalStyle = (colors) =>
  css([
    cssReset,
    documentSetup(colors),
    accessibilitySettings,
    elementBase(colors),
    elementBase700,
    elementBase1220,
    listStyle,
    quoteStyle(colors),
    codeStyle(colors),
    mediaStyle(colors),
    tableStyles(colors),
    snipcartStyle(colors),
  ]);

export default globalStyle;
As you can see, we also need to add this style object to the array we pass to the css function called within our globalStyle function.
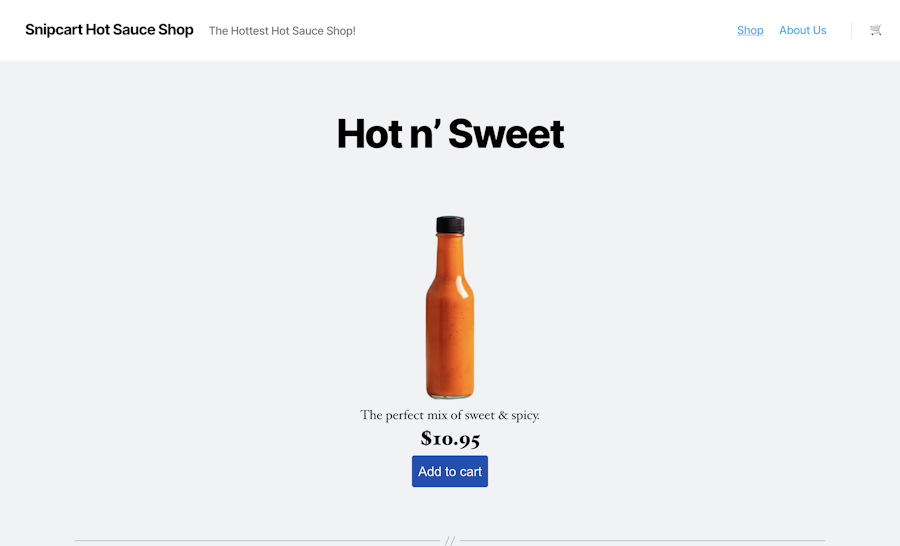
That's it. You now have an e-commerce site built on WordPress and React!
Live demo & GitHub repo
See the live demo here
See the GitHub repo here
Closing thoughts
As someone who's not a developer, I enjoyed and appreciated the ease Frontity brings to building a headless WordPress static site. I also enjoyed developing using only JavaScript (once our instance of WordPress was built and deployed).
The zero setup of Frontity is also lovely to work with. Not having to configure the routing and the API speed up the development process.
Have you tried Frontity? Let me know in the comments what your thoughts are about this framework and how your experience was.


