What is Headless WordPress & Should You Use It?
WordPress is the most popular CMS in the world, powering 43.3% of the world’s websites according to W3Techs. What started in 2003 as a fork of the early 2000’s blogging platform b2/cafelog has become a tech juggernaut that helps people and businesses worldwide build their digital presence.
However, WordPress is built as a monolithic platform with a tightly coupled front and backend, making it unwieldy for developers who want to create digital experiences without the constraints of its theme-based structure.
If you ever felt locked in or stuck while using WordPress, decoupling the frontend from your backend might be the solution. Going headless unlocks a variety of new opportunities for WordPress developers by opening the door for new frameworks, tech stacks, and delivery channels.


However, it’s not a decision that you want to make blindly. So, follow me as we shed some light on the benefits and drawbacks of headless WordPress.
In this article, I’ll cover:
What is a headless CMS?

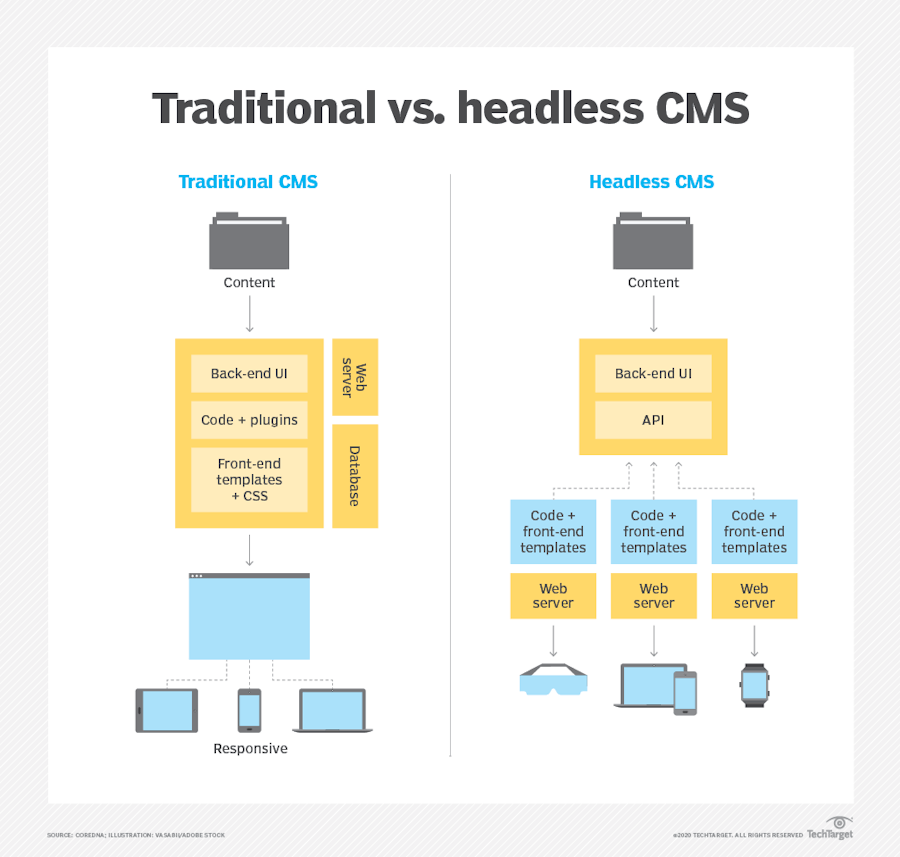
A headless CMS is a content management system that is not coupled to any frontend. Its content is accessible through an API, connecting your backend to a ‘head’ or frontend. A headless CMS removes the restrictions on how content is presented. It enables developers to use one source of content and deliver it to mobile apps, smartwatches, and IoT devices as well as websites and apps.
Contrary to ‘traditional’ platforms like WordPress or Drupal that are built on a LAMP stack, a headless CMS creates and stores JSON or XML files that can be read and presented by frontend frameworks like Gatsby or Next.js. This independence of frameworks provides developers with the creative freedom to build, test, and deploy digital experiences.
While most people will tell you to ditch WordPress altogether if you’re going headless, for most WordPress users, decoupling the platform is a convenient way to gain the benefits of the headless architecture without re-platforming.
But what is headless WordPress exactly, and why would you want to use it? Let’s find out.
What is headless WordPress?


A headless WordPress website uses it as the CMS, but another frontend tool to display and render content to the user. This API-first system decouples all the content from WordPress and allows developers to integrate with third-party services and deliver content to various channels and interfaces.
In addition, with headless WordPress, you don’t present content using themes. WordPress themes limit how you present content, forcing you to think within the boundaries of a website and preventing you from creating digital experiences at scale.
Instead, when you leverage WordPress as a headless platform, you only use it to store your data and serve as an API endpoint. This decoupled approach separates concerns. It allows marketing teams to work with the familiar WordPress UI while also enabling developers to build a website employing the tech stack and the workflow they are comfortable with like React, GraphQL, and Git.
As Jamstack and headless technologies become mainstream, taking advantage of WordPress’s backend and immense popularity is an accessible way of experimenting with new development paradigms. Gatsby, for example, built gatsby-source-wordpress, a plugin that allows you to source content from WordPress using REST APIs cached as GraphQL to be used in a Gatsby site. This plugin has been downloaded almost 1 million times already, and its user base keeps growing, suggesting that headless WordPress has become much more than a niche alternative.
It makes sense to imagine WordPress as a headless CMS because you get a WordPress installation with nearly all its features intact and the ability to experiment with web frameworks you couldn't use before. While losing the head might not be the best bet for all WordPress users, it offers plenty of benefits for forward-thinking developers and companies.
Benefits of headless WordPress
While traditional WordPress is a popular choice for non-technical users, it falls short for most developers who want more freedom and a better developer experience over the features and the UI.
For those developers, decoupling WordPress from the frontend is an option worth considering. Let's discuss some of its main benefits.
Supports a wider set of tools, frameworks, and libraries
Vanilla WordPress' monolithic architecture forces you to marry a technology stack chosen early in development. For developers, building traditional WordPress sites using PHP templates is a huge hindrance because it adds an extra layer of complexity, especially if you're used to building websites using components and hosting your sites on Vercel and Netlify or following CI/CD practices.
Headless WordPress, on the contrary, enables you to build websites using your favorite JavaScript frontend framework and tool stack. In addition, it offers a technology-agnostic approach that makes it easier to integrate tools and technologies into your project's workflow without sacrificing what you’ve already built.
Unlocks performance benefits
WordPress is built around PHP. Each page is generated from information stored in a database, and they take longer to load than a static site built using HTML files. You get an even slower site when you add plugins to the equation.
By using headless WordPress, you don’t need to hide or make up for performance issues. Instead, you can connect your backend to a Gatsby or Next.js frontend and instantly access performance benefits such as server-side rendering, faster loading times, and out-of-the-box SEO options. Besides, when you choose headless alternatives, you’re building digital experiences using modern web best practices, future-proofing your build.
Allows for code reusability
In WordPress, neither your code nor your data is portable. While it’s possible to store content and reuse it using the functions.php file, it’s not the best way of doing it and you end up working more than you would with a headless solution.
By going headless, you can leverage APIs to communicate with your backend. Once your content has been authored and published in WordPress, it becomes available to be delivered to different frontends. Plus, by allowing you to use modular frameworks, you can reuse code from other projects without affecting changes on your backend.
Secures data from malicious actors
Traditional WordPress is vulnerable to cyber-attacks. Hackers only need to gain access to the /wp-login.php file of a website to begin a brute force attack, compromise a plugin to gain access, or overload your website with requests to trigger a DDoS attack.
The headless architecture prevents that kind of cyberattacks. By reducing the reliance on plugins, allowing client-side rendering, and using a CDN to cache content, hackers will find fewer attack surfaces, deterring them from messing with your headless site. Also, the API-first nature of headless WordPress makes it easier to integrate with cybersecurity services and tools to prevent further intrusions.
Disadvantages of headless WordPress
Despite the many advantages of unscrewing WordPress' head, the actual implementation is easier said than done for non-technical users. Let's see the other side of the coin to get a better perspective on this.
Requires extensive coding knowledge
Headless WordPress comes with a steep learning curve that novice developers, fresh from its LAMP stack, will find off-putting. As a result, headless is a solid option only if you have the developers to pull it through. Otherwise, navigating and working in the split environment takes some adjustment, and not every developer will be able to help.
A traditional WordPress setup is easier to understand for both developers and non-technical users. If you're building a website that doesn't require the amount of upfront work that a headless installation needs, you're probably better off with vanilla WordPress.
Complicates hosting workflows
With a headless installation, you need separate hosting: one for your WordPress backend, and another for your frontend. The first server needs to support PHP and the other has to support the frontend framework you’re using. This reiterative model increases the time developers spend on maintenance tasks.
Vanilla WordPress hosts everything under the same roof, reducing complexities and maintenance work. Rather than forcing you to play 4D chess with your hosting options, you can work with a single solution and scale when you need it.
Needs more maintenance
The headless architecture requires developers to maintain keep a larger infrastructure that’s spread across different databases, servers, and environments. Such a sprawled system can be a pain to keep in fighting shape and requires resources that could be put to better use.
A traditional WordPress site requires less maintenance. While it’s not a secret that WordPress requires constant upkeep or you risk a buggy, insecure website, it has fewer moving pieces, reducing the amount of time you have to spend taking care of your web stack.
When to use headless WordPress (or not)
Going headless isn’t for everyone, but the performance benefits make it a good choice for developers with the resources to take WordPress to the next level. Here are a handful of scenarios where headless shines bright.
Use headless WordPress when:
You anticipate publishing content on multiple platforms: With decoupled WordPress, you can create personalized, omnichannel customer journeys using APIs to push content to different channels, maximizing traffic and reach.
You want to build a custom product: If customizability is a must for you, you're better off by going headless. The headless architecture opens you to other processes and workflows that vanilla WordPress simply isn't built for. A headless solution puts all the control in your hands and gives you complete creative control over your website.
Don’t use headless WordPress if:
You require a flexible backend: Headless WordPress is more pliable than the traditional version, but if you’re already familiar with headless platforms, I’d suggest you go straight to a fully headless platform that offers content-as-a-service capabilities out-of-the-box.
You can’t configure it: Going headless without the proper knowledge can be a detriment to your performance and security. If you fail to configure and optimize your APIs, you will end up with a slow, unsafe website.
If you think headless WordPress is the solution for you, follow along. I’ll show you how you can get started quickly using Gatsby.
Getting started with headless WordPress in 7 steps
There’re many ways to get started using headless WordPress. You could go with almost every modern frontend JavaScript frameworks like React, Vue.js, or Angular. However, in this tutorial, we’ll take advantage of GraphQL and Gatsby with its gatsby-source-wordpress plugin.
If you wish to see how to get started with WordPress REST API, you can have a look at this tutorial.
We’ll not go over creating a WordPress instance in this tutorial. We’re assuming you already know how to do so. You can refer to WordPress documentation to see how.
Follow along as I show you how to create an eCommerce Gatsby app with WordPress as the headless CMS.
Prerequisites
Here’s what you’ll need to get started:
Knowledge of WordPress, JavaScript, and GraphQL
A WordPress instance
A Snipcart account (free in test mode forever)
Gatsby installed globally
npm install -g gatsby-cli
1. Configuring WordPress for headless use
With WordPress instance up and running, we’ll create our homepage. To do so, let’s go to the “Pages” section of the sidebar and create the new page named “Homepage”.
Once the page has been created, head to “Settings” > “Reading” and select “A static page” with our homepage selected for “Homepage” and save the changes.

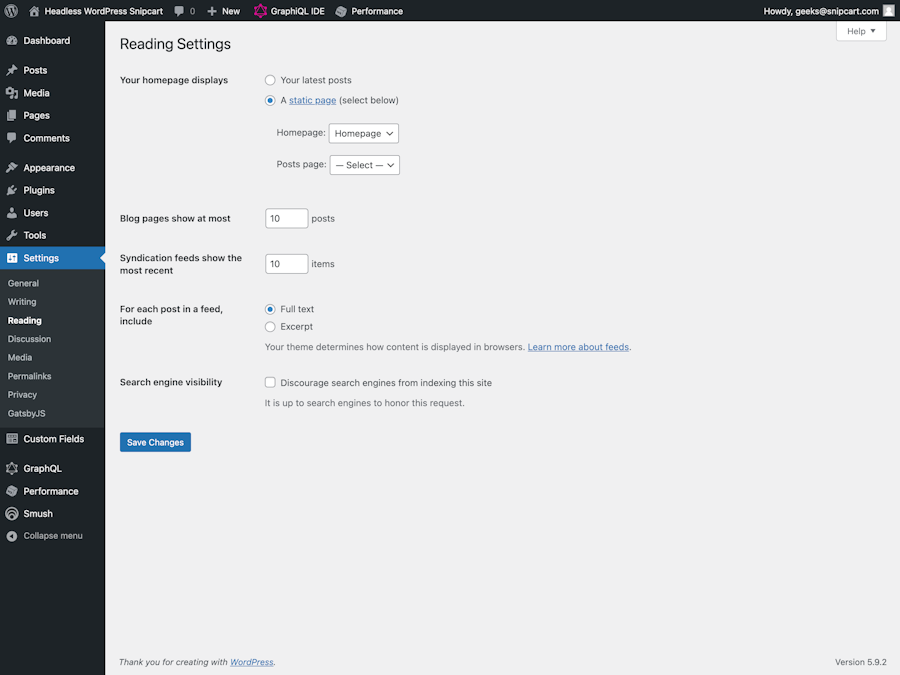
This will make the page we created earlier the default homepage.
With that done, head to “Add New” in the “Plugins” section of the sidebar. From there, we’ll need to install a few WordPress plugins required by Gatsby.
WPGraphQL for Advanced Custom Fields plugin (this one will need to be uploaded manually. See the “Install and Active” section of the readme)
Once all the plugins have been installed, make sure to activate them to use them later.
2. Creating our Gatsby app
Now that our WordPress backend is set up let’s create our frontend Gatsby app. For this, we’ll take advantage of the WordPress Homepage Starter to build our app.
In your terminal, navigate to the location in which you would like to create your app with cd, and paste the following command:
npx gatsby new <YOUR_APP_NAME> <https://github.com/gatsbyjs/gatsby-starter-wordpress-homepage>You can replace <YOUR_APP_NAME> with the name you would like to give your app.
Once the Gatsby installation is done, you can open up your project in your favorite code editor. In the terminal, navigate inside your newly created project and type the following command to install all the dependencies it needs to run:
npm install3. Setting up the GraphQL endpoint
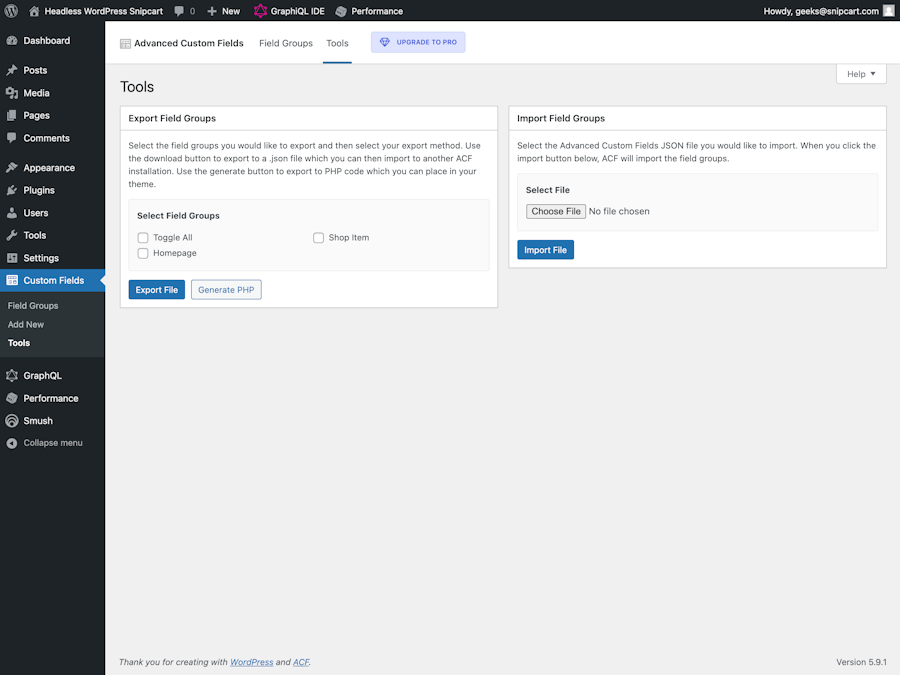
With our frontend and backend know created, we’ll need to set them up for them to communicate together. For this, we’ll need to configure custom fields that will be used to enter the content we want WordPress to pass through the API.
In WordPress, head to the Custom Fields’ Tools setting in the sidebar and import the acf-field-groups.json file from our Gatsby project located in the data folder.
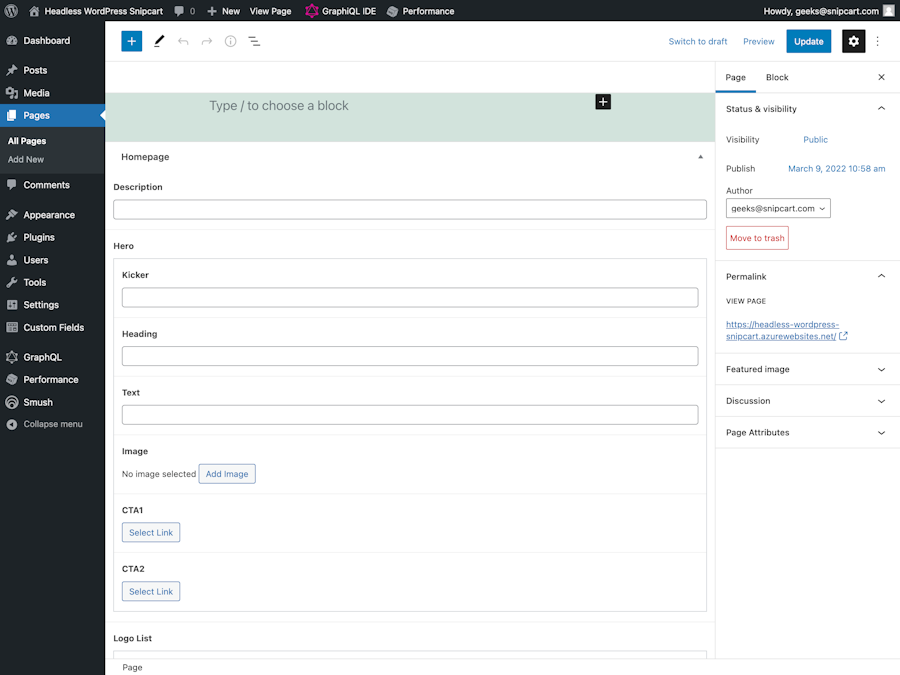
Now let’s navigate back to the homepage page. You should now be able to see all the fields. For this demo, we’ll only be using these fields:
Description
Hero
CTA
Once we’ll also need to create custom fields for our products. For this, let’s once again go to the “Custom Fields” and create a new custom field called “Product” with the following:
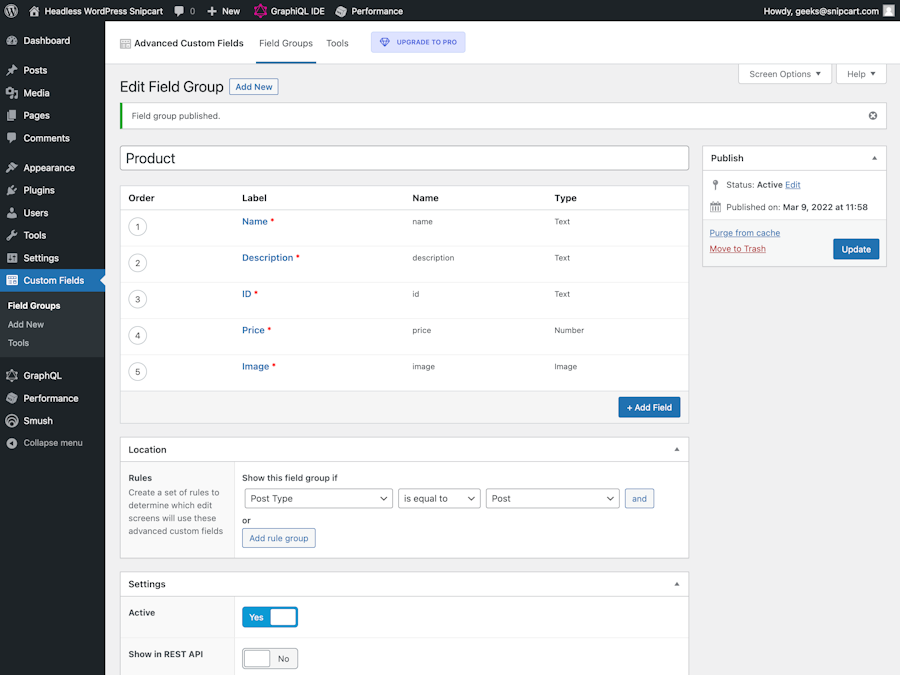
Once this is done, you can go to “Posts” and create new ones for each product you would like to have.
We will also need to copy the URL of our WordPress GraphQL endpoint, so Gatsby knows where to find our d
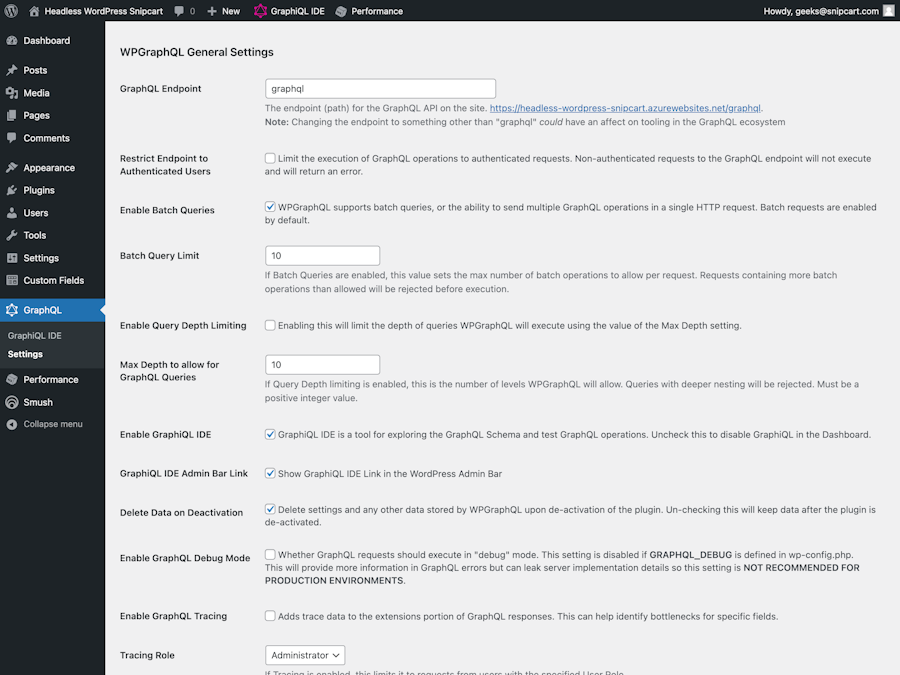
ata. To do so, navigate to “GraphQL” > “Settings” and copy the endpoint URL.
4. Connecting the WordPress API endpoint to Gatsby
Going back to our Gatsby project, let’s create a .env file at the root. In it, let’s add the reference to our GraphQL endpoint with the following by replacing <YOUR_GRAPHQL_ENDPOINT_URL> with the URL you copied earlier:
WPGRAPHQL_URL="<YOUR_GRAPHQL_ENDPOINT_URL>"Now let’s see the result in our browser by running the following command:
gatsby developOnce the app is done building, navigate to http://localhost:8000/ to see it.
5. Creating our product page
We need to create a page to display the products we created earlier. For this, let’s create a file named products.js in the src/pages folder. In it let’s add the following:
import * as React from "react"
import { graphql } from "gatsby"
import Layout from "../components/layout"
import Product from '../components/product'

export default function Products(props) {
  const { products } = props.data
  console.log(products)
  return (
    <Layout>
    		<h1 style={{ display: 'flex', flexDirection: 'column', alignItems: 'center' }}>Headless Art</h1>
      {products.nodes.map(({ product }) => {
        return <Product key={product.id} {...product} />
      })}
    </Layout>
  )
}

export const query = graphql`
  {
    products: allWpPost {
      nodes {
        product {
          description
          id
          name
          price
          fieldGroupName
          image {
            id
            gatsbyImageData
            alt
          }
        }
      }
    }
  }
`
This will query WordPress GraphQL to fetch our products data we’ve created earlier.
With the component created, let’s create a product.js file in the components folder. In it, paste this code:
import * as React from "react"
import { GatsbyImage, getImage } from "gatsby-plugin-image"
import { Button } from "./ui"

export default function Product(props) {
	return (
		<section style={{ display: 'flex', flexDirection: 'column', alignItems: 'center' }}>
			<h2>{props.name}</h2>
			{props.image && (
				<GatsbyImage
					style={{ display: 'block', width: '50%' }}
					alt={props.image.alt}
					image={getImage(props.image)}
				/>
			)}
			<p style={{ width: '50%' }}>{props.description}</p>
			<p style={{ width: '50%' }}>{props.price}$</p>
			<Button
				className="snipcart-add-item"
				data-item-id={props.id}
				data-item-price={props.price}
				data-item-description={props.description}
				data-item-name={props.name}
				data-item-image={props.image.gatsbyImageData.images.fallback.src}
			>Add to cart</Button>
		</section>
	)
}
This will create a Product component that we’ll display our products and a buy button on our page.
6. Customizing our Gatsby website
Let’s make a few changes to our website to make it our own. We’ll first make changes to the header and footer component, so we only display to our product page.
In src/components/header.js. Let’s remove all page links except Products so your code looks like that:
const data = {
  navItems: [
    {
      id: 0,
      navItemType: "Link",
      href: "/products",
      text: "Products",
    },
  ],
  cta: {
    text: "View Cart",
  },
}
This will remove all the unnecessary links in the header of our website. We can do the same in the footer component:
// src/components/footer.js
const data = {
  links: [
    {
      id: 0,
      href: "/products",
      text: "Products",
    },
  ],
We’ll also customize what we’re displaying on the home page by changing removing a few blocks we’re not using in src/components/sections.js. We’ll only keep these lines:
export { default as HomepageHero } from "./hero"

export { default as AboutHero } from "./about-hero"
export { default as AboutStatList } from "./about-stat-list"
export { default as AboutLeadership } from "./about-leadership"
export { default as AboutLogoList } from "./about-logo-list"
7. Install Snipcart
To install Snipcart to our website, we’ll take advantage of a Gatsby plugin. To add it to our project, let’s run the following command in the terminal:
npm install gatsby-plugin-snipcart-advancedOnce the command has been run, add the following in gatsby-config.js just under plugins: [
{
      resolve: `gatsby-plugin-snipcart-advanced`,
      options: {
        version: "3.3.3",
        publicApiKey: process.env.GATSBY_SNIPCART_API_KEY,
        defaultLang: "en",
        currency: "usd",
        openCartOnAdd: true,
        useSideCart: true,
        templatesUrl: "<https://cdn.snipcart.com/themes/v3.3.3/default/snipcart.css>",
      },
    },
In the .env file we have created earlier, we’ll add our Snipcart public API variable with the following line:
GATSBY_SNIPCART_API_KEY="<Your_Public_API_Key>"You’ll need to replace <Your_Public_API_Key> with your account public API key. You can easily find it here.
The last thing we’ll want to do is to add a button to show the cart in the header.js component by taking advantage of the Button style and cta component. To do so, let’s go to the header.js file in src/components and replace the content of return.
//return (
<header>
      <Container className={desktopHeaderNavWrapper}>
        <Space size={2} />
        <Flex variant="spaceBetween">
          <NavLink to="/">
            <VisuallyHidden>Home</VisuallyHidden>
            <BrandLogo />
          </NavLink>
          <nav>
            <FlexList gap={4}>
              {navItems &&
                navItems.map((navItem) => (
                  <li key={navItem.id}>
                    <NavLink to={navItem.href}>{navItem.text}</NavLink>
                  </li>
                ))}
            </FlexList>
          </nav>
          <Button className="snipcart-checkout">{cta.text}</Button>
        </Flex>
      </Container>
      <Container className={mobileHeaderNavWrapper[isOpen ? "open" : "closed"]}>
        <Space size={2} />
        <Flex variant="spaceBetween">
          <span
            className={
              mobileNavSVGColorWrapper[isOpen ? "reversed" : "primary"]
            }
          >
            <NavLink to="/">
              <VisuallyHidden>Home</VisuallyHidden>
              <BrandLogo />
            </NavLink>
          </span>
          <Flex>
            <Space />
                <Button variant={isOpen ? "reversed" : "primary"} className="snipcart-checkout">
                  {cta.text}
                </Button>
            <Nudge right={3}>
              <InteractiveIcon
                title="Toggle menu"
                onClick={() => setOpen(!isOpen)}
                className={
                  mobileNavSVGColorWrapper[isOpen ? "reversed" : "primary"]
                }
              >
                {isOpen ? <X /> : <Menu />}
              </InteractiveIcon>
            </Nudge>
          </Flex>
        </Flex>
      </Container>
      {isOpen && (
        <div className={mobileNavOverlay}>
          <nav>
            <FlexList responsive variant="stretch">
              {navItems?.map((navItem) => (
                <li key={navItem.id}>
                  <NavLink to={navItem.href} className={mobileNavLink}>
                    {navItem.text}
                  </NavLink>
                </li>
              ))}
            </FlexList>
          </nav>
        </div>
      )}
    </header>
That’s it!
You now have a complete eCommerce store using headless WordPress, Gatsby, and Snipcart.
Live demo & GitHub repository
Try out the live demo here
See the GitHub repo here
Conclusion
Decoupling WordPress comes with a lot of advantages. The headless approach brings solid performance gains and architectural freedom, but it also introduces complexities that can be too much to handle for novice developers or non-technical people.
I believe headless is the future, but I don't think headless WordPress spells doom for its traditional counterpart. WordPress has a huge market of people who aren't developers and aren't interested in decoupling their CMS and that’s not going to change.
Headless technology is and will continue to be a feasible option for businesses with the developer muscle, the experience, and the funds to build custom digital experiences at scale. Now that WordPress is gaining traction as a feasible headless CMS, it’s nice to see developers looking to adapt the platform to serve new use cases.
My final two cents here is: If you have what it takes to go headless, go. You won't regret it, and you won't go back, but make sure you’re doing it for the right reasons.
The choice rests with you, but I hope this guide serves you as a starting point if you want to get started with headless WordPress or simply if you want to assess the viability of going headless.


