Leveraging Vue.js & GraphQL with Gridsome (Airtable Database Example)
Take a moment to look back at the advancement of modern JavaScript in the last few years.
There are certainly a few specific frontend techs that pop to your mind—React, Node, Redux, etc.
You can’t argue that Vue.js and GraphQL also made significant waves in the ever-growing JS pond.
Now, what if I told you that the tool leveraging both to build powerful websites and apps has arrived?
Yes, Vue.js finally found its Gatsby, and it’s called Gridsome.
It quickly caught the attention of our team and today I’m putting it to the test by building my own Vue & GraphQL-powered e-commerce app.
This tutorial will highlight some of Gridsome’s neat features while using Airtable as a handcrafted database.
Steps 🛠
Creating a Gridsome project
Handling a products sheet in Airtable
Crafting a Gridsome data source plugin to fetch products from Airtable
Querying data with GraphQL
Building Vue.js views & listing
Adding the buy button
First, a bit of context.
Intro to Gridsome: Leveraging Vue.js & GraphQL

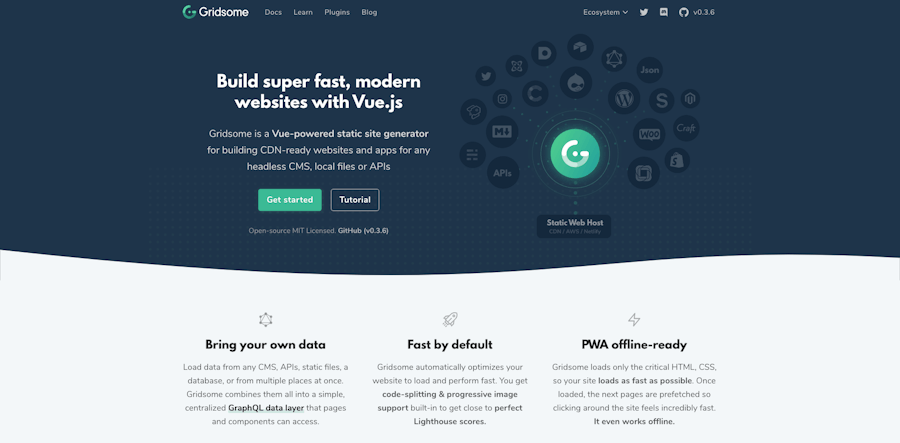
Please don’t feel ignorant if this is the first time you've read about Gridsome as it’s only a few months old. Though, spoiler alert, you’ll probably hear about it more and more in the months to come.
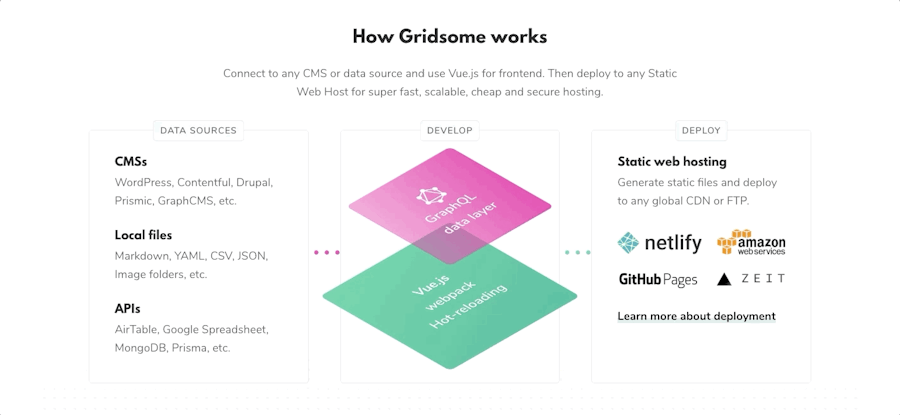
It’s a Vue-based static site generator that connects to any CMS or data source from a GraphQL layer.
It was strongly inspired by what Gatsby does for React. A quick scan through both platform’s core features attests the influence:
Static site generation
Easy connection to data sources—headless CMSs, SaaS services, APIs, databases, etc.
Data fetching through GraphQL
Progressive Web App generation for offline capabilities
Blazing fast performance
React and Gatsby are awesome, no doubt. But I fully agree with Gridsome’s creator when he says that Vue.js is more accessible for most web developers getting started with the JAMstack—and that Gridsome’s fills a gap in its ecosystem.

The feature that really caught my attention here is the capacity to easily unite the capabilities of Vue.js and GraphQL. The latter has come a long way since we introduced it on the blog. We sure weren’t wrong when stating that it wouldn’t be a short-lived, trendy tool.
GraphQL is now a widely adopted query language for APIs, still challenging the traditional RESTful APIs. What’s so great about it is how easily it connects data sources to JavaScript-based frontend applications.
Until now, the main way to tie your data to a Vue.js app through GraphQL was with Apollo, the GraphQL client. It’s also a neat tool for which you can find tons of great Vue.js-GraphQL tutorials if you’re curious.
But it’s always nice to have alternatives, right? Having Gridsome as an added tool on our belt capable of doing this work for us Vue.js lovers is a blessing!
Using Airtable as a database?

Airtable sits on the perfect spot between spreadsheet and database.
It allows developers to create databases with the flexibility and editing functions of good ol’ spreadsheets. What makes it stand out from more traditional spreadsheets is its powerful API.
With it, your data is effortlessly transferable to other services and your own interfaces.
You could, for example, create a list of products in an Airtable spreadsheet that will then be used to feed a Vue-powered store built with Gridsome. GraphQL would, of course, serve to query these products.
Guess what? That’s precisely what I’ll do in the following section.
Let’s do this!
If you want to dive deeper into the Airtable API, I recommend either this excellent blog post or the official docs once you’ve got started with it.
Vue.js & GraphQL Tutorial: Gridsome + Airtable Demo Store

Prerequisites
A Node.js installation
Basic Vue.js knowledge
Optional—A Snipcart account (forever free in test mode)
1. Creating a Gridsome project
To quickstart this demo, use Gridsome’s starter project and the “Product Catalog” demo base—database/spreadsheets in Airtable’s parlance.
All along this demo, I recommend using the npx command that comes with npm. It allows calling commands from npm packages without installing them globally.
Let’s create and start a project:
npx @gridsome/cli create snipcart-gridsome-airtable-democd snipcart-gridsome-airtable-demonpx gridsome develop
It’ll give you a running website at http://localhost:8080 and, most importantly, a data explorer that will be helpful to craft GraphQL queries at http://localhost:8080/___explore.
2. Handling a product sheet in Airtable
I’ve created my Airtable base from which I’ll query the Furniture table:

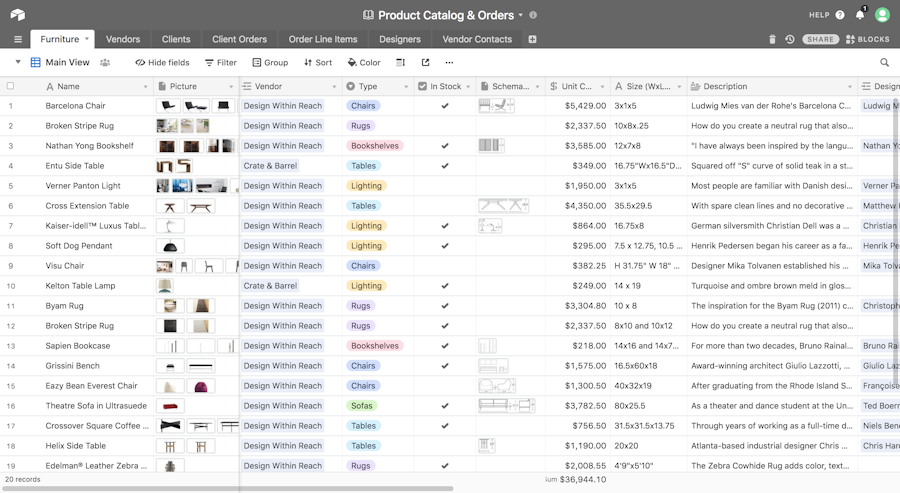
When you create a base in Airtable, you instantly get auto-generated API documentation. This allows you to quickly retrieve products with their node.js package and build a new Gridsome data source plugin.
3. Crafting a Gridsome data source plugin to fetch products from Airtable
There are a few data source plugins available for Gridsome, but here we’ll have to create a custom one.
Be it a custom or built-in one; they get registered in gridsome.config.js:
    module.exports = {
      plugins: [
        {
          use: '~/src/sources/products',
          options: {
            apiKey: '<your API Key here>',
            base: '<your base' ID here>',
          },
        },
      ],
    };
To build the plugin itself, you first need to install airtable library by running npm install --save airtable.
And then create the following file in src/sources/products/index.js:
    const Airtable = require('airtable');

    module.exports = function (api, opts) {
        const base = new Airtable({apiKey: opts.apiKey}).base(opts.base);

        api.loadSource(async store => {
            const contentType = store.addContentType({
                typeName: 'Product',
                route: '/products/:slug',
            });

            contentType.addSchemaField('price', ({ graphql }) => ({
                    type: graphql.GraphQLFloat,
                    resolve (node) {
                        return node.fields.unitCost;
                    }
                }));

            await base('Furniture').select().eachPage((records, fetchNextPage) => {
                records.forEach((record) => {
                    const item = record._rawJson;

                    contentType.addNode({
                        id: item.id,
                        title: item.fields.Name,
                        fields: item.fields,
                        content: item.fields.Description,
                    });
                });
                fetchNextPage();
            });
        });
    };
First, the Airtable-related steps:
To use the API and initialize the node.js module, you need an API key which can be found in your account.
You also need the identifier of your base available in its API documentation.
The
base('Furniture').select()method fetch all records of the Furniture table.You should receive them in batch in the
eachPagecallback, and thefetchNextPagemethod allows asynchronously receiving the next batch if necessary.To keep it simple here, I’ve used the
_rawJsonproperty of the record.
Then, the crunchy part of mapping the data to GraphQL:
Everything happens inside the
api.loadSourcecallback.First declare your new type with
store.addContentType:
The
routeparameter defines the pattern of each product’s URL.You’ll later create a Vue component that matches the name of our type.
Declare a custom field for price with
contentType.addSchemaFieldThen create a new GraphQL node for each furniture record.
All values under the fields property are automatically made available in GraphQL and, most times, it’s smart enough to determine the type of that field.
However, when the data isn’t consistent, it may guess the wrong type. Sadly, you’ll notice it breaks only when querying the field. If you’re familiar with Gatsby, you may have encountered the same issue.
How to fix this?
I had to specify the price field because unitCost was mistakenly identified as Int—everything still exploded for prices with decimals. By mapping the data to a new field with the proper type of graphql.GraphQLFloat everything works great.
    contentType.addSchemaField('price', ({ graphql }) => ({
            type: graphql.GraphQLFloat,
            resolve (node) {
                return node.fields.unitCost;
            }
        }));
4. Querying data with GraphQL
Okay, let’s head over to the data explorer at http://localhost:8080/___explore to craft your product listing query.
The nice thing about using GraphQL to separate our data source layer from our view is that we can provide virtually all of our data in the source and only query what we need in each view.
With the help of the data explorer’s autocomplete, I quickly came up with this query:
    query Products {
      allProduct {
        edges {
          node {
            id,
            title,
            path,
            price,
            content,
            picture {
              thumbnails {
                 large {
                  url
                }
              }
            }
          }
        }
      }
    }
5. Building Vue.js views & listing
Gridsome fully embraces the single file component approach of Vue.js.
Your newly created query can be put inside a <page-query> tag in src/pages/Index.js which will make the list of products available in the $page.allProduct.edges variable.
The Vue.js template looks like this:
    <template>
      <Layout>
        <section>
          <g-link
            v-for="edge in $page.allProduct.edges" :key="edge.node.id"
           :to="edge.node.path" class="product">
            <ProductPreview :product="edge.node" />
          </g-link>
        </section>
      </Layout>
    </template>
As with any other good framework, you can separate your layout from your views with Gridsome by directly leveraging Vue.js templating. The <Layout> tag is a component in the project that can define content around the one from our page using the slot mechanism of Vue.
The remaining will look familiar to anyone who worked with Vue.js before:
The
g-linktag is a built-in component of Gridsome used to navigate to each product’s pageThe
ProductPreviewtag is a custom component to display our product data in a list
Earlier, I mentioned that for single product’s pages, you need to make a Vue component with the name matching the type we created in the data source plugin. Consequently, I created src/templates/Product.vue with a <page-query> section like this:
    query Product ($path: String!) {
      product(path: $path) {
        id,
        title,
        path,
        price,
        content,
        picture {
          thumbnails {
             large{
              url
            }
          }
        }
      }
    }
The new thing here is the $path variable that gets injected in the query by Gridsome to fetch the specific product’s data which will get available inside our component and template through the $page.product variable.
5. Integrating a shopping cart
If you’ve gone through this demo, you might want to know how it can be easily transformed into a functioning online store. For this last step, we’ll throw Snipcart into the mix.
To modify the <head> of your pages, Gridsome leverages vue-meta. There we can add Snipcart’s required files using src/main.js:
    export default function (Vue, { head, router, isServer }) {
      head.link.push({
        rel: 'stylesheet',
        href: 'https://cdn.snipcart.com/themes/2.0/base/snipcart.min.css'
      });

      head.script.push({
        type: 'text/javascript',
        src: 'https://ajax.googleapis.com/ajax/libs/jquery/2.2.2/jquery.min.js',
        body: true,
      });

      head.script.push({
        type: 'text/javascript',
        src: 'https://cdn.snipcart.com/scripts/2.0/snipcart.js',
        body: true,

        // snipcart scripts' attributes
        id: 'snipcart',
        'data-api-key': 'MzMxN2Y0ODMtOWNhMy00YzUzLWFiNTYtZjMwZTRkZDcxYzM4',
      });
    }
And then you can create a component for the buy buttons that you’ll use to sell your products in src/components/BuyButton.vue.
It has a product prop to receive a product node and define Snipcart’s product attributes:
<template>
<button class="snipcart-add-item"
:data-item-id="product.id"
:data-item-name="product.title"
:data-item-image="image"
:data-item-price="product.price"
:data-item-url="product.path">
<slot>
Buy for {{ product.price }}$
</slot>
</button>
</template>
<script>
export default {
name: 'ProductPreview',
props: ['product'],
data() {
return {
image: this.product.picture.length ?
this.product.picture[0].filename: null,
};
}
};
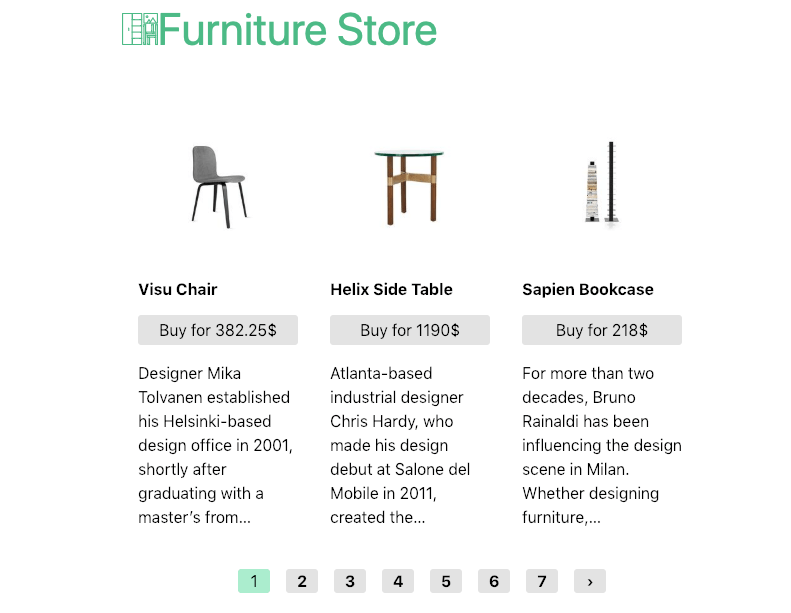
</script>Aaand that’s it! You now have a small Vue.js & GraphQL-powered online store. It should closely look like what I’ve got below.
Live demo & GitHub repo

See the live demo here
See the GitHub repo here
Closing thoughts
You can already see in the demo that I’ve added pagination to the product listing. A nice thing to add would be product categories. The data is already available in Airtable’s demo base. It would make for a fun challenge to add a new type to GraphQL with a reference between products and categories.
Feel free to push it further and send me feedback in the comments below!
Having already played with Gatsby a few times in the past, Gridsome felt particularly familiar. I mean this in a good way because both are great SSGs. I won’t lie to you, using Vue.js is the thing that would pull the balance on the side of Gridsome if I had to choose between the two.
I spent around two days learning the tools and building this demo. My previous Gatsby and Vue.js experience should have helped make it faster but, I have to admit, GraphQL it its own beast to tame. I would recommend reading a few resources before diving into it.
Still, I’m happy to have played with it and I’m eager to have more opportunities to use it!
If you've enjoyed this post, please take a second to share it on Twitter. Got comments, questions? Hit the section below!


