Using Snipcart to Manage Your Event Tickets Sale
I can't be the only one overwhelmed by the number of events popping up on my Facebook feed every day.
Shows, conferences, sporting events, charity dinners, meetups... name it!
Over is the time of long waiting lines in front of ticket booths to hopefully get our hands on these precious event tickets.
Today, event organizers are looking for the easiest way to sell event tickets online.
Here, at Snipcart, we often get these questions from users:
Is it possible to sell event tickets on my website with Snipcart?
Can I send ticket buyers unique bar or QR codes along with the invoice?
How can you guys be so awesome?
I'm glad to answer a big YES to the first two. As for the third one, I'll show you how right now with this in-depth answer to these event tickets inquiries.
In this post, I'll craft a demo of all of the following use cases for building a ticketing service with Snipcart:
Crafting an event landing page.
Integrating Snipcart to sell event tickets.
Customizing email template.
Generating QR codes for ticket tracking.
Scanning tickets at the event.
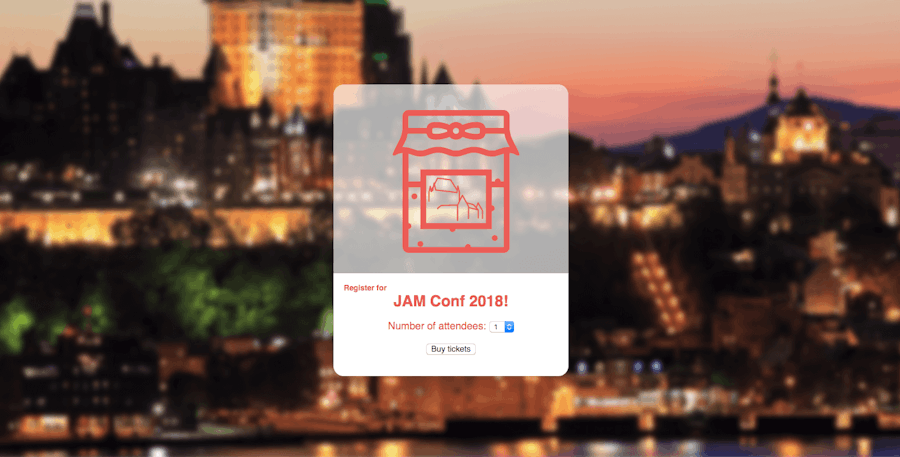
To do so, we'll create our own fictional event to bring together the JAMstack & static web community of our hometown of Quebec City. (I know it sounds exciting, but keep in mind that we'll be selling fake tickets here).
Why sell tickets with Snipcart vs. other services?
First, let's start by stating that we're all about using the right tool for the right job. With that in mind, I wouldn't suggest using Snipcart to sell the tickets for the next Kanye West concert at Madison Square Garden.
For huge events such as these, the Ticketmaster and Eventbrite of this world are perfectly fine solutions.


But for small to midsize events, Snipcart is a very viable option.
Mostly if you want to sell directly from your website.
Contrary to most third-party services, Snipcart offers the flexibility to seamlessly sell tickets from your website.
What I mean by that is that these other services' integrations mostly consist of widgets, iframes or even simple redirects on their website.
All things that can strongly affect the user experience on your website.
Snipcart, on the other hand, gives you the freedom to sell your event tickets without messing with your site's UX. Your visitors won't be redirected to another page, the complete checkout can be done without ever leaving your website.
Our templating system also allows users to send tracking QR codes to ticket buyers along with their invoices. This way, we accompany organizers from the planning to the end of their event.
Our solution asks for a few programming skills, but for developers like us, it turns out to be a cool playing field. ;)
Let's see how to get this done.
Sell event tickets on my website with Snipcart
I started by crafting a landing page for our conference and customized our invoice template to display QR codes for each purchased ticket.
1. Creating a landing page with a Snipcart integration
For the landing page I worked with simple HTML—plain old HTML without any generator, hosted with Github pages.
I'll allow our customers to select the number of tickets before they click the buy button. But I want them to fill details about each attendee on their tickets.
I've first used simple jQuery to dynamically update data-item-quantity attribute on the buy button:
$(function() {
    var btn = $('#buy-button');
    $('#qnt').change(function() {
        btn.attr('data-item-quantity', this.value);
    })
});
To make sure every ticket appear as a single row in the cart, I've used our Javascript API and events to multiply each item:
document.addEventListener('snipcart.ready', function() {
    Snipcart.subscribe('item.adding', function(ev, item) {
        if(item.id == 'jam-conf-qc') {
            ev.preventDefault();

            var quantity = item.quantity;
            item.quantity = 1;

            Snipcart.api.configure('show_cart_automatically', false);

            Snipcart.api.items.add((new Array(quantity)).fill({
                id: item.id,
                name: item.name,
                price: item.price,
                url: item.url,
                customFields: item.customFields,
                stackable: false,
                shippable: item.shippable,
            })).then(function(){
                Snipcart.api.configure('show_cart_automatically', true);
                Snipcart.api.modal.show();
            });
        }
    })
});
There are two things to notice here:
When a ticket is being added to the cart, I cancel that operation and use
Snipcart.api.items.addto add an array of how many tickets were being added.The code is adjusted to prevent the cart from re-rendering itself between each ticket. To do so, disable
show_cart_automaticallyand enable it again when the Promise returned from Snipcart's Javascript API is complete.
So now when you select multiple tickets to add to your cart, the cart shows only once with rows to fill every attendee's details.

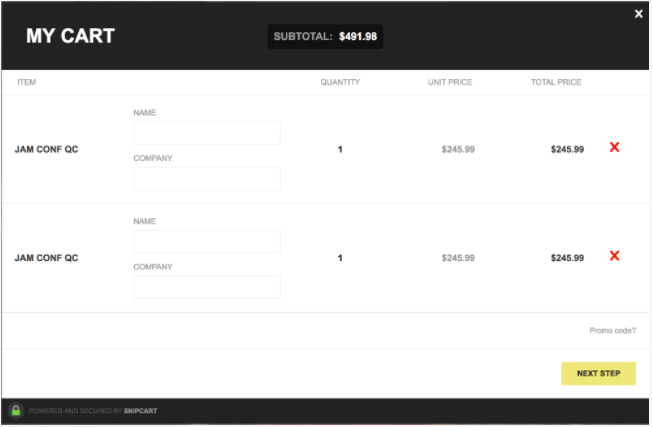
As you can see, the usual plus/minus buttons beside Quantity aren't there. That's made possible by using data-item-stackable="false" on the product definition or in this case stackable: false from the Javascript API.
2. Customizing email template
The fun part starts with showing proper tickets to our customers.
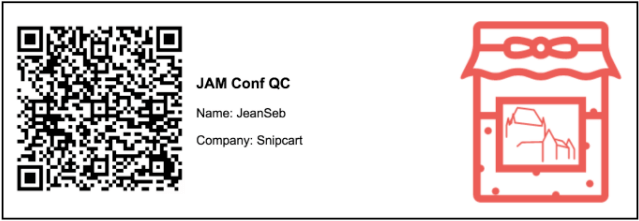
For that, I've added a section to the Invoice email template. It'll iterate over each item in the cart and display an image that will be dynamically generated by my QR code generation script.
{{ #each order.items }}
    {{ #if_eq this.id 'jam-conf-qc' }}
<table style="border: 2px solid black; width: 100%; table-layout: fixed; margin-top: 10px;">
    <tr>
        <td style="width: 30%">
            <img style="width: 100%;"
                 src="https://snipcart-qr-dotnet.azurewebsites.net/api/{{ ../../order.token }}/{{ this.uniqueId }}" alt="qr" />
        </td>
        <td style="width: 40%">
            <h3>{{ this.name }}</h3>
            {{ #each this.customFields }}
            <p>{{ this.name }}: {{ this.value }}</p>
            {{ /each }}
        </td>
        <td style="width: 30%">
            <img style="width: 100%;"
                 src="https://snipcart.github.io/event-tickets/logo.png" alt="logo" />
        </td>
    </tr>
</table>
    {{ /if_eq }}
{{ /each }}
If you look at the first img tag, its source URL receives the order's token and the cart item's unique ID. That's all the information my script needs to create a unique QR code.
You could add more styling, but this already looks like a proper ticket:

3. Generating the QR code
I used an Azure function to easily host my QR code generation script.
It uses our REST API to retrieve the details of specific tickets to embed it into the QR Code's image.
Know that you could actually use any other tech you're familiar with that as a QR code generation library.
Here's my full C# script. It uses QRCoder and Azure Functions:
using System;
using System.Collections.Generic;
using System.IO;
using System.Net.Http;
using System.Net.Http.Headers;
using System.Threading.Tasks;
using System.Drawing;
using Microsoft.AspNetCore.Mvc;
using Microsoft.Azure.WebJobs;
using Microsoft.Azure.WebJobs.Extensions.Http;
using Microsoft.AspNetCore.Http;
using Microsoft.Extensions.Logging;
using Newtonsoft.Json;
using QRCoder;

namespace Snipcart.EventTickets
{
    public static class QrCodeFromOrder
    {
        private static readonly HttpClient _httpClient;
        private static readonly QRCodeGenerator _qrCodeGenerator;
        private static readonly JsonSerializerSettings _jsonSerializerSettings;

        static QrCodeFromOrder()
        {
            _httpClient = new HttpClient
            {
                BaseAddress = new Uri("https://app.snipcart.com/")
            };
            var basicAuthHeader = Convert.ToBase64String(System.Text.ASCIIEncoding.ASCII.GetBytes(System.Environment.GetEnvironmentVariable("SNIPCART_API_KEY")  + ":"));

            _httpClient.DefaultRequestHeaders.Authorization = new AuthenticationHeaderValue("Basic", basicAuthHeader);
            _httpClient.DefaultRequestHeaders.Accept.Add(new MediaTypeWithQualityHeaderValue("application/json"));

            _qrCodeGenerator = new QRCodeGenerator();

            _jsonSerializerSettings = new JsonSerializerSettings
            {
                NullValueHandling = NullValueHandling.Ignore
            };
        }

        [FunctionName("QrCodeFromOrder")]
        public static async Task<IActionResult> Run(
            [HttpTrigger(AuthorizationLevel.Anonymous, "get", Route = "{order:guid?}/{item:guid?}")] HttpRequest req, Guid? order, Guid? item,
            ILogger log)
        {
            if (!order.HasValue || !item.HasValue)
            {
                var qrCodeData = new QRCode(_qrCodeGenerator.CreateQrCode("https://snipcart.com/", QRCodeGenerator.ECCLevel.Q));
                var pngByteData = qrCodeData.GetGraphic(6, System.Drawing.Color.Black, System.Drawing.Color.White, true);

                return new FileContentResult(ImageToByteArray(pngByteData), "image/jpeg");
            }

            var body = await GetApi($"/orders/{order}");
            if (body == null)
            {
                return (ActionResult)new NotFoundResult();
            }

            dynamic jsonBody = JsonConvert.DeserializeObject(body);

            foreach (var itemObject in jsonBody.items)
            {
                if (itemObject.id == "jam-conf-qc" && itemObject.uniqueId == item)
                {
                    var qrCodeData = new QRCode(_qrCodeGenerator.CreateQrCode(
                        DataForItem(itemObject, jsonBody),
                        QRCodeGenerator.ECCLevel.Q));
                    var pngByteData = qrCodeData.GetGraphic(6, System.Drawing.Color.Black, System.Drawing.Color.White, true);

                return (ActionResult)new FileContentResult(ImageToByteArray(pngByteData), "image/jpeg");
                }
            }

            return (ActionResult)new NotFoundResult();
        }

        private static byte[] ImageToByteArray(Image img)
        {
            using (var stream = new MemoryStream())
            {
                img.Save(stream, System.Drawing.Imaging.ImageFormat.Png);
                return stream.ToArray();
            }
        }

        private static async Task<string> GetApi(string path)
        {
            var response = await _httpClient.GetAsync("api" + path);
            response.EnsureSuccessStatusCode();

            return await response.Content.ReadAsStringAsync();
        }

        private static string DataForItem(dynamic item, dynamic order)
        {
            var data = new Dictionary<string, object>();

            data.Add("event_id", item.id);
            data.Add("guid", item.uniqueId);
            data.Add("order_id", order.token);

            foreach (var field in item.customFields)
            {
                data.Add(field.name.ToString(), field.value);
            }

            if (order.creditCardLast4Digits != null)
            {
                data.Add("card", order.creditCardLast4Digits);
            }

            return JsonConvert.SerializeObject(data, _jsonSerializerSettings);
        }
    }
}
The interesting parts are:
The
getApifunction which makes GET requests to the provided path on Snipcart's Rest API. It contains a reference toSNIPCART_API_KEYwhich is a Snipcart private API Key stored in the function's configurations.The
dataForItemfunction prepares the JSON data that I store in the QR code. I chose to store the order token, item id and customer' last four digits of its credit card.The route for
/:order/:itemfetches the corresponding order with Snipcart's REST API and selects the matching item from the result.Finally a simple creationg of a QR code with
QRCoder. The result is returned as a ByteArray.
When visiting the endpoint's URL with an order token and cart's item ID, you can see a QR code similar to the one on my ticket.
4. Scanning tickets at the door
At that point, I could use a standard QR code scanning app to verify the tickets at the entrance of my event. That would give a chunk of JSON for each scan.
But you would probably prefer to use something specifically for your use case or something built on Javascript, right? ;)
I thought about playing with Navigator.getUserMedia() to use the Webcam from Javascript and to do fancy image processing. It turns out all of that is already implemented by Instascan.
I merely had to change their demo to parse my event's data and my ticket scanner was ready.
Demo & GitHut repo

See our demo's landing page here
See scanner app here
See GitHub repo here
If you complete your purchase (no worries—it uses Snipcart's test card, it's on us) you'll see tickets with their QR codes in your mailbox!
Closing thoughts
It was a cool demo to put together and I know it'll please a lot of our users. It's always cool to mix awesome techs to build simple projects. I mean, I've got our Javascript API, email templating, QR codes, webcam and even asm.js—used under the hood by Instascan, all working together to make this work!
I had a proof of concept of every separate bit under a few hours and then took my time to polish all parts to fit together. By following these steps you should get through it pretty quickly.
I could have pushed this even further. A simple adding would be using our inventory management feature to make sure I don't overbook my event.
If I was really serious about organizing a conference about the JAMstack, I would use Snipcart's REST API to create a CSV of the sold tickets that I would import into Conference Badge to provide awesome name badges for the attendees.
Any other questions about event tickets selling with Snipcart? Or maybe you've got any other ways to do so that you would like to share? Hit the comment section!
If you've enjoyed this post, please take a second to share it on Twitter.


