Grav as Headless CMS Tied to Gatsby with GraphQL Schema
In a rush? Skip to tutorial steps for Grav as headless CMS, Gatsby with GraphQL or live demo.
Last year has been a very exciting year for devs like us.
A whole lot of promising up-and-coming technologies have made their place in the spotlight.
Maybe even so much that it's hard to keep up.
To stay sane I guess we all have our favorites to focus on.
If you've been following this blog, you already know we're big fans of everything related to the JAMstack, headless CMSs & static site generators.
So let's keep moving this way and pushing new boundaries with some of the great tools we've explored in the last few months.
In this post I'll show you how to:
Set up Grav CMS as a headless CMS.
Install React-powered static site generator Gatsby.
Create a source plugin to query the API with GraphQL.
The result? A small demo shop powered by Snipcart.
Sounds heavy?
Bear with me, it's gonna be fun.
Let's start by quickly introducing these tools.
Looking for alternative tools to build your headless stack? Visit our developer's guide to headless e-commerce!
What is Grav CMS?
Simply put, Grav is a modern open-source flat-file CMS. It actually won the CMS Critic award for "Best open source CMS" in 2016.


In this case, we'll use it solely for content management, decoupling the backend from the frontend, or, as we like to call it, as a headless CMS.
Why bother doing so you may ask?
Mainly because it's a great way to mix the backend capacities of the CMS with some of the amazing frontend JS frameworks out there (React in our case).
For more info, we've already covered all the benefits of working with headless CMS in another blog post.
We wanted to try Grav this time because of its nice and extensible admin panel which makes it a great choice to manage a simple website.
It's also a very easy to install, easy to learn flat file CMS that is a great alternative to heavier systems like WordPress or Drupal.
React static site with Gatsby.. and GraphQL
After we've got our decoupled CMS running, I'll go on strapping the static site generator Gatsby on top of it.
Gatsby is the most popular static site generator powered by React. We've already played with it for e-commerce & serverless functions, but this time we'll try to push it even further.
Mostly because I think it's awesome and deserving of the exploration.

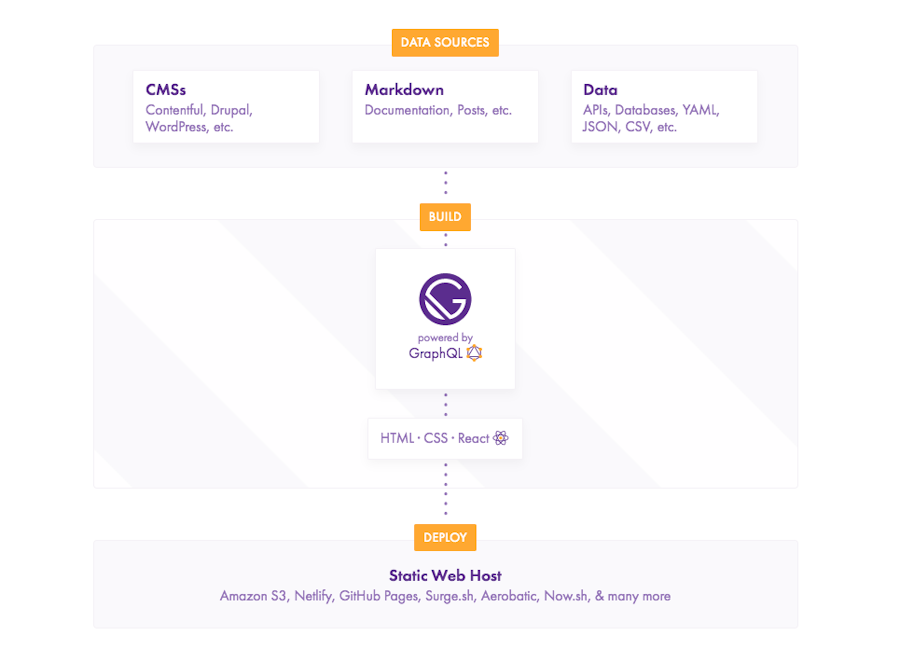
Here I want to use one of Gatsby's great features which allows us to bring our own data from databases, SaaS services, APIs and, as in our current case, headless CMSs.
This data is pushed directly into our pages using GraphQL.
In our first blog post on this new technology we stated that GraphQL is probably more than just a trendy tool and that it's here to stay.
It really seems to be the case as it's probably going to get even bigger in 2018.
It's nice to see it getting implemented with great tools such as Gatsby and I'm really pumped to give it another try today.
Okay, this is gonna be a long one, so without further ado, let's get to work!
Grav as headless CMS tutorial
Grav installation
Grav is very easy to install. I used composer to do so. Simply open a terminal and type this command:
composer create-project getgrav/grav snipcart-grav-headlessThen, we want to start a web server, I chose to go with the built-in PHP development web server. Note that I am on Windows.
cd snipcart-grav-headless
php -S localhost:8000 .\system\router.php
This will start a web server on your machine with Grav running. You can open http://localhost:8000 in a browser and you should see it in action.
Grav CMS as headless setup
We now have a working Grav instance. The first thing we'll do is to add their awesome admin panel.
We'll install it via their own package manager.
php .\bin\gpm install adminOnce the installation is completed, open your browser to http://localhost:8000/admin. You will have a small form to fill to create your initial user, then you'll be logged in.
We'll also add another plugin, this plugin will be responsible to serve the content we'll add in Grav in JSON. We'll then be able to use this data in our Gatsby application, later in the tutorial.
To be honest, I don't think Grav CMS is widely used this way yet. I've got a hard time finding a plugin that does the job and that had a bit of documentation.
I started by looking at feed from the Grav team, but, it wasn't exporting all the data I needed. This plugin is really intended to generate a feed file for RSS readers and things like that.
The one I took is page-as-data. Although it does not seem to be maintained anymore, it does the trick. It generates a JSON file containing everything I need to use Grav as a headless CMS.
Defining products in Grav
The last step will be to define our product blueprint. A blueprint in Grav allows you to define the structure of the content. In our case, we'll create one that will define what is a product with Snipcart required options.
For this step, I prefer to open the folder in my beloved VS Code (or any other editor) and edit it manually. You'll need to go to your themes folder. In my case, I kept the default one as I won't really use Grav to display anything.
So I had to create the file in: /users/themes/antimatter/blueprints.
# /user/themes/antimatter/blueprints/product.yaml

title: Product
form:
  fields:
    tabs:
      type: tabs
      active: 1
      fields:
        product_information:
          type: tab
          title: 'Product information'
          fields:
            header.name:
              type: text
              autofocus: true
              style: vertical
              label: 'Name'
            header.image:
              name: image
              type: file
              autofocus: false
              destination: 'assets/uploads'
              style: vertical
              label: 'Image'
              multiple: false
              accept:
                - image/*
            header.id:
              type: text
              style: vertical
              label: 'ID or SKU'
            header.price:
              type: text
              autofocus: true
              style: vertical
              label: 'Price'
            header.description:
              type: textarea
              style: vertical
              label: 'Description'
This new blueprint will give us a new "content type" in Grav CMS, with some default fields that will keep product information within Grav.
Adding content in Grav
We now have everything needed to make Grav work as we expect. We'll add some content.
We'll start by creating a new page which is going to be the parent of each product we'll add.
Log into the Grav admin panel, the URL should be: http://localhost:8000/admin.
Go to the Pages section, and click on the Add button in the top right corner and create a new page:


We can keep the default Page template. As we won't use Grav to render the content it doesn't really matter. However, we'll need to instruct the page about its content.
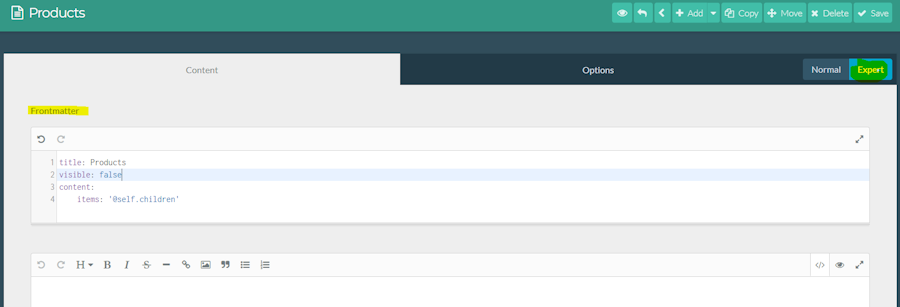
Open the page in Expert mode to get access to the frontmatter and paste this:
title: Products
visible: false
content:
    items: '@self.children'
Once the page is created and configured, we'll define the products.
Click on the Add button again:

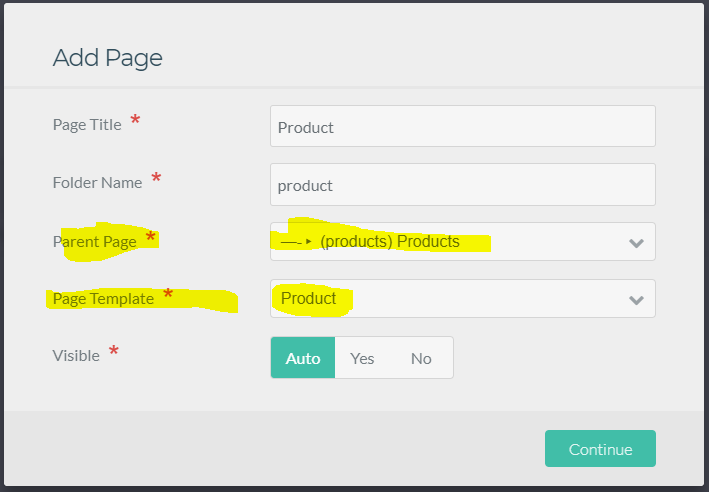
Make sure to select the correct parent page and template.
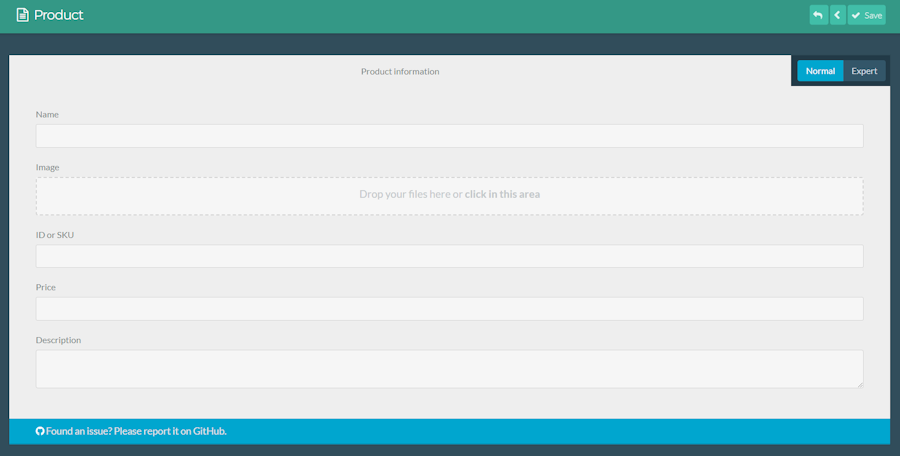
Once the page is generated, you'll get a form, which uses the fields we defined in our blueprint earlier in the post.
You can set the product attributes there and hit the Save button. Make sure you are in Normal mode, not Expert.

Now that we have come content, we can open this URL in the browser: http://localhost:8000/products?return-as=json.
The page-as-data plugin will catch this request and return a JSON object containing our data. This is exactly what we're going to use as the data source in our Gatsby project.
Gatsby setup using GraphQL schema
Installing Gatsby
Our first move is to install Gatsby. Their documentation is well done and you should refer to it if you want more information.
Make sure you have the classic NodeJS stack installed and have access to npm and then open a command line.
We'll install the gatsby-cli package, this package will expose a couple of commands related to Gatsby.
npm install --global gatsby-cliThen, we'll scaffold our new project:
gatsby new gatsby-siteThis will clone the necessary files and install the default starter.
Creating a source plugin to query our API
In order to get access to our data in Gatsby, we'll need to craft a source plugin. The plugin allows to "source" data into nodes, a concept built into Gatsby. These nodes will generate a GraphQL schema that will be able to query in our components.
I have to say, this is a very nice approach. I love the fact that I can use GraphQL in Gatsby in such a fun and simple way.
Start by creating a pluginsfolder at the root of your workspace. You could also work with a standalone NPM package if you'd prefer, but I decided to use the simplest way for this example.
My tree looks like this (note that I ran npm init in the folder to create the package.json file):
plugins
    └───grav-headless-plugin
        │   gatsby-node.js
        └───package.json
You can consider gatsby-node.js as the index.js of the package. This is where the plugin code will start.
Our plugin will basically make an HTTP call to our /products endpoint we've built with Grav. Then, it will use the response payload and constructs the nodes that will be used by Gatsby to generate our GraphQL schema.
We're going to use two packages for this. The first one being axios, a very well known HTTP client in the Node community.
Then, gatsby-node-helpers which will be very useful to generate nodes. A node in Gatsby contains, amongst other things, some internal data that must be hashed. Using the helpers will save us a lot of code.
npm install --save axios gatsby-node-helpersOur Gatsby plugin must export a function named: sourceNodes, this function will call our API and create nodes.
Add a file named gatsby-node.js in your project if you did not already, and add this code in it:
const axios = require('axios').default
const createNodeHelpers  = require('gatsby-node-helpers').default
const slug = require('slug')

exports.sourceNodes = async ({boundActionCreators}) => {
    const {createNode} = boundActionCreators
    const data = await fetchProducts()

    data.forEach(x => {
        createNode(x)
    })

    return
}

fetchProducts = async () => {
    const {
        createNodeFactory,
        generateNodeId,
        generateTypeName
    } = createNodeHelpers({
        typePrefix: `Snipcart`
    })

    const ProductNode = createNodeFactory('Product', node => {
        return node
    })

    try
    {
        // This is where we call Grav API.
        const response = await axios.get('http://localhost:8000/products', {
            params: {
                "return-as": "json"
            }
        })

        return response.data.children
            .map(x => x.header)
            .map(x => Object.assign(x, {
                userDefinedId: x.id,
                path: `/products/${slug(x.name)}-${slug(x.id)}`.toLowerCase()
            }))
            .map(ProductNode)
    }
    catch (error) {
        console.log(error)
        throw e
    }
}
I think the code is quite straightforward and simple so I won't explain it step by step.
Once it's done, we'll have to let Gatsby know about our plugin.
Open gatsby-config.js file. This file should be in your workspace root. In the plugins array, add 'grav-headless-plugin'.
My config file looks like this:
module.exports = {
  siteMetadata: {
    title: 'Gatsby Default Starter',
  },
  plugins: ['gatsby-plugin-react-helmet', 'grav-headless-plugin'],
};
You can then launch your Gatsby development server:
gatsby develop --port 8001Gatsby comes with a pre-configured GraphiQL.
It's a very clean GraphQL client that enables you to execute queries directly in your browser. Navigate to http://localhost:8001/___graphql in your browser.
You can then run this query:
{
    allSnipcartProduct {
        edges {
            node {
                path,
                userDefinedId,
                name,
                image,
                price,
                description
            }
        }
    }
}
This will return a JSON object:
{
  "data": {
    "allSnipcartProduct": {
      "edges": [
        {
          "node": {
            "path": "/products/hat-hat",
            "userDefinedId": "HAT",
            "name": "Hat",
            "image": "http://localhost:8000/assets/uploads/hat.png",
            "price": "50",
            "description": "Classic sombrero style. No Day of the Dead costume would be complete without an epic hat such as this one."
          }
        },
        {
          "node": {
            "path": "/products/mask-mask",
            "userDefinedId": "MASK",
            "name": "Mask",
            "image": "http://localhost:8000/assets/uploads/mask.png",
            "price": "25",
            "description": "Too lazy or not skilled enough for makeup? This mask is your easy way out. Caution: Be careful when crossing the street. "
          }
        },
        {
          "node": {
            "path": "/products/skull-skull",
            "userDefinedId": "SKULL",
            "name": "Skull",
            "image": "http://localhost:8000/assets/uploads/skull.png",
            "price": "15",
            "description": "Put them all around the house to traumatize the kids for life. FYI: Not a real skull."
          }
        }
      ]
    }
  }
}
This data comes from Grav and is now available on your Gatsby site!
Awesome isn't it?
Generating the site
I don't know if it's because of the Pixar movie Coco being nominated for an Oscar, or the fact that one of our team member is currently on vacation in Mexico, but I feel like building a Día de Muertos theme shop. Let's see how it goes.
The first thing we'll do is to add Snipcart dependencies.
To do so you'll need a Snipcart account (forever free in test mode).
Open layouts/index.js file and add these lines in the <Helmet> component:
<Helmet
      title="Gatsby Default Starter"
      meta={[
        { name: 'description', content: 'Sample' },
        { name: 'keywords', content: 'sample, something' },
      ]}>
      <script src="https://ajax.googleapis.com/ajax/libs/jquery/2.2.2/jquery.min.js"></script>
      <script src="https://cdn.snipcart.com/scripts/2.0/snipcart.js" id="snipcart" data-api-key="YOUR_API_KEY"></script>
      <link href="https://cdn.snipcart.com/themes/2.0/base/snipcart.min.css" type="text/css" rel="stylesheet" />
    </Helmet>
This will add required files to your site and Snipcart will work when we'll need it. :)
As we want to create a static site, we'll need to make a page per product. Luckily, Gatsby has it covered and exposes some methods we can use to do so.
Basically, we'll query all of our products via GraphQL, then we'll generate a page dynamically for each product using a generic component.
To do so, open gatsby-node.js file at the root of your workspace (not the one from the plugin we made). This is where we'll generate the pages.
We want to run this GraphQL query and create a page for each result:
{
    allSnipcartProduct {
        edges {
            node {
                path,
                userDefinedId,
                name
            }
        }
    }
}
In the gatsby-node.js file, we can export a function that will create these dynamic pages. The function is named createPages.
exports.createPages = async ({graphql, boundActionCreators}) => {
}
Copy the two lines above. Notice that we inject graphql that will be used to query our datastore and boundActionCreators that will be used to build the page.
We'll first get our products:
let result = await graphql(`
        {
            allSnipcartProduct {
                edges {
                    node {
                        path,
                        userDefinedId,
                        name
                    }
                }
            }
        }
    `)
With these results, we'll create the pages automatically. For this, we'll need to require two dependencies, path which comes with Node and slash to deal with Windows file system correctly.
You'll have to install this one via npm.
npm install slash --save-devInclude these two dependencies in the top of your file:
const slash = require('slash')
const path = require('path')
Now we'll use the createPage method available in boundActionCreators to generate the pages:
const { createPage } = boundActionCreators
const productTemplate = path.resolve('src/components/product.js')

result.data.allSnipcartProduct
    .edges
    .map(x => x.node)
    .forEach(node => {
        createPage({
            path: node.path,
            component: slash(productTemplate),
            context: {
                id: node.userDefinedId
            }
        })
    })
As you can see, we get all the products, then for each of them we create a page. We pass the product ID to the context, which will be available in the Product component data.
My whole gatsby-node.js file looks like this:
const slash = require('slash')
const path = require('path')

exports.createPages = async ({graphql, boundActionCreators}) => {
    let result = await graphql(`
        {
            allSnipcartProduct {
                edges {
                    node {
                        path,
                        userDefinedId,
                        name
                    }
                }
            }
        }
    `)

    const { createPage } = boundActionCreators
    const productTemplate = path.resolve('src/components/product.js')

    result.data.allSnipcartProduct
        .edges
        .map(x => x.node)
        .forEach(node => {
            createPage({
                path: node.path,
                component: slash(productTemplate),
                context: {
                    id: node.userDefinedId
                }
            })
        })
}
Speaking of Product component, this is what we'll do next. This component will be used to render each product page.
Create a file named product.js in your src/components folder.
This file will contain the Snipcart buy button and general information about the product. I won't dig too much into React and styling things, but here's my component code:
import React from 'react'
import Link from 'gatsby-link'
import styles from './product.module.css'

export default ({data, location}) => (
    <div>
        <h1>{data.snipcartProduct.name}</h1>
        <div className={styles.breadcrumb}>
            <Link to='/products'>Back to the products</Link>
        </div>

        <section>
            <figure className={styles.productFigure}>
                <img src={data.snipcartProduct.image} />
            </figure>

            <article>
                {data.snipcartProduct.description}
            </article>
            <div className={styles.actions}>
                <button type="button" className={`${styles.buyButton} snipcart-add-item`}
                    data-item-name={data.snipcartProduct.name}
                    data-item-id={data.snipcartProduct.userDefinedId}
                    data-item-image={data.snipcartProduct.image}
                    data-item-url={location.pathname}
                    data-item-price={data.snipcartProduct.price}>
                    Buy it now for {data.snipcartProduct.price}$
                </button>
            </div>
        </section>
    </div>
)

export const query = graphql`
query ProductById($id: String!) {
    snipcartProduct(userDefinedId: {eq:$id}) {
        userDefinedId,
        description,
        image,
        name,
        price
    }
}
`
Note that we use GraphQL there too to fetch the product by its ID. The id value comes from the value we set in the context while we were in gatsby-node.js file.
I used CSS modules to manage my components CSS. I suggest you read this excellent tutorial on the matter.
We also imported the Link component. You'll want to use it to add link between pages generated by Gatsby.
Once your site is loaded, React router will take care of the routing and it will create a very fluid experience. No full reloads, only speed!
If you hit this page (make sure that you have your Gatsby dev server running with gatsby develop): http://localhost:8001/products/hat-hat you should see an awesome product page.

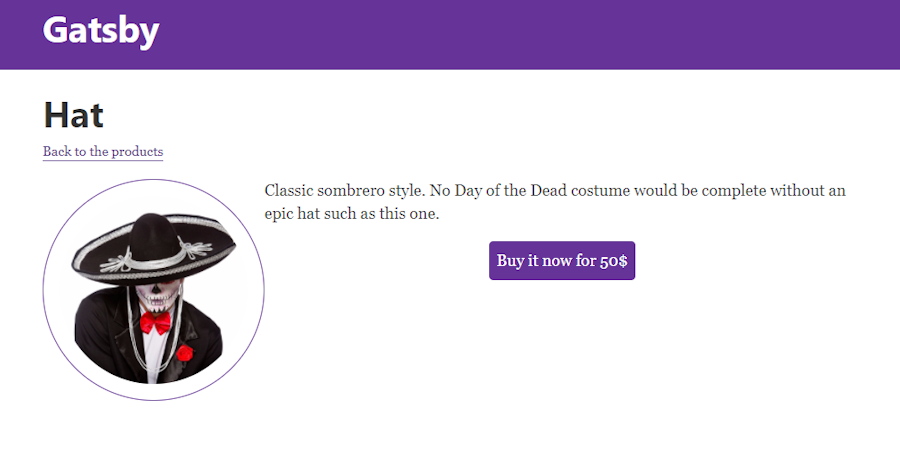
Notice the Back to products link? This is intended to redirect to our products page that does not exist yet.
Let's craft a page for it, in the pages folder, create a new file named products.js:
import React from 'react'
import Link from 'gatsby-link'
import styles from './products.module.css'
export default ({data}) => (
<div>
<h1>Products</h1>
<ul className={styles.itemsList}>
{data.allSnipcartProduct.edges.map((o, index) =>
<li key={index} className={styles.item}>
<Link to={o.node.path}>
<figure>
<img className={styles.image} src={o.node.image} alt={o.node.name}></img>
<figcaption className={styles.figCaption}>Buy the {o.node.name} now</figcaption>
</figure>
</Link>
</li>
)}
</ul>
</div>
)
export const query = graphql`
query snipcartProducts {
allSnipcartProduct {
edges {
node {
path,
userDefinedId,
name,
image,
price,
description
}
}
}
}
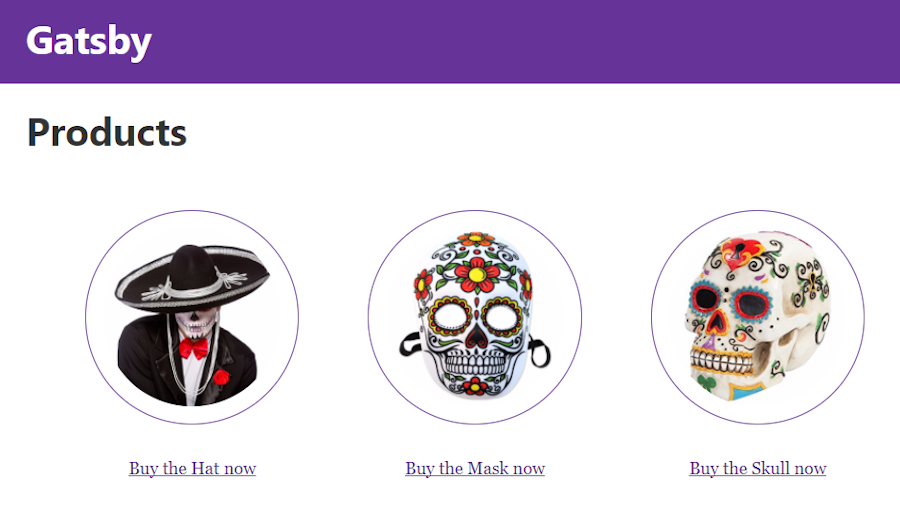
`As we did earlier, we again use GraphQL to query our products. Products will then be available in component data object and we'll be able to render each of the products.
If you go to http://localhost:8001/products you should now have an awesome product listing page. :)
Live demo & GitHub repo

Closing thoughts
I had a blast doing this tutorial!
I enjoyed the simplicity of Grav, it took me only a couple of minutes to get it running. The hardest part was to find the plugins I was going to use it as a headless CMS and to be honest, the plugin I used in the demo is kind of limited.
I think Grav might be a good solution for a very basic scenario, but is not as advanced as other options we looked at in previous posts such as Directus or GraphCMS.
That being said, I'm well aware that it is not the way most people use Grav. ;)
For the frontend part with Gatsby, it's been a real delight to use once again. This really is an awesome piece of software. The documentation is on point and it's very well executed.
The GraphQL implementation makes the whole experience even more special.
I haven't touched to React a lot, only with a few tutorials a while ago. Still, Gatsby was easy to learn and made me want to dig deeper into React.
If you've enjoyed this post, please take a second to share it on Twitter. Got comments, questions? Hit the section below!


