How to Use WordPress with React to Build a Modern Web App
In a rush? Skip to tutorial steps or live demo
When we first wrote about using WordPress as a headless CMS and the WP REST API back in 2017, it was a very big deal for us, JAMstack aficionados.
I mean, a concept like “headless CMS” was only beginning to make noise, and WordPress embracing it was a huge statement.
And it paid.
The web development landscape is ever-changing and the promises of modern frontend techs are materializing.


Every developer and their dog has something to say about WordPress, and it's not always flattering. Far from it. However, even its most avid detractors are forced to take notice of this feature, because it has already transformed the way we use the popular CMS.
WordPress REST API is a huge step forward for frontend developers looking to combine the power of JavaScript frameworks like React (or Vue.js) with WordPress.
This is exactly what I want to do today with this demo of the WordPress REST API in the work.
I'll use WordPress as a backend, and the REST API integration to feed data into a React app.
More precisely, you’ll learn how to:
Access the WP REST API from your frontend
Add a custom post type and expose it to the API
Build a React app backed by this API
Handle React Hooks (and create a custom one)
Before we start, let's see what is the REST API for WordPress and why you should care about it.
What is WordPress REST API?
WordPress itself doesn't need any introduction, but let's take a closer look at the recent WP REST API. Before we start sliding down the road of its evolution, let's get some definitions out of the way:
An API (Application Program Interface) is a set of protocols for building software applications. It defines the way information is shared between programs and structures the way different components of an application will interact with each other. A good API makes for easier program development by providing all the necessary pieces. You can learn more about APIs here.
REST (Representational State Transfer) is an architectural style defining constraints on the way programs are made. When this architecture is met by web services we called them RESTful APIs or, simply, REST APIs.
JSON (JavaScript Object Notation) is a format for structuring data so that a large number of applications can read it. It makes interactions between something like, say, WordPress, and any kind of app convenient.
Since WordPress 4.7, these concepts have been applied to create the WordPress JSON REST API. It allows for a decoupled approach, effectively separating data (back) from views (front).
What does it mean for users?
WordPress can now be used as a headless CMS.
This offers a whole new world of possibilities for developers, as the frontend of WordPress doesn't need to be "WordPress"—PHP-generated views. The ever-growing numbers of frontend frameworks can now be hooked up to a WordPress backend to develop websites and applications.

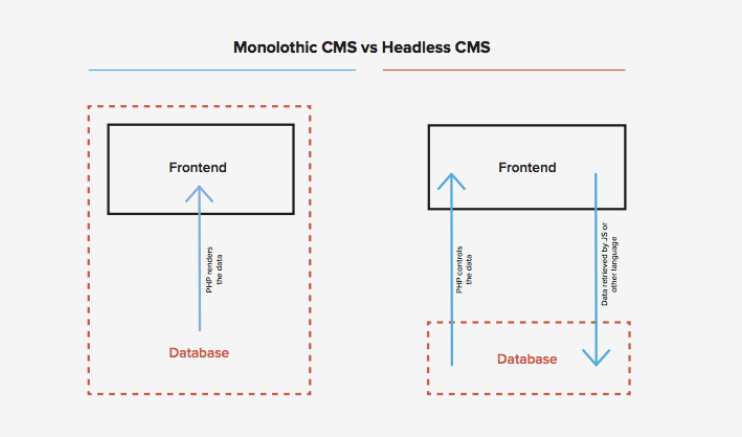
Monolothic CMS vs Headless CMS [source]
When it comes to WP REST API, benefits abound.
Don't only take my word for it, developers already using it are thrilled of this paradigm shift:
"I’ve been able to forget about some of the weaker aspects of WordPress and take advantage of some of its better features — such as revisions, a simple editing interface, and familiarity. I can then use any frontend framework to consume the REST API, and display the content in the form I choose, taking advantage of the great features of those JavaScript frameworks, without the hassle of WordPress theming."
Working alone on a small demo means that I still have to deal with it to get WordPress running. On a larger project with a bigger team though, frontend developers could work in the language of their choice (without ever touching PHP) even if all the data is managed with WordPress on the backend. JSON magic at work right here.
Looking for alternatives? We've listed a load of headless solutions that we've put to the test in other technical tutorials.
Easier applications & using React on a headless WordPress
What’s truly awesome is that we can end the long-running debate of traditional CMSs vs. modern web development tools like JS frameworks. We can now use the best aspects of both worlds and make them work together beautifully.
WordPress REST API makes it easier to connect to apps. A custom looking mobile or single-page app can now more easily than ever not only read WordPress data, but also create, edit and delete that data.
Many have started to use WordPress in "weird places", as in applications where it would have been a pain to work with a few years ago.
As for us? We chose React for this demo because, well, it’s React. When we wrote the first version of this post, we still had to justify this choice, but it has since gotten so popular that it simply is the use case that will reach the most devs out there.
Plus, it is more than ever one of the best frameworks out there: flexible & reusable component system, virtual DOM, efficient workflow with JSX, etc.
Oh, and added more recently: React Hooks, which I’ll use in the demo below.
Also, using WP REST API with a React frontend you can put together a full JAMstack, the which I'm always more than willing.
For another way to connect React to a Headless CMS, check out this tutorial about the static site generator Gatsby and GraphQL.
Enough talking; time to get practical.
WordPress & React Tutorial: JSON REST API example


In this little demo, I’m going to build an e-commerce store to sell online courses. I won’t go in much detail for the e-commerce part though. I want to focus on what’s essential for us here: generating a React app that’s tied to WordPress data thanks to the WP REST API.
If you’re curious about the shopping cart integration as well, feel free to visit the GitHub repo linked just after the tutorial.
Okay, let’s do this!
1. Querying WordPress data
First and foremost, you need to have a WordPress website running. I won’t go through the whole “installing WordPress” part as it’s a bit out of scope for what I want to focus on here.
So I’ll assume you’ve already got a WP installation working with your web server of choice or refer you to the WordPress documentation before going further.
Personally, I’ve sprung one up quickly using Docker Compose for local development and made some changes to wp-config.php to make the demo run on Heroku as well.
Feeling curious? See my wp-config.php and my docker-compose.yml in the demo’s repo.
Out of the box, you can already use WP REST API from your frontend by making a GET request to /wp-json/wp/v2/{post type}. For example, you can get all posts from /wp-json/wp/v2/posts.
From our frontend the requests would be made with the fetch API:
fetch('/wp-json/wp/v2/posts')
  .then(response => response.json())
  .then(posts => console.log(posts));
2. Querying WP REST API from React
To get started fast with React, run this command in a terminal:
npx create-react-app react-appNote that npx is provided with Node.js to run commands without installing them globally.
Then, add material-ui to the project ( cd react-app then npm install @material-ui/core ).
To query the posts data, add the following Posts component:
import React, { useEffect, useState } from 'react';
import Card from '@material-ui/core/Card';
import CardContent from '@material-ui/core/CardContent';
import Typography from '@material-ui/core/Typography';
import Grid from '@material-ui/core/Grid';

export default function Posts() {
    const [posts, setPosts] = useState([]);
    useEffect(() => {
        async function loadPosts() {
            const response = await fetch('/wp-json/wp/v2/posts');
            if(!response.ok) {
                // oups! something went wrong
                return;
            }

            const posts = await response.json();
            setPosts(posts);
        }

        loadPosts();
   }, [])
  return (
    <Grid container spacing={2}>
      {posts.map((post, index) => (
      <Grid item xs={4} key={index}>
        <Card>
           <CardContent>
                <Typography
                    color="textSecondary"
                    gutterBottom
                    dangerouslySetInnerHTML={{__html: post.title.rendered}} />
                <Typography
                    variant="body2"
                    component="p"
                    dangerouslySetInnerHTML={{__html: post.content.rendered}} />
            </CardContent>
        </Card>
      </Grid>
     ))}
    </Grid>
 );
}
You’ll notice I used useEffect and useState, two of React’s Hooks.
First, useState is used to declare the array of posts and provide a callback to update it.
Then useEffect allows running the fetch code when the component is mounted.
Finally, to render a list of posts, you can “map” over the posts array and return components for each one of them. However, there are a few quirks related to how useEffect works:
The callback cannot return a promise, so an async function cannot be passed directly to
useEffect.An empty array must be passed to
useEffectto make it run only once. This tells React that this effect doesn't depend on any value.
2.1 Creating a custom React Hook
To simplify this, you can create your own React Hook “useFetch” (in ./useFetch.js):
import { useEffect, useState } from 'react';

export default function useFetch(url) {
    const [data, setData] = useState(null);
    useEffect(() => {
        async function loadData() {
            const response = await fetch(url);
            if(!response.ok) {
                // oups! something went wrong
                return;
            }

            const posts = await response.json();
            setData(posts);
        }

        loadData();
    }, [url]);
    return data;
}
I extracted the previous Hooks into a function and told useEffect to run again when the fetched URL changes. This is essentially how you can create any custom React Hooks!
This one can be used like this:
export default function Posts() {
    const posts = useFetch('http://localhost/wp-json/wp/v2/posts');
  return (
    <Grid container spacing={2}>
      {posts && posts.map((post, index) => (
      <Grid item xs={4} key={index}>
        <!-- this code is unchanged -->
      </Grid>
      ))}
    </Grid>
  );
}
3. Adding custom post type to WP Rest API
Now that we have some basic React code to query WP’s REST API let’s add a new data type!
You can use many WP functions to register what's needed. All of which will go in a new PHP file in wp-content/plugins/my_plugin.php.
Starting with meta comments like this:
<?php
/**
 * @package Sample_Plugin
 * @version 1.0.0
 */
/*
Plugin Name: Sample Plugin
Plugin URI: http://example.com/
Description: The beginning of an awesome plugin
Author: Me
Version: 1.0.0
Author URI: http://example.com/
*/
For the sake of this demo, I decided to create a course type that would represent an online course from a learning platform.
I could never explain all available options while creating custom post types. To do so, you could dive into WP documentation or use a generator.
Whichever way you prefer, here’s a minimal version of my course type declaration, I’ll then explain the relevant parts:
function generate_course_type() {
    $labels = array(
        'name'                  => 'Courses',
        'singular_name'         => 'Course',
    );
    $args = array(
        'label'                 => 'Course',
        'labels'                => $labels,
        'supports'              => array( 'title', 'editor', 'custom-fields' ),
        'taxonomies'            => array( 'category', 'post_tag' ),
        'hierarchical'          => false,
        'public'                => true,
        'capability_type'       => 'page',
        'show_in_rest'          => true,
        'rest_base'             => 'courses',
    );
    register_post_type( 'course_type', $args );
}
add_action( 'init', 'generate_course_type', 0 );generate_course_typeis a function that will run when WP initialize, because it’s attached toinitthrough theadd_actioncall. Most customizations in WordPress get attached to actions like this.In that function, the custom type gets registered with
register_post_type. This is what defines how the type is handled in WP both for the admin and the REST API.The relevant parameters are
show_in_restto allow fetch the courses from the REST API andrest_basethat set the url path for courses to be/wp-json/wp/v2/courses
So now, the plugin can be activated in WP’s admin and then some courses can be added.
With the help of our useFetch Hook, getting the list of courses in a React component is simple:
export default function Courses() {
    const courses = useFetch('http://localhost/wp-json/wp/v2/courses');
  return (
    <List component="nav" aria-label="main mailbox folders">
        {courses && courses.map((course, index) => (
        <ListItem key={index}>
          <ListItemText primary={course.title.rendered} />
        </ListItem>
        ))}
    </List>
  );
}
4. Further customizations
I know that most use cases will be more complex than what we just did, but it sets the foundations for a WP & React powered web app. Plus, it helps us understand how the WP REST API works.
To spice things up a little, I made these courses buyable for signed-in users. So a price field must be exposed in the API. To do this, there are two approaches:
use post meta: the cleaner way would be to do it from the perspective a plugin, but it requires slightly more work to implement the meta box for editing these fields.
use custom fields: these can be added directly from the editor but we need to tweak to the REST API to expose them.
Here’s how to declare a post meta for the courses:
function generate_course_type() {
    // ... previous code from generate_course_type

    $meta_args = array(
        'type'         => 'number',
        'description'  => 'The price of a course.',
        'single'       => true,
        'show_in_rest' => true,
    );
    register_post_meta( 'course_type', 'price', $meta_args );
}
By setting show_in_rest to true, it will be exposed automatically to the REST API.
Alternatively, custom fields created in WP’s admin interface can be exposed to the REST API by using register_rest_field:
function get_price_field($object, $field_name, $value) {
    return floatval(get_post_meta($object\['id'])[$field_name\][0]);
}

function register_course_price_in_api() {
    register_rest_field('course_type', 'price', array(
        'get_callback' => 'get_price_field',
        'update_callback' => null,
        'schema' => null,
    ));
}

add_action( 'rest_api_init', 'register_course_price_in_api' );
Here we declare the get callback for the price field and in that callback, we retrieve and format that field from the post meta.
Querying the REST API returns a payload like this one:
[
    {
        "id": 72,
        "date": "2020-03-11T06:31:52",
        "slug": "markething-madness-with-frank",
        "status": "publish",
        "type": "course_type",
        "title": {
            "rendered": "Markething Madness with Frank"
        },
        "content": {
            "rendered": "",
            "protected": false
        },
        "price": 75.99,
        "_links": {
            // ...
        }
        // ...
    },
    // ...
]
With the price being available in the REST API, e-commerce functionalities can be added to the app!
I won’t go into the details of configuring Snipcart in this demo. However, if you’re interested, the GitHub repo shows an example of using Snipcart’s API with React Hooks.
Live demo & GitHub repo
Try the live demo here
See the GitHub repo here
Closing thoughts
WordPress is constantly evolving and so is its REST API. From what I remember from our latest experiments with it, it’s now much easier to use and even enjoyable to configure—believe it or not ;).
It can all be done very quickly and hassle-free, empowering developers to use WP, and its proven content management capabilities, with any frontend stack.
For me, using React was the cherry on the cake as I hadn’t played with its Hooks yet. They may be daunting to understand at first, but they end up being simple building blocks that we can abstract away to be more efficient.
We wouldn’t have thought that five years ago, but WordPress and the JAMstack can now work hand-in-hand in a few different ways. In this post, we’ve shown how WP can be used as a headless CMS. But did you know it can also act as a static site generator? We’ll have a go at this with the help of tools such as Strattic and WP2Static in another upcoming post.
Stay tuned (by subscribing to our newsletter) if it’s something that might interest you!
If you've enjoyed this post, please take a second to share it on Twitter. Comments, questions? Hit the section below!


