Using Node.js Express to Quickly Build a GraphQL Server
In a rush? Skip to technical tutorial or live demo
We’ve already played with GraphQL a few times on the blog.
Always with great results as GraphQL is pretty awesome—and more in vogue than ever!
But we’ve mostly stuck to the frontend side of things, using existing APIs and built-in GraphQL implementations.
Here, I’ll be trying something different. For this, I need to jump to the obscure place that is server-side development.
More precisely, I’ll go on and craft a GraphQL server using Node.js Express.
To do so, I’ll leverage these tools to create and expose a simple API. For this use case, I’ll also throw in PostgreSQL as a database and the Join Monster library to optimize my queries.
The tutorial will cover:
Creating a project for the API
Building a GraphQL schema and resolvers
Crafting an Express app
Linking the GraphQL API to a PostgreSQL database
But let’s not get ahead of ourselves just yet. For now, let’s start with a few definitions.
What is GraphQL (& why should you use it)?
GraphQL is an API syntax that defines how to fetch data from one or many databases.

Since this query language for APIs was open sourced in 2015 by a small company named Facebook (which has used it for its mobile apps since 2012), a growing community has been supporting and developing it.
It has been created to solve some structural problems developers encountered when they started to create apps that were way more complex than before.
As for Facebook’s use case, they wanted to put all of the website features into the users' hands, with their mobile apps, back in 2011. That’s when they started to think about a new way of doing things. A way that would make traffic between clients and servers simpler and more organized.
GraphQL was the result.


They made it possible to manage data over a single endpoint via HTTP. Each query you send to your API gets you exactly what you want. What I mean is that you’ll receive nothing more and nothing less on the other end than exactly what you need. The data required is determined client side instead of letting servers control it, helping to build apps that are way faster and more stable.
Its type schema system regroups all the data you can access under different fields, no matter where it is stored. You can relate these to one another to get the information needed in one simple request.
Important definitions
Here are some terms you’ll encounter in the tutorial below that needs to be fully understood before continuing on:
→ Query: A query is what a client sends to a server in order to specify the necessary data. For our upcoming use case, it would look like this:
{
  players {
    first_name
  }
}
What you would get in return for this query are all the first names of the players of our fictional sport league.
→ Schema: The blueprint for communication between client and server. It specifies what queries clients can make, the types of data retrievable, and relationships between types.
→ Resolvers: A function applied to every field. It specifies how that field is connected to the backend and fetches data for that field from a database.
GraphQL vs REST APIs
This topic has already caused a lot of discussions on dev forums, and what you get out of these is that you can’t compare both directly. They are not the same, and GraphQL won’t take over REST APIs tomorrow morning. Whereas the first is, as I already mentioned, a query language, the other is an architectural concept.
You can actually wrap a REST API in GraphQL. This is good to know if you want to try GraphQL without throwing away your existing infrastructure.
Still, more and more developers will turn to GraphQL for their new APIs because it solves a lot of the problems that caused some major head scratching with REST’s multiple endpoints.

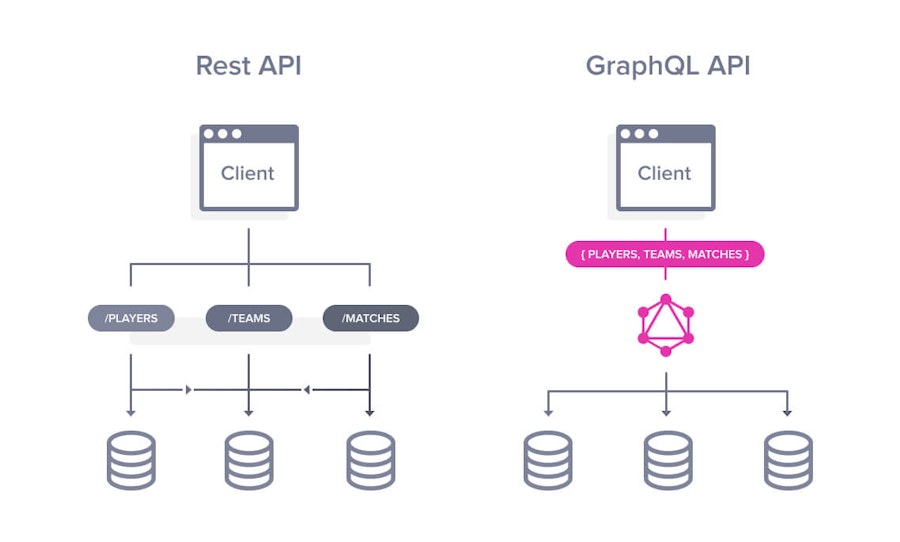
The latter means you have to make different calls to different endpoints for a single request, like loading a page. It made the process slower as you scaled to more complex architectures. And it can rapidly become a real mess with REST APIs for that reason.
So, why choose GraphQL?
There are a few situations where GraphQL absolutely is the best option to build your server with, such as:
If you have multiple clients, because they simply write their own queries in the language of their choice (GraphQL supports them all);
If you work on different platforms: web, mobile, apps, etc.;
If your API is highly customizable.
GraphQL is also being added as a built-in feature in many headless CMSs, as we’ve covered in this blog post.
What is Node.js Express?
Express is a fast, unopinionated, minimalist web framework for Node.js.

It has been the most well-known framework for Node.js for many years, and for good reasons.
It's a simple framework that adds key web application features on top of Node.js. It was one of the first out there and is widely used by lots of companies that work with Node.js (IBM, Uber & more).
There's a ton of modules you can add on top of it to handle most use cases, including mine here. Node.js Express is without a doubt your best bet for starting a new server with GraphQL, as the express-graphql module provides a shortcut to create one. This module will be part of the tutorial below.
Although there are other Node.js alternatives such as Koa and Strapi, I decided to go with the classic and stick to what I know best here.
Consult the Express official docs over here.
Building a GraphQL server with Node.js Express
Context
In this demo, I'll create and expose a simple API for a sports league using GraphQL, Express and PostgreSQL. I'll also optimize our queries using the Join Monster library. The data inputted in this server could then be fetched and consumed by frontend apps to be shown to users.
Let’s do this!
1. Installing the required dependencies
Before getting started, there are a few things you need in addition to the express package. You'll need to install express-graphql, an HTTP middleware that will be leveraged by Express to rapidly create your API and the official graphql implementation.
You can do so by running the following command in the root directory of your project:
npm install express express-graphql graphql --save2. Creating an entry point
After you've installed the necessary dependencies, you’ll need to make an entry point to your API. To do so, create a file named server.js at the root of your project.
This way, you can start your server with the simple command node server.js.
3. Importing the dependencies
Once your file is generated, you can import the required dependencies installed in the previous step.
Simply insert the following code at the start of the server.js file:
const express = require('express')
const graphqlHTTP = require('express-graphql')
const graphql = require('graphql')
4. Building a GraphQL schema and a first resolver
For GraphQL to work, you need to define what will be queried by a client with the help of a schema. For starters, you’ll make the API return Hello world! whenever a user requests it.
To do so, define your schema programmatically using the GraphQLObjectType. This new variable will define all the fields that can be queried at the first level.
const QueryRoot = new graphql.GraphQLObjectType({
  name: 'Query',
  fields: () => ({
    hello: {
      type: graphql.GraphQLString,
      resolve: () => "Hello world!"
    }
  })
})
Your GraphQL API needs to know what value(s) to return. To do so, you need to create what we call resolvers. In this case, you only want to return "Hello world!" whenever the user queries hello. So, inside the hello field, I had to define what type was going to be returned by the resolver as well as the resolver itself.
You can now instantiate the schema using the following code:
const schema = new graphql.GraphQLSchema({ query: QueryRoot });5. Building the Node.js Express app
The latest step to get a basic GraphQL API working is creating the Express server.
const app = express();
app.use('/api', graphqlHTTP({
  schema: schema,
  graphiql: true,
}));
app.listen(4000);
Here, I’ve set up a single route for the API and then pass as a parameter the graphqlHTTP middleware in which we set the schema and the graphiql flag.
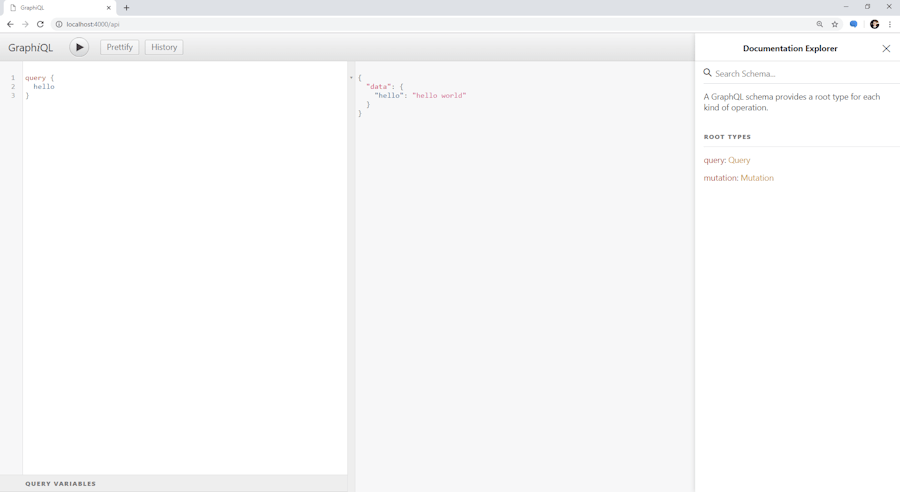
Setting the graphiql flag as true will automatically set up a GraphIQL playground, which allows you to query your API with code completion.

At this stage, this is what your server.js file should look like:
const express = require('express')
const graphqlHTTP = require('express-graphql')
const graphql = require('graphql')

const QueryRoot = new graphql.GraphQLObjectType({
  name: 'Query',
  fields: () => ({
    hello: {
      type: graphql.GraphQLString,
      resolve: () => "Hello world!"
    }
  })
})

const schema = new graphql.GraphQLSchema({ query: QueryRoot });

const app = express();
app.use('/api', graphqlHTTP({
  schema: schema,
  graphiql: true,
}));
app.listen(4000);
If you run node server.js in the command prompt and visit localhost:4000/api in your web browser, the API should be live and queryable!
6. Linking the API to a PostgreSQL database
In a real-world scenario, you would probably want to tie your API to an existing database, right?
To do so, you first need to install a database of some sort. Here, I'll use Postgres, an open source SQL database. Since the setup depends on your operating system, I'll skip this part, but you can always follow the instruction in the official documentation.
Just make sure to keep track of the superuser's username and password as you'll need it in the next step.
7. Creating the database
Got your database installed? You'll now need to set it up and create your tables. Since in this demo you’re building a public dataset for a sports league, create a database named league.
First, connect to the database with the following command:
psql -h localhost -U {YOUR_USERNAME}Then create the database with the following SQL query:
CREATE DATABASE league;Once completed you can connect to it with the \connect command.
\connect league;Finally, let's create a team, player and match table.
CREATE TABLE team (
  id SERIAL PRIMARY KEY,
  name VARCHAR (255)
);
CREATE TABLE player (
 id SERIAL PRIMARY KEY,
 first_name VARCHAR (255),
 last_name VARCHAR (255),
 team_id INT NOT NULL REFERENCES team (id)
);
CREATE TABLE match (
  id SERIAL PRIMARY KEY,
  date DATE NOT NULL DEFAULT CURRENT_DATE,
  winner_team_id INT NOT NULL REFERENCES team (id),
  loser_team_id INT NOT NULL REFERENCES team (id)
);
Don't forget to add at least a few rows in each of our newly created tables as placeholder data!
8. Installing a driver to connect to our database
Next up, you'll need to connect to your database from server.js to make actual reads and writes to the database. In this case, use the [pg](https://node-postgres.com/) driver which is the defacto library to connect to a Postgres database from a Node environment.
You can install it with a simple NPM command.
npm install pgAnd then create a new client by adding the following code under your previous dependencies.
const { Client } = require('pg')
const client = new Client({
  host: "localhost",
  user: "{YOUR_POSTGRES_USERNAME}",
  password: "{YOUR_POSTGRES_PASSWORD}",
  database: "{YOUR_POSTGRES_DATABASE}"
})
client.connect()
9. Updating the schema and creating new resolvers
Since you probably want to do more than a mere Hello World! with your API, you can create a new GraphQLObjectTypes and link them to your schema.
But first, install Join Monster and import it to your project.
npm install join-monsterconst joinMonster = require('join-monster')This library is an alternative to DataLoader and translates the users GraphQL queries to SQL statements saving you from many useless round-trips to the database. Once this is done, you can now define the new types:
const Player = new graphql.GraphQLObjectType({
  name: 'Player',
  fields: () => ({
    id: { type: graphql.GraphQLString },
    first_name: { type: graphql.GraphQLString },
    last_name: { type: graphql.GraphQLString },
    team: {
      type: Team,
      sqlJoin: (playerTable, teamTable, args) => `${playerTable}.team_id = ${teamTable}.id`
    }
  })
});

Player._typeConfig = {
  sqlTable: 'player',
  uniqueKey: 'id',
}

var Team = new graphql.GraphQLObjectType({
  name: 'Team',
  fields: () => ({
    id: { type: graphql.GraphQLInt },
    name: { type: graphql.GraphQLString },
    players: {
      type: graphql.GraphQLList(Player),
      sqlJoin: (teamTable, playerTable, args) => `${teamTable}.id = ${playerTable}.team_id`
   }
  })
})

Team._typeConfig = {
  sqlTable: 'team',
  uniqueKey: 'id'
}
In the code above, I specified the name of the table as well as the unique id of the rows inside the type's configuration object, _typeConfig. That way, Join Monster will know how to construct a proper SQL statement for your table.
Furthermore, since your data model contains relationships, you'll need to join your data together. Thankfully, joining data is only a matter of specifying the ON clause of the SQL statement inside the sqlJoin key. You can see the full set of types in the GitHub repo of this demo!
Finally, let’s add the required new fields to our QueryRoot variable.
const QueryRoot = new graphql.GraphQLObjectType({
  name: 'Query',
  fields: () => ({
    hello: {
      type: graphql.GraphQLString,
      resolve: () => "Hello world!"
    },
    players: {
      type: new graphql.GraphQLList(Player),
      resolve: (parent, args, context, resolveInfo) => {
        return joinMonster.default(resolveInfo, {}, sql => {
          return client.query(sql)
        })
      }
    },
    player: {
      type: Player,
      args: { id: { type: graphql.GraphQLNonNull(graphql.GraphQLInt) } },
      where: (playerTable, args, context) => `${playerTable}.id = ${args.id}`,
      resolve: (parent, args, context, resolveInfo) => {
        return joinMonster.default(resolveInfo, {}, sql => {
          return client.query(sql)
        })
     }
    },
   //...
  })
})
As you can see inside the resolvers, I use a Join Monster function that takes the queries information as a parameter and pass as a callback the SQL statement that I'll execute through the pg client.
In case you’re wondering what the where field is, it's a new field used by Join Monster that describes the where clause in the generated SQL statement. You can customize as you please depending on your requirements.
Take note that if you have a large dataset, you'll probably want to implement a pagination system to prevent users from suffocating your database with massive operations. GraphQL's, as well as Join Monster's official documentation, address the topic here and here.
10. Mutations
Querying the database is great, but not of much use if you can't add any data inside.
Thankfully, GraphQL comes with a mutation type that allows you to do exactly that. To do so, you'll use the same process as before but create your SQL query manually through the pg client.
const MutationRoot = new graphql.GraphQLObjectType({
  name: 'Mutation',
  fields: () => ({
    player: {
      type: Player,
      args: {
        first_name: { type: graphql.GraphQLNonNull(graphql.GraphQLString) },
        last_name: { type: graphql.GraphQLNonNull(graphql.GraphQLString) },
        team_id: { type: graphql.GraphQLNonNull(graphql.GraphQLInt) },
      },
      resolve: async (parent, args, context, resolveInfo) => {
        try {
          return (await client.query("INSERT INTO player (first_name, last_name, team_id) VALUES ($1, $2, $3) RETURNING *", [args.first_name, args.last_name, args.team_id])).rows[0]
        } catch (err) {
          throw new Error("Failed to insert new player")
        }
      }
    }
  })
})

const schema = new graphql.GraphQLSchema({
  query: QueryRoot,
  mutation: MutationRoot
});
However, be careful when exposing your database to the public as anyone will be able to make modifications to the data.
If you want to limit writing access to only a handful of individuals, you should add an authorization business logic in your code.
And that’s it guys; we’re all done!
Live demo & GitHub repo

See the GitHub repo here
See the live demo here
Closing thoughts
Building this simple API with GraphQL was an insightful experience. Querying only what you want and having extra tooling to create queries, such as code completion, is fantastic to build client-side applications rapidly.
However, the business logic behind it is something to get used to. As a newcomer to this technology, it's easy to write unoptimized resolvers that send way too many queries to the database. Thankfully, the Join Monster library came to my rescue allowing me to optimize my resolvers intuitively!
All in all, I spent around two days building this demonstration, but doing it again would no doubt be much faster now that I understand most of the fundamentals of GraphQL.
To push this experiment further, it would have been interesting to build an API with a full set of CRUD operations protected by an authorization layer to simulate the backend of a full-fledged application.
If you've enjoyed this post, please take a second to share it on Twitter. Got comments, questions? Hit the section below!


