Building a Strapi E-Commerce: Nuxt.js Tutorial & Live Demo
In a rush? Skip to the technical tutorial or live demo. Also, the Strapi team built a Nuxt e-commerce starter. You can find it here.
As a developer, building a simple online store shouldn't be complicated if you're using the right stack.
And Strapi for e-commerce with Nuxt.js as the frontend sounds like an excellent choice to come to accomplish that.
Strapi was already a solid product when we first wrote about it back in 2018. However, their team didn’t stop the great work there. I can’t wait to see what it has to offer as of today.
In this tutorial, I’ll mix it up with two other powerful tools from the Jamstack ecosystem. The result? A Strapi-powered e-commerce website.
The frontend will be built using the neat Vue framework that is Nuxt.js.
The e-commerce functionalities will be provided by Snipcart, our JS/HTML shopping cart.
Here are the specific steps:
Generating a Strapi app & creating products
Consuming products with Nuxt.js
Adding e-commerce functionalities with Snipcart
Handling custom fields in the cart
Integrating a GraphQL plugin
Deploying the Strapi & Nuxt e-commerce app
But first, let’s start with a quick introduction to our stack.
What’s up with Strapi?


Strapi is an open-source Node.js-based headless CMS. It’s 100% JavaScript, fully customizable, and developer-first.
It has made its way to the top of the most popular headless CMSs thanks to the flexibility it gives to devs to work with any tools they love.
Using Vue, React, or plain JS on the frontend? It doesn’t matter. Consuming the API with REST or GraphQL? Both options work seamlessly. Connecting PostgreSQL, MongoDB, SQLite, MySQL as a database? All the same to Strapi.
In our last Strapi post, we highlighted another huge benefit a Node.js headless CMS brings: building entirely JavaScript apps on the frontend and the backend alike. Welcome code universality, performance & easy npm install at every level!
This tutorial will showcase both the flexibility of Strapi and the power of Universal JS apps.
Why use Snipcart on a Strapi e-commerce site?
Even though they’re two completely different products, I could reuse the Strapi definition above to describe Snipcart. I mean, our shopping cart is 100% HTML/JS, fully customizable, and developer-first.
You can already see why it’s a good fit.
Our mission is pretty much the same: not getting in the way of developers to work with the tools they love. In the same way, you’ll use Strapi only for what a CMS is good at (content management & admin tasks); Snipcart only manages the e-commerce functionalities on your website. That’s it.
Not convinced yet? The tutorial below will show how the shopping cart's integration is a breeze.
And what about Nuxt.js?

I think I’ve made it clear that you could use whatever you want on the frontend when working with Strapi. So why Nuxt.js here?
First, we love Vue.js. Incredible to see the place this independent framework continues to take in the JavaScript ecosystem.
Second, Nuxt.js does it all. I mean, it’s way more than a static site generator. You can use it to build server-rendered apps, SPAs (single-page apps), or PWAs (progressive web apps).
“Nuxt's goal is to make web development powerful and performant with a great developer experience in mind.”
Once again, it fits the grand vision we’re trying to put forward here.
Okay, enough talking. Let’s get to the nitty-gritty.
Nuxt.js & Strapi e-commerce tutorial
Prerequisites:
1. Generating a Strapi app
Use the following command to scaffold a Strapi app:
yarn create-strapi-app my-project --quickstart
It’ll install Strapi’s dependencies and start the project locally. You can then jump right into designing content types.
Once the install is finished, you’ll be prompt with a new web page where you can create your admin user. Complete this, and you’ll be redirected to the dashboard.


2. Creating products
2.1 Build a new collection type
The first thing to do is to create a new collection type to support the products’ entry. Do so by clicking on the Content-Types Builder tab on the left panel.
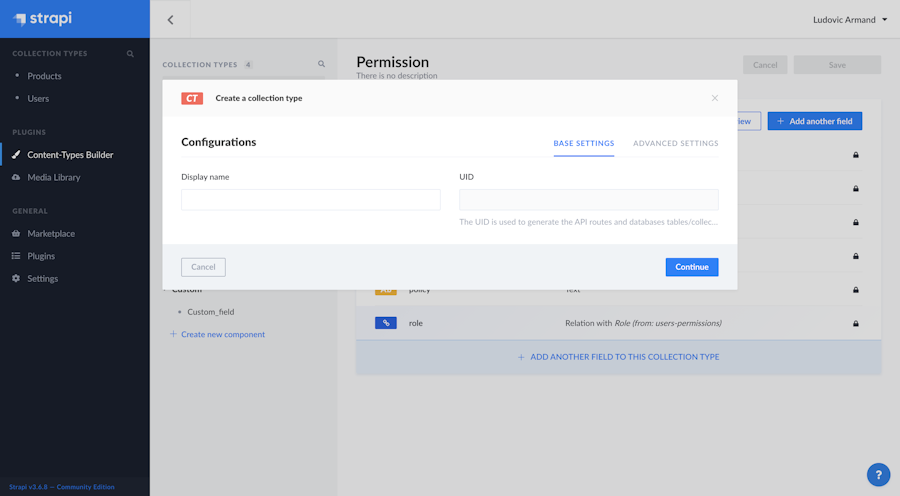
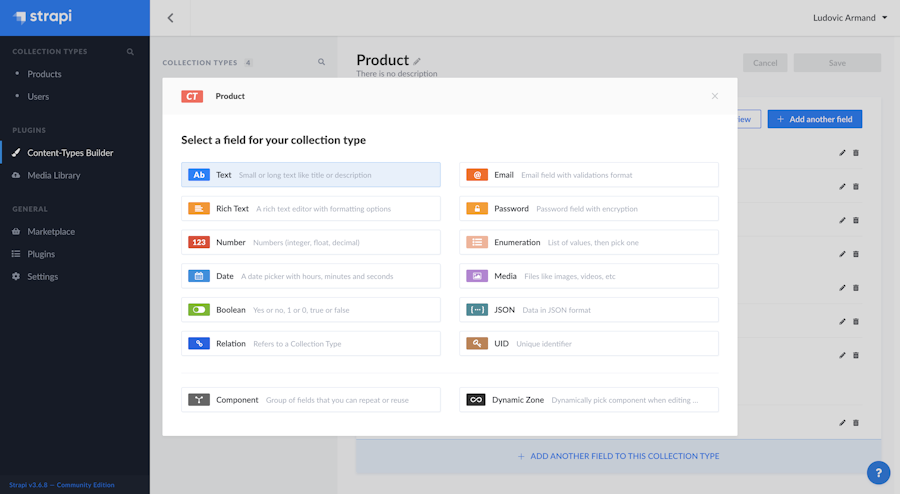
Then, you can click on Continue. The forms are well thought; it should be easy to add the following fields for your Product collection type:
title (Text),
description (Text),
price (Number, float),
image (Media, single image)*.

Once it’s done, it should look like this (without the custom repeatable component):

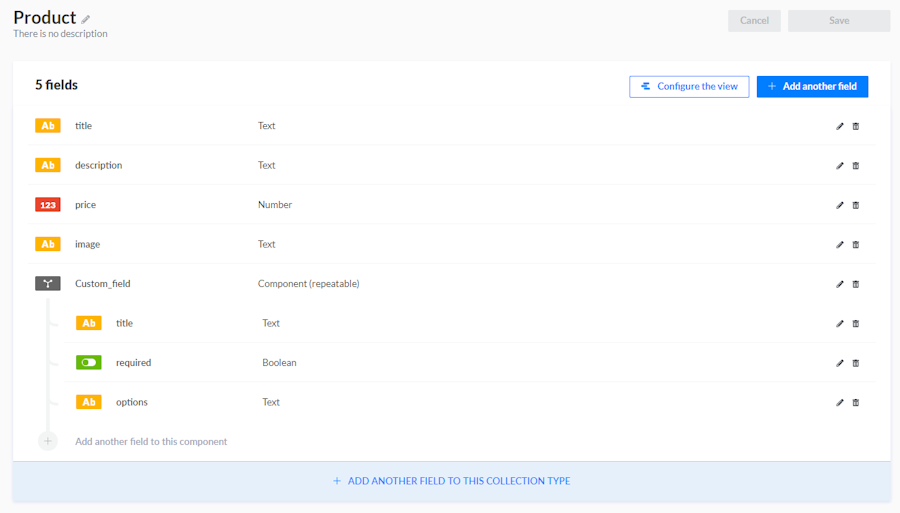
*Note: I defined the image as
Textbecause I’ll use Heroku for hosting, which has an ephemeral file system. Thus, I’ll upload images somewhere else for this demo, but you wouldn’t have to do this in a proper production setup.
Notice the custom - Component (repeatable) field? This is to support custom fields for products. To create it, click on add another field to this collection type button and choose the component item at the bottom left of the form.
Call the component custom_field and create a new custom category. You can select an icon to your liking.
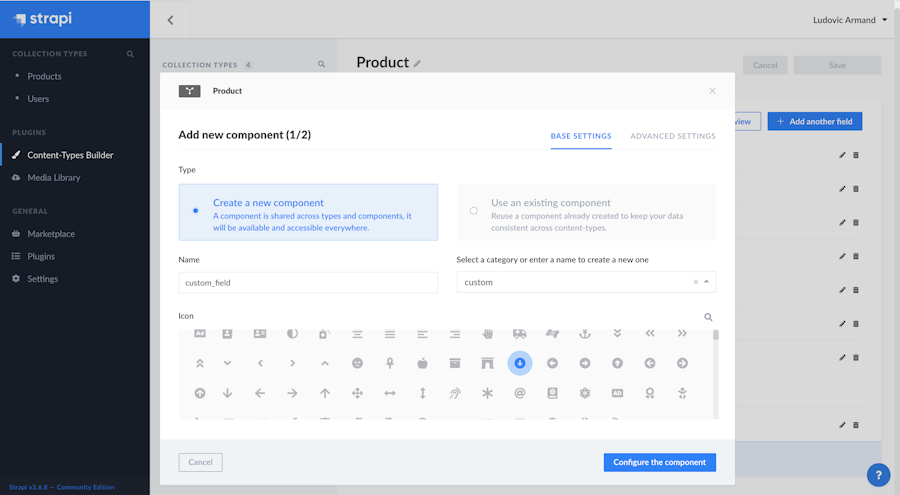
Click the Configure component button and set the type as Repeatable component. Hit Add first field to the component.
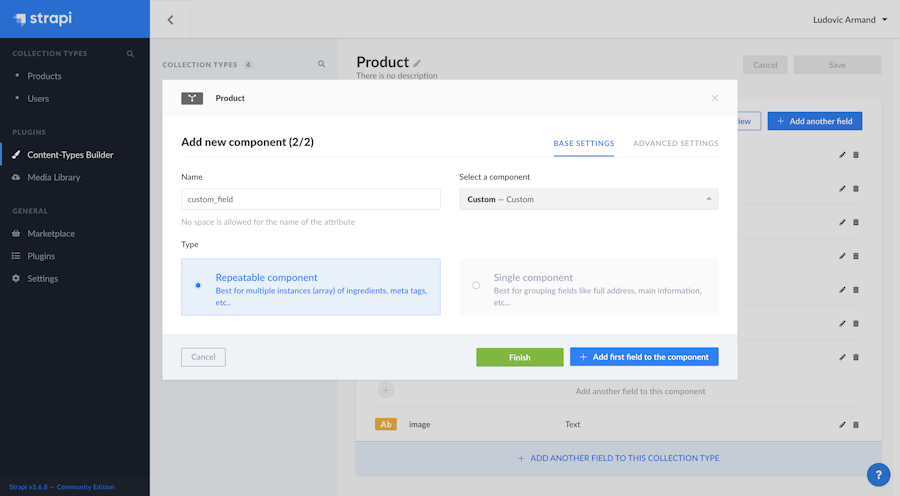
Now let’s add fields the same way you did for products, but for your new custom field. This time, create a:
title (Text),
required (Boolean),
options (Text).
Once it’s done, you can click on the Save button in the upper right corner. It’s now time to create actual products.
2.2 Making products
Click on the new Products section of the left side panel, then click on the Add New Product in the upper right corner.
For this demo, I’ll be creating a little cupcake shop. Here’s what I defined:

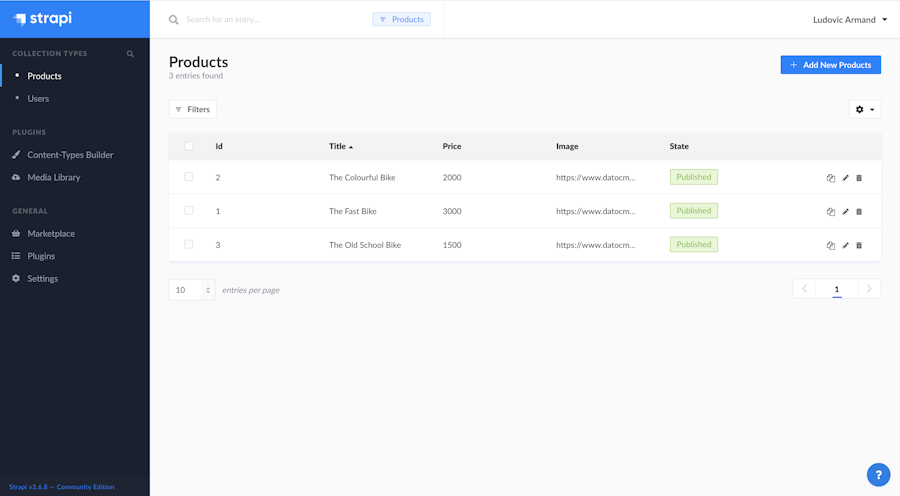
Hit Save and Publish.
Hooray, products are created!
One last thing to do before you can fetch your new products is to set permissions to expose them publicly. To do so, go to General → Settings → Users & Permissions Plugin → Role and click on the Public role. In the Permissions section, you should have a Product subsection. You need to check the find and findone boxes. Click on Save.

Publish the product and hop at http://localhost:1337/products. You should see a JSON blob representing your products. That’s what you’ll consume to render your e-commerce store.
3. Consuming products with Nuxt.js
As mentioned, Nuxt.js will be used to create a static website.
Inside your project folder, create a frontend folder. In it, create your Nuxt.js project with the following command:
yarn create nuxt-app your-project-name
JavaScript is my programming language for this demo, Yarn is my package manager, and Tailwind CSS is the UI framework. There are no Nuxt.js modules, so simply press enter without having any selected when prompted. Do the same for linting tools and select no testing framework.
Without surprise, I also chose the Universal & Static option for (SSR/SSG) and static deployment in Nuxt as I want to create a static site.
After installation, open the project in your favorite IDE and run yarn dev to fire it up.
Open the /pages/index.vue file. This will be the homepage of your store. It’s where you want to show the products with their respective name, image & description, but no buy buttons yet. Users will be able to put items in their cart when they’re on an individual product page, something I’ll create later on.
For now, let’s start by fetching the products on the index component mounting event. Swap the entire script tag for this one:
export default {
  data(){
    return {
      products: []
    }
  },
  created: async function () {
    const res = await fetch('http://localhost:1337/products')
    this.products = await res.json()
  }
}
And replace the template content with this:
<div>
    <div
      class="
        m-6
        grid grid-cols-1
        sm:grid-cols-2
        md:grid-cols-2
        lg:grid-cols-2
        xl:grid-cols-2
        gap-4
      "
    >
      <div
        v-for="p in products"
        :key="p.id"
        class="border rounded-lg bg-gray-100 hover:shadow-lg"
      >
        <nuxt-link :to="`/products/${p.id}`">
          <div class="rounded-t-lg bg-white pt-2 pb-2">
            <img class="crop mx-auto" :src="p.image" />
          </div>
          <div class="pl-4 pr-4 pb-4 pt-4 rounded-lg">
            <h4
              class="
                mt-1
                font-semibold
                text-base
                leading-tight
                truncate
                text-gray-700
              "
            >
              {{ p.title }}
            </h4>
            <div class="mt-1 text-sm text-gray-700">{{ p.description }}</div>
          </div>
        </nuxt-link>
      </div>
    </div>
  </div>
Now, there’ll also be a single page for each product rendered on the home page. This means you want a route like this: /products/:id. The parameter inside the route is the information you’ll use to render the respective product.
Nuxt.js gives you a neat way to create such pages structure without ever touching a router grammatically. You only need to use a proper page structure.
For this use case, simply create a products folder with another folder inside it named _id. In that final folder, create an index.vue file. Nesting folders this way makes your ID parameter ***.
For a use case where ID isn’t required, you could use a single products folder with an _id.vue file inside it instead.
Open the new index.vue file and paste the following content:
<template>
  <div class="flex justify-center m-6">
    <div v-if="this.product !== null">
      <div class="flex flex-col items-center border rounded-lg bg-gray-100">
        <div class="w-full bg-white rounded-lg flex justify-center">
          <img :src="product.image" width="375" />
        </div>
        <div class="w-full p-5 flex flex-col justify-between">
          <div>
            <h4
              class="
                mt-1
                font-semibold
                text-lg
                leading-tight
                truncate
                text-gray-700
              "
            >
              {{ product.title }}
            </h4>
            <div class="mt-1 text-gray-600">{{ product.description }}</div>
          </div>
          <button
            class="
              snipcart-add-item
              mt-4
              bg-white
              border border-gray-200
              d
              hover:shadow-lg
              text-gray-700
              font-semibold
              py-2
              px-4
              rounded
              shadow
            "
            :data-item-id="product.id"
            :data-item-price="product.price"
            :data-item-url="`${storeUrl}${this.$route.fullPath}`"
            :data-item-description="product.description"
            :data-item-image="product.image"
            :data-item-name="product.title"
            v-bind="customFields"
          >
            Add to cart
          </button>
        </div>
      </div>
    </div>
  </div>
</template>

<script>
export default {
  data() {
    return {
      product: null,
      storeUrl: process.env.storeUrl,
    };
  },
  created: async function () {
    const res = await fetch(
      `https://YOUR.ADRDRESS/${this.$route.params.id}`
    );
    this.product = await res.json();
  },
};
</script>
<style>
</style>
The code is pretty self-explanatory. I use some async/await sugar to make the code less nested than the classic .then approach.
Once this is done, you can test that your products are indeed loaded by firing up a local Nuxt.js development server using the yarn dev.
4. Adding e-commerce functionalities with Snipcart
Now that you have access to the proper information on your pages, you’ll be able to use it with Snipcart.
First things first, you need to add Snipcart’s necessary scripts. Since you’re aiming for a static build, you want to add the scripts in the nuxt.config.js file instead of directly in your components.
So open that file and replace the link: […] section with this object instead:
link: [
      { rel: 'preconnect', href: "https://app.snipcart.com" },
      { rel: 'preconnect', href: "https://cdn.snipcart.com" },
      { rel: 'stylesheet', href: "https://cdn.snipcart.com/themes/v3.2.1/default/snipcart.css" },
      { rel: 'icon', type: 'image/x-icon', href: '/favicon.ico' }
    ],
    script: [
      { src: 'https://cdn.snipcart.com/themes/v3.2.1/default/snipcart.js'}
    ]
This will inject the stylesheets/script directly into the head of your pages. Now, you only need to add a hidden div to put Snipcart’s API key.
Put it in the layouts/default.vue component as such:
<template>
  <div class="md:flex flex-col w-screen h-screen content-center p-6">
    <NavBar />
    <Nuxt />
    <div hidden id="snipcart" data-api-key="YOUR_PUBLIC_API_KEY"></div>
  </div>
</template>
5. Handling custom fields
At the moment, the custom fields we declared in the products aren’t handled in the cart. It’s not much, but there’s still a little more logic to add, so I want to explain it clearly.
Hop back in the /products/_id/index.vue to change the button section of the template section with:
<button
            class="
              snipcart-add-item
              mt-4
              bg-white
              hover:bg-gray-100
              text-gray-800
              font-semibold
              py-2
              px-4
              border border-gray-400
              rounded
              shadow
            "
            :data-item-id="product.id"
            :data-item-price="product.price"
            :data-item-url="`${this.$route.fullPath}`"
            :data-item-description="product.description"
            :data-item-image="product.image"
            :data-item-name="product.title"
            v-bind="customFields"
          >
            Add to cart
          </button>
The only thing to change is v-bind="customFields". Now, you need to actually define the logic inside the component with:
computed: {
    customFields() {
      return this.product.custom_field
        .map(({ title, required, options }) => ({
          name: title,
          required,
          options,
        }))
        .map((x, index) =>
          Object.entries(x).map(([key, value]) => ({
            [`data-item-custom${index + 1}-${key.toString().toLowerCase()}`]:
              value,
          }))
        )
        .reduce((acc, curr) => acc.concat(curr), [])
        .reduce((acc, curr) => ({ ...acc, ...curr }));
    },
It's a little rough on the eyes at first, but let’s try to understand what you’re doing here.
You need to generate some data-item-custom{number}-{fieldName}: value key for the buy button. I know that creating such dynamic template attributes can’t be done with sugar syntax directly in the template tag. You need to wrap your tag in a JS object and let Vue parse it with v-bind.
This is what’s happening here. CustomFields ultimately returns an array of objects as such:
{
  "data-item-custom1-name":"Intensity",
  "data-item-custom1-required":true,
  "data-item-custom1-options":"Vim|Lemonade|Zesty"
}
For each object in the array, Vue generates an attribute with the name of the object key and the object value's value.
6. Polishing our store
At the moment, you have a functional store, but it lacks some basic functionalities. Navigation would be great, and while you’re at it, why not also add a cart summary in the navigation bar.
Create an icons folder in /components and in it create a cart.vue file:
<template>
  <svg width="31" height="100%" viewBox="0 0 31 27" fill="none" xmlns="http://www.w3.org/2000/svg">
    <path
      d="M1.10512 0.368718C0.560256 0.368718 0.118164 0.812066 0.118164 1.35848C0.118164 1.9049 0.560256 2.34824 1.10512 2.34824H4.90887L8.30138 18.4009C8.43503 19.0053 8.83085 19.5079 9.32946 19.5041H25.7788C26.3005 19.5118 26.7799 19.0375 26.7799 18.5143C26.7799 17.9911 26.3006 17.5168 25.7788 17.5245H10.1315L9.71003 15.545H27.095C27.5371 15.5412 27.9547 15.2048 28.0511 14.7718L30.354 4.87412C30.4825 4.29933 29.9852 3.67172 29.3979 3.66786H7.21171L6.6771 1.15221C6.58329 0.71276 6.15921 0.368652 5.7107 0.368652L1.10512 0.368718ZM7.623 5.64746H12.7634L13.2569 8.61674H8.25005L7.623 5.64746ZM14.7785 5.64746H20.9881L20.4946 8.61674H15.2719L14.7785 5.64746ZM23.0031 5.64746H28.1537L27.4649 8.61674H22.5097L23.0031 5.64746ZM8.67181 10.5963H13.5862L14.0797 13.5656H9.29919L8.67181 10.5963ZM15.6009 10.5963H20.1656L19.6721 13.5656H16.0944L15.6009 10.5963ZM22.1807 10.5963H27.0023L26.3135 13.5656H21.6872L22.1807 10.5963ZM12.6197 20.164C10.8141 20.164 9.32979 21.6525 9.32979 23.4632C9.32979 25.2739 10.8141 26.7624 12.6197 26.7624C14.4252 26.7624 15.9095 25.2739 15.9095 23.4632C15.9095 21.6525 14.4252 20.164 12.6197 20.164ZM22.4892 20.164C20.6837 20.164 19.1994 21.6525 19.1994 23.4632C19.1994 25.2739 20.6837 26.7624 22.4892 26.7624C24.2948 26.7624 25.7791 25.2739 25.7791 23.4632C25.7791 21.6525 24.2948 20.164 22.4892 20.164ZM12.6197 22.1435C13.3586 22.1435 13.9356 22.7222 13.9356 23.4632C13.9356 24.2042 13.3586 24.7829 12.6197 24.7829C11.8807 24.7829 11.3037 24.2042 11.3037 23.4632C11.3037 22.7222 11.8807 22.1435 12.6197 22.1435ZM22.4892 22.1435C23.2282 22.1435 23.8052 22.7222 23.8052 23.4632C23.8052 24.2042 23.2282 24.7829 22.4892 24.7829C21.7503 24.7829 21.1733 24.2042 21.1733 23.4632C21.1733 22.7222 21.7503 22.1435 22.4892 22.1435Z"
      class="fill-current text-indigo-500"
    />
  </svg>
</template>
Since you probably want these functionalities to be reusable, let’s embed them in a component. To do so, jump in the /components folder and create a navbar.vue file:
<template>
  <div class="flex justify-between ml-6 mr-6 mt-4">
    <nuxt-link to="/">
      <span class="emoji"> 🚲 </span>
    </nuxt-link>
    <button class="snipcart-checkout flex items-center">
      <Cart />
      <span
        class="snipcart-total-price ml-3 font-semibold text-sm text-indigo-500"
      ></span>
    </button>
  </div>
</template>
<script>
import Cart from "./icons/cart.vue";
export default {
  components: {
    Cart,
  },
};
</script>
<style>
.emoji {
  font-size: 30px;
}
</style>
Note that you could also create components for your product listing on the homepage and your single product pages. This would be helpful if you were to reuse the logic on other pages. There’s no value for it in this small demo—it would add a little heaviness. It’s good to keep re-usability in mind, though.
7. Switching to GraphQL
I kept a good ol’ REST API until now, but Strapi makes it easy to change to a GraphQL using a neat plugin. You can skip to the next part if you wish to stick to the REST API. Otherwise, please stick with us a little longer.
Hop back to your Strapi project and run:
yarn strapi install graphql
The default config is running, so no need to do anything else on Strapi’s side.
Then, jump back in the Nuxt project and run:
yarn add graphql
Now, you’ll need to add a little config in your nuxt.config.js. Add '@nuxtjs/apollo' to the modules array and add this object:
apollo: {
  clientConfigs: {
    default: {
      httpEndpoint: process.env.BACKEND_URL || "http://localhost:1337/graphql"
    }
  }
},
env: {
  storeUrl: process.env.STORE_URL ||"http://localhost:1337"
},
Queries will be created directly in your components, but it’s good to know that Strapi offers a fine GraphQL playground at http://localhost:1337/graphql. If you’re not familiar with GraphQL, it gives you a nice way of experimenting with queries.
Create an apollo/queries/product folder to create the queries directly at your project’s root. Start with a products.gql file to fetch all our products.
query Products {
  products {
    id
    title
    image
    description
  }
}
You get only the fields you want without filtering. GraphQL magic is at work right here!
Still, in the same folder, let’s create a query for a single product in a file called product.gql:
query Products($id: ID!) {
  product(id: $id) {
    id
    title
    image
    description,
    price,
    custom_field {
      title
      required,
      options
    }
The last thing you need to do is use these queries. Start with pages/index.vue component.
Replace the whole script tag with:
<script>
import productsQuery from '../apollo/queries/product/products'
export default {
  data(){
    return {
      products: []
    }
  },
  apollo: {
    products: {
      prefetch: true,
      query: productsQuery
    }
  }
}
</script>
The created hook is simply replaced by an Apollo object that will run your newly imported query.
The structure of the objects is the same, so it’s really a plug-n-play replacement. You don’t have anything else to change in the template.
Do the same thing with the product/_id/index.vue component:
<script>
import productQuery from '../../../apollo/queries/product/product'
export default {
  data(){
    return {
      product: null,
      storeUrl: process.env.storeUrl
    }
  },
  computed: {
    customFields(){
      return this.product.custom_field
        .map(({title, required, options}) => ({name: title, required, options}))
        .map((x, index) => Object.entries(x)
          .map(([key, value]) => ({[`data-item-custom${index + 1}-${key.toString().toLowerCase()}`]: value})))
        .reduce((acc, curr) => acc.concat(curr), [])
        .reduce((acc, curr) => ({...acc, ...curr}))
    }
  },
  apollo: {
    product: {
      prefetch: true,
      query: productQuery,
      variables () {
        return { id: parseInt(this.$route.params.id) }
      }
    }
  }
}
</script>
8. Deploying the Strapi & Nuxt e-commerce app
Now that everything works locally, you’re ready to deploy the infrastructure and ensure everything keeps working in production.
Strapi is initialized by default with a MySQL database, which can’t be hosted on Heroku for free. So I decided to switch to Postgres to enable free hosting on Heroku. It’s quite simple to do by following this Strapi tutorial.
Still, if you do that, you won’t be able to upload media on the free tier, so I decided to host the images on Snipcart’s own CMS. You wouldn’t do that in a proper production setup, but you get the point.
Once the backend is deployed, I’ll use Netlify to deploy the frontend.
To do so, replace "generate": "nuxt generate" script in your package.json with the following entry in the “scripts” object:
"generate": "nuxt build && nuxt export"
In the same file, replace "build": "nuxt build" with "build": "nuxt generate"
Then, push your repo to your favorite git hosting platform and create a new Netlify site. Define the deploy settings as such:


The last thing you need to add is the BACKEND_URL & STORE_URL. This will serve to both fetch the “production” GraphQL server and set the proper store URL for the data-item-url on your individual product pages.
Here’s my config:

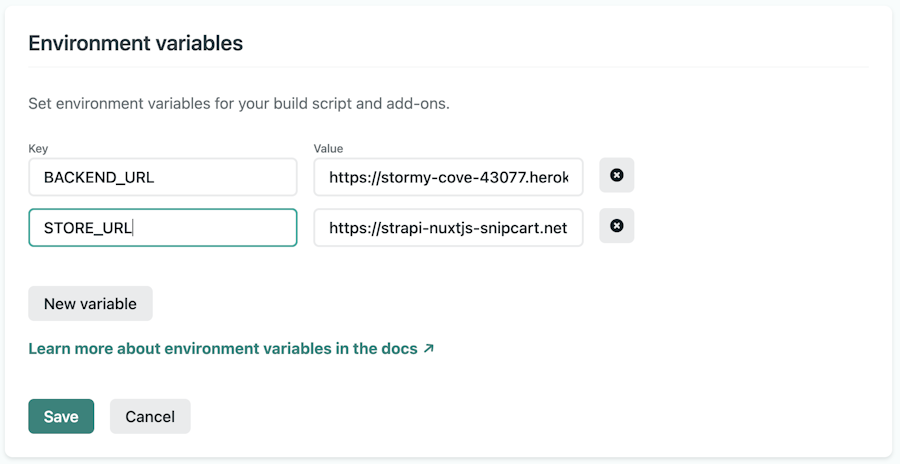
And that’s it! Your Strapi-powered e-commerce website is open for business.
Live demo & GitHub repo

See the live demo here.
See GitHub repo here.
Find the Strapi e-commerce starter here.
Closing thoughts
So that's how you can easily go headless to build a simple e-commerce store.
Kudos to the Strapi team for building a great e-commerce starter for making it even more straightforward.
Overall, I truly enjoyed Strapi. For a newcomer like me, the documentation was A+. Building the demo took me 3 to 4 hours. I lost some time in the end because I had issues deploying on Netlify.
If you want to go further, creating more complex models could be fun. The products in this demo are quite simple, without any other relations to other entities. Obviously, there are many other Snipcart features you could leverage, such as multi-currency, subscriptions, etc.
Let me know in the comments what's your experience with Strapi!


