How to Set Up Google Analytics for Your Client in 2021
I’ll be totally honest: as an online consumer, Google’s data-tracking kinda’ gives me the creeps.
By now, Google has enough information to know what I love, what I hate, and more importantly, what I buy:


But as someone who works with e-commerce developers, the advantages of Google’s tracking systems is invaluable.
With the data provided by Google Analytics, store owners can learn about their audience’s behaviors, buying patterns, and product preferences.
That means stronger marketing strategies and more sales.
So, today, I’m going to show you the process of setting up a Google Analytics account for a client.
Here's what we'll cover
How to set up Google Analytics 4 for your client
How to set up Google Analytics (the Old Version)
How to connect Google Analytics to your client’s website
How to create 3 views for your clients (for more accurate tracking)
How to set up e-commerce events to see what’s driving revenue
What to do when your e-commerce tracking doesn’t appear to be working
But first, let’s get into the most fundamental rule of setting up Google Analytics for your clients: making sure that they’re in charge of the data.
Rule #1: Make Sure Your Client Owns the Account
If you’re working with a client who could be considered a bit… technically challenged… then you might be tempted to set up and run their Google Analytics account.
And while you can definitely guide them through the process, you need to make one thing clear:
They are the owners and operators of their own d*** data.
Your job is to set things up and sit back like the Tiger King (before prison):


This is crucial for the continued success of your relationship with your client for several reasons.
First, you might have a great relationship with your client right now. But as you know, sometimes good things must come to an end.
Whether they decide to start working with a new agency/developer or if you feel it’s time to move on to other contracts, you don’t want the added headache of transferring your Google Account ownership to a 3rd-party.
Second, the data from Google Analytics is designed to help your client’s marketing and sales funnels. They need to have quick access to all their key performance indicators (KPIs) to tweak their marketing strategies as they strive to attract more paying customers.
While there are a few metrics you’ll find helpful as the site’s creator/designer, the data is much more useful to your client. It only makes sense that this data should be 100% theirs from day 1.
Finally, until your client understands how to navigate Google Analytics on their own, you’ll find yourself continuously fetching metrics for them. As nice as you probably are, your role isn’t to compile their marketing reports unless they’re explicitly paying you to do so. Your job is to build, maintain, and improve your client’s website–not their data.
That’s why I recommend setting up a call with your client and guiding them through the process (while making sure the account is created with their credentials). You can also teach them how to grant you or your team access to the account if they’re more comfortable with it.
But that means you need to master the process of setting up Google Analytics for your client before that call takes place. Nothing will hurt your reputation more than fumbling your way through a live call and making it clear you’ve never created a Google Analytics account for a client before.
Fortunately, you can follow this step-by-step guide to get your client’s Google Analytics account set up in a matter of minutes.
Let’s get started.
How to Set up Google Analytics 4
Let’s begin this tutorial with a step-by-step guide on how to set up Google Analytics 4.
It is a newer version by Google that doesn’t support app measurement, and it’s shaping up to be what new Google Analytics users are pushed to do.
That said, many Google Analytics users are still with the older version. Many industry experts still consider GA4 in beta (even though it isn’t “officially”).
It doesn’t integrate with external tools because they’re still working on creating a reliable API.
Honestly, you get the impression that Google is “building the plane as it’s flying,” as they say.
So, for now, the standard advice is to either run both GA4 in parallel with their older version or stick to their older version altogether (at least until the plane is fully built).
That’s why we’ll make sure to show you how to set up Google Analytics Universal Tracking in this guide.
We’ll also focus our e-commerce tracking on Google’s older version, though we’ll give you a reliable resource for configuring that with Google Analytics 4.
With this disclaimer in mind, let’s jump into the tutorial.
Setting up the Account
Step 1) Create an account with Google
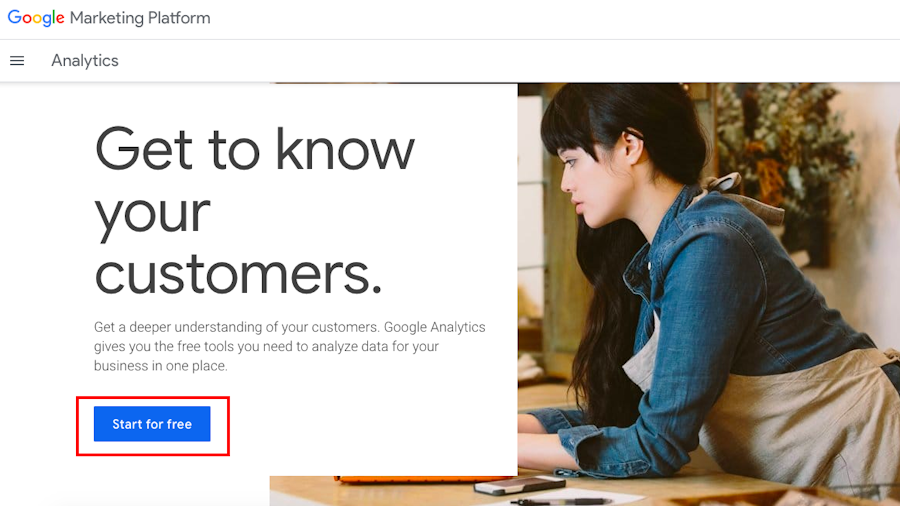
First, you’ll need to visit the Google Marketing Platform to create the Google Analytics account. Click Start for Free:

Next, have your client login into their Google Account (if your client doesn’t have one, set one up for free):


Sign in and click Start Measuring:


Step 2) Set Up Your Account
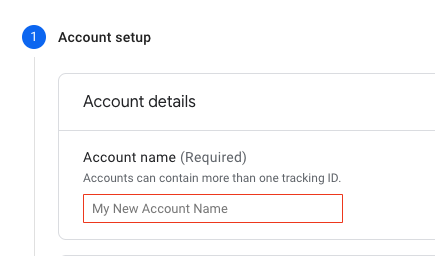
Now have your client give their account a name:

Select your data sharing options. This includes sharing data for:
Google products & services
Benchmarking (to gather data for market trends)
Technical support
Account specialists

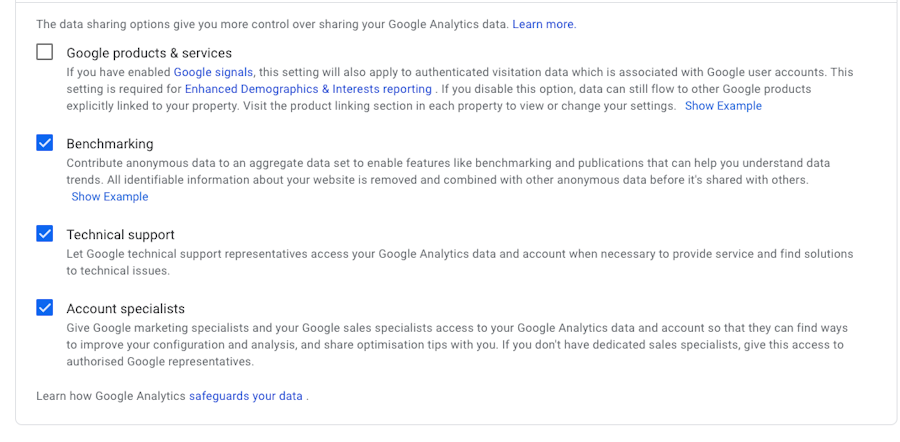
You’ll notice that each of these is clicked by default except for Google Products & Services. This is fine for most people, but you may want to describe what these mean for your client briefly.
Their specific preferences may change depending on how private they want to keep their Google Analytics data.
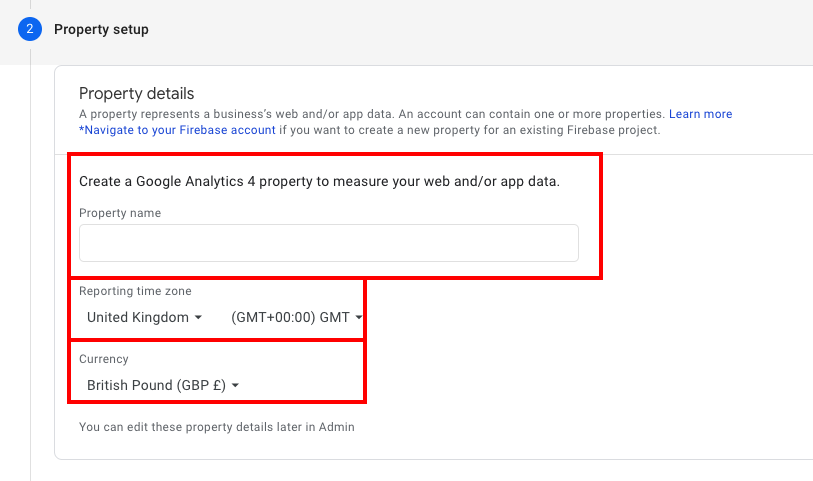
Step 3) Set up Your Google Analytics Property
Now you’ll set up your client’s Google Analytics property. You’ll need to:
Provide a name for the property
Determine the time zone your client wants to use
Select the currency your client will be using

Step 4) Tell Google More About Your Client’s Industry
Finally, you’ll need to provide a few basic details about your client’s business, such as:
Industry category
Business size
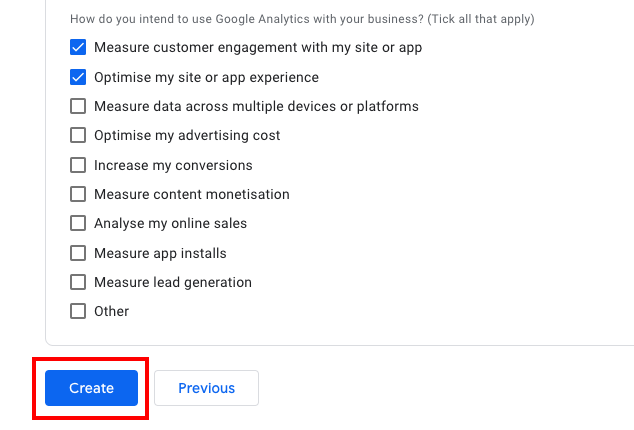
How you’ll use Google Analytics for your business

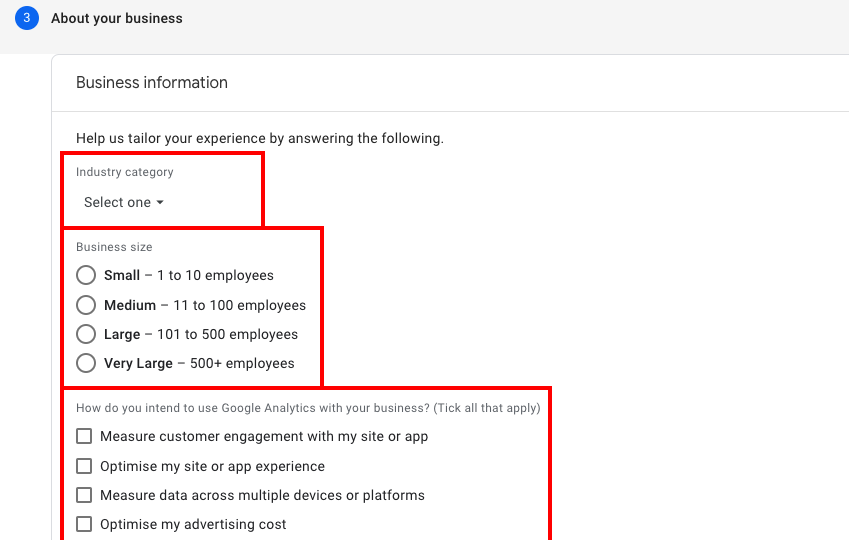
When you’re done, click Create:

At this point, you’re ready to connect Google Analytics to your client’s website with just a tiny bit of code.
Let’s see step-by-step how you can guide them through that process.
How to Connect Google Analytics 4 to Your Client’s Website
As soon as you create your client’s Google Analytics account, you’ll see a popup asking about email communications. This is basically Google asking your client permission to send emails about:
Performance suggestions and updates
Feature announcements
Feedback and testing
Offers from Google

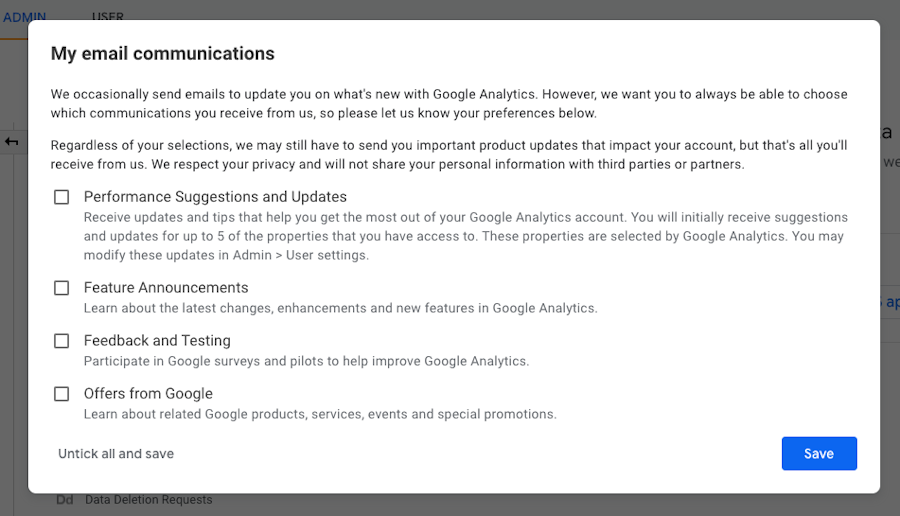
Make sure to explain to your client what each of these means. To be honest, your client likely won’t require many of these emails for basic e-commerce store tracking, but everyone’s needs will be different.
Now you’ll be in your client’s Google Analytics dashboard:

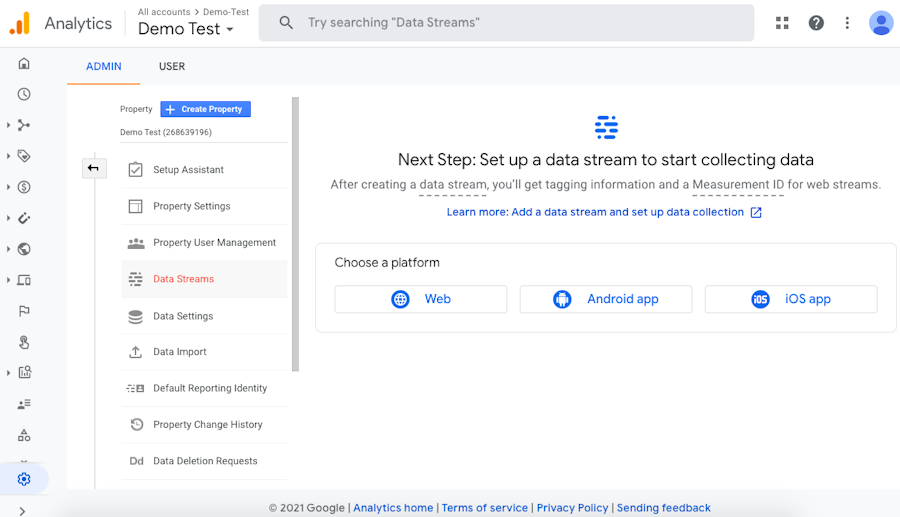
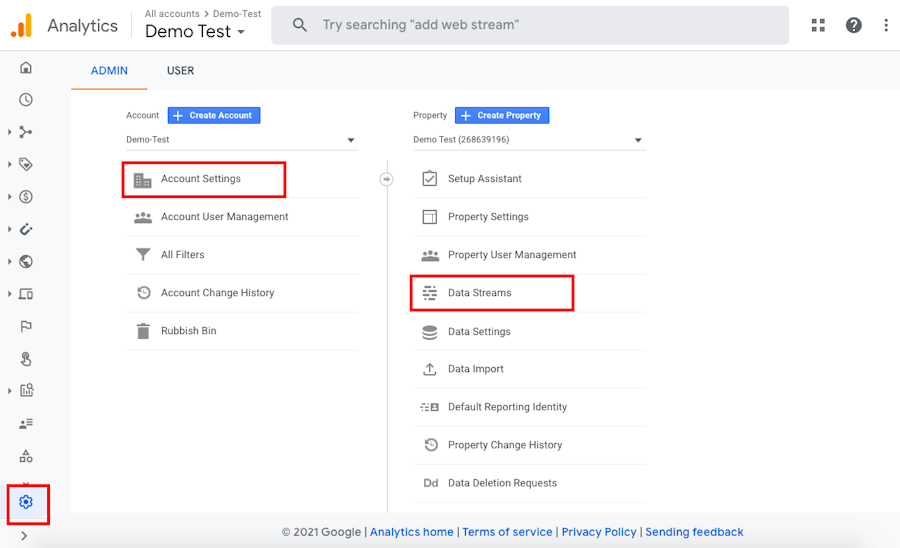
This is where you’ll find the tracking code to install on your client’s website.
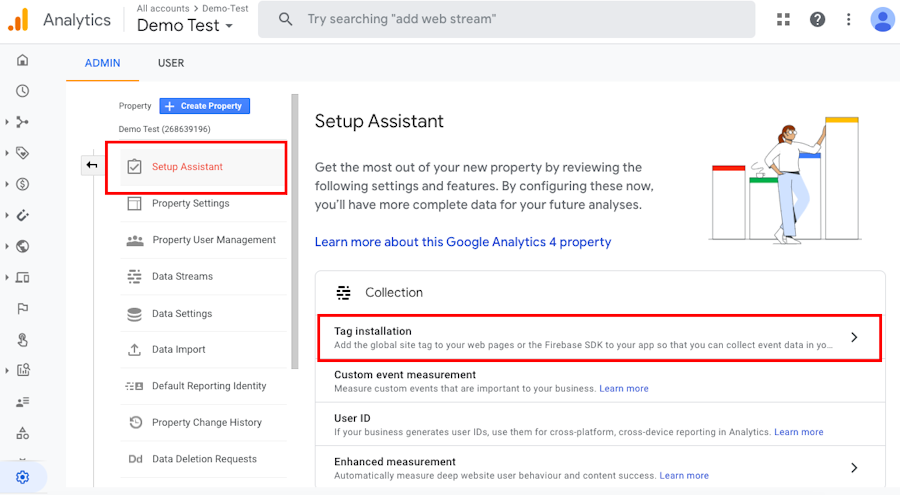
To find the tracking code in Google Analytics 4, go to Account Settings >> Setup Assistant>> Tag installation:

This will take you to a new screen where you can choose your platform:
Web
Android App
iOS App
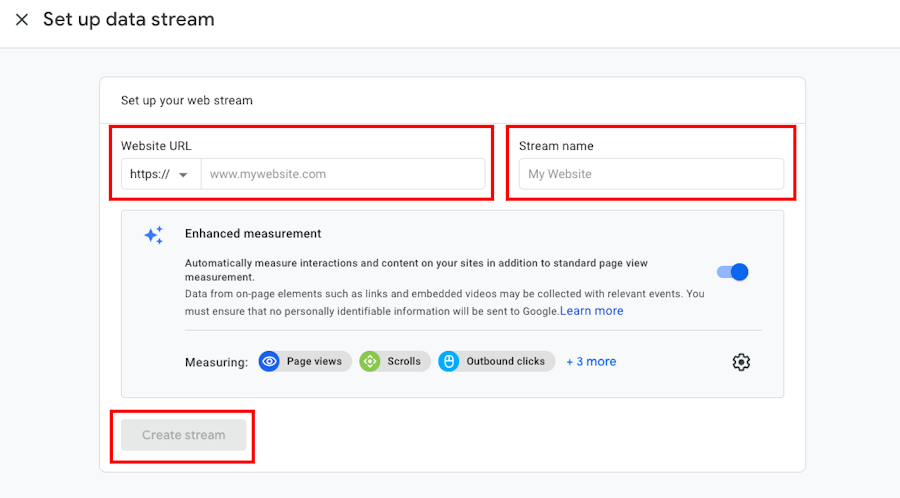
In most cases, you’ll simply select Web:

This brings up a new window where you can get your global tracking code. You’ll need to fill out your client’s website and name. You can also configure various tracking settings, but in most cases, you’ll want to leave the default settings as they are.
Then click Create Stream:

Scroll down to Tagging Instructions and expand the Global site tag section. This will give you the tracking code you need to connect Google Analytics to your client’s website:

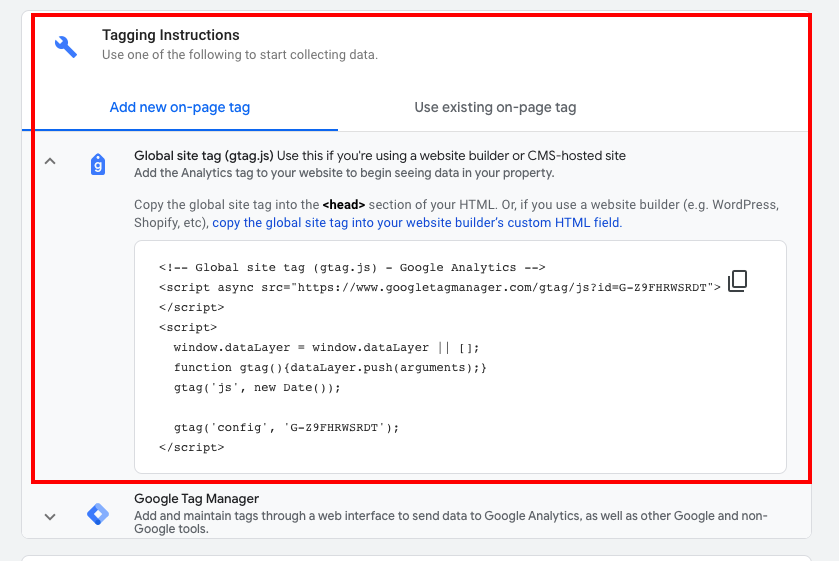
And this is also where you take the driver’s seatback for a few minutes. You’ll add this tag to the section of your HTML.
From there, your Google Analytics account will be all set up! If you’re familiar with Google Analytics' older version, then you may wonder if you have to create 3 distinct views: Master, Test, and Raw.
But in GA4, views aren’t offered. Word on the data-tracking streets is that they’ll release something similar or equivalent in the future, but for now you’ll rely mostly on filters.
As a quick note of caution: these filters are very basic and, honestly, can do more harm than good without testing them in a Test view first (which, again, isn’t offered in GA4).
Now let’s dive into how to set up the older (and my preferred) version of Google Analytics.
How to Set Up Google Analytics (Universal Analytics, aka, “Old Version”)
Setting up the Account
For this first part of the process, everything is exactly the same as setting up GA4, with one crucial exception:
If you want to rely on the older Google Analytics version, you’ll need to go into the Property Setup’s Advanced Settings.
Follow Step 1 & Step 2 from the previous section and skip directly to Step 3: Set up Your Google Analytics Property.
After you give your property a name, configure a time zone, and set the currency, click Show Advanced Options:

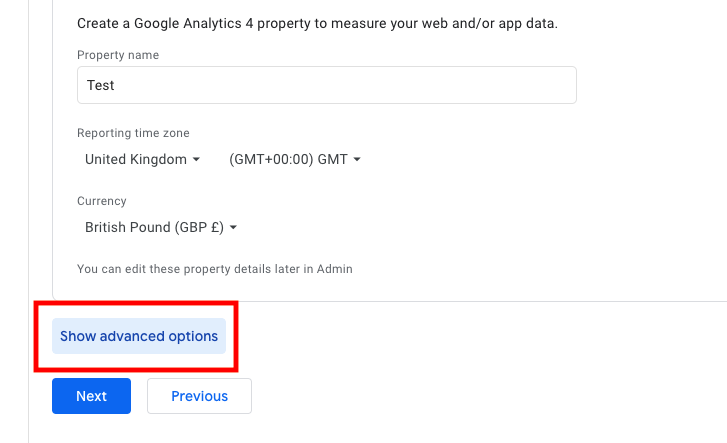
This will expand the field box and give you a single option: create a Universal Analytics property.
Flip the toggle switch to On. Then you’ll need to enter your website’s name and determine whether or not you want both the new GA4 or to stick with the older version only:

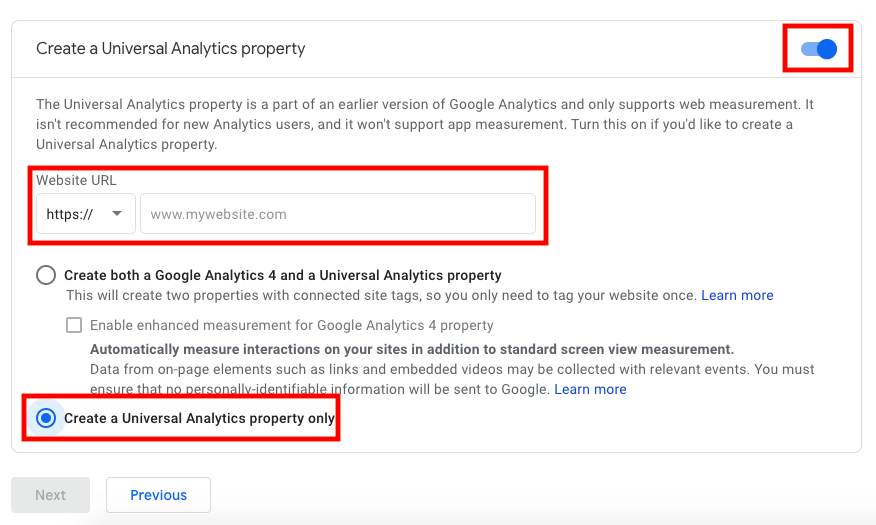
We’ll stick with the older version by clicking Create a Universal Analytics Property Only.
While Google Analytics 4 does have some cool new features, it’s not supported by lots of 3rd-party marketing tools. That’s because they’ve only recently put their API in beta for other tools to use.
There are advantages and disadvantages to both versions, but the old one still seems the most reliable at this point.
Plus, there’s WAY more documentation on how to navigate/configure the older version that will help your client troubleshoot problems if you’re off the clock.
Now that the account is created, it’s time to connect it to your client’s website. Fortunately, that’s a lot easier than it was with Google Analytics 4.
How to Connect Google Analytics (Old Version) to Your Client’s Website
As soon as you’re done creating your Google Analytics property, the very first thing that will appear is your universal tracking code:

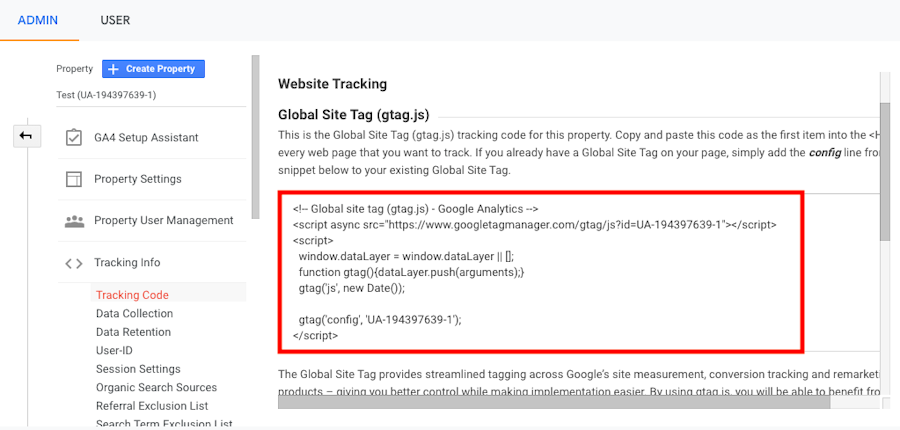
Copy and paste that code into the top of your tag on each page of your site.
There are plenty of tools that allow you to do this without manually adding the tag to each page, but they’ll be different depending on which platform your client uses for their website.
Once your tracking code is in place, it’s time to create 3 distinct views: Master, Test, and Raw.
Set up the Google Analytics Views (Raw, Master, Test)
This is one of the biggest mistakes I see business owners and new marketers make all the time. They’ll set up a Google Analytics Master view and leave it at that.
But when you only have this one view, your client is running several risks. If there’s a small bug or glitch with your tracking system, all the data will be affected. And since nothing with Google Analytics is retroactive, all of that data history will be lost.
That’s why every Google Analytics accounts should have a minimum of 3 views:
Master: This is the view that you’ll consult the most. It’s a reliable configuration of all your filters and sales funnels.
Test: This is where you can run new tests by applying filters or setting up custom funnels. After a few days with no problems, you’ll be able to transfer these filters to your Master view.
Raw: This is your unfiltered data. If your Test or Master views have a problem, you’ll still have untouched data history to draw from.
These different views will allow them the freedom to create new configurations and manage what information they receive without the risk of losing data—which, unfortunately, in Google Analytics cannot be recovered.
To be even franker: skip this step, and _you might as well go back to leaving your e-commerce tracking up to guesswork. _
Here’s a quick look at how to set up your 3 views:
First, go to Admin and look at the Views column (it’s the 3rd one) and click + Create View:

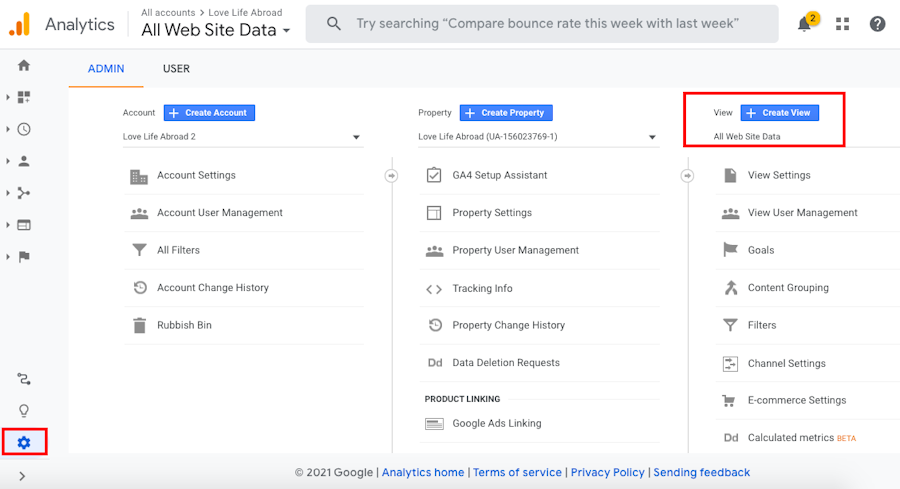
Enter the name for your new view (like Test, for example) and click Create View:

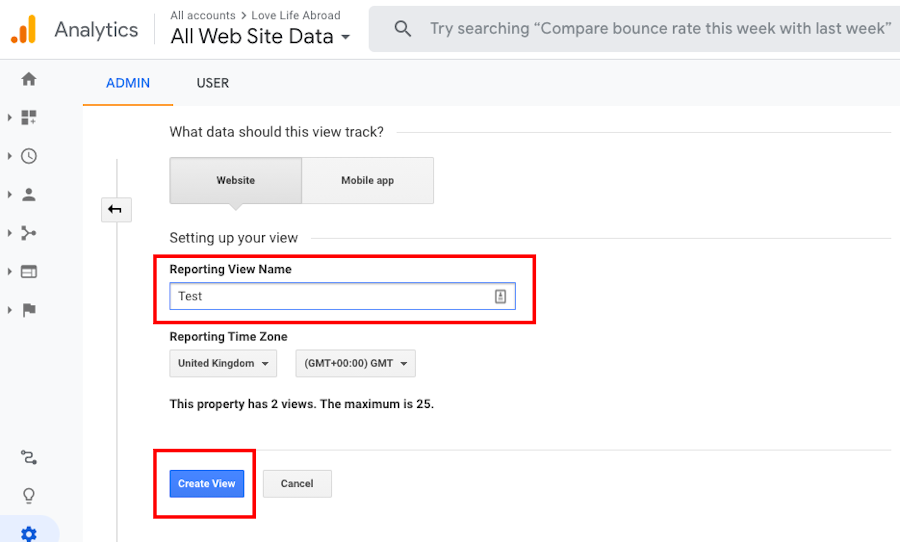
Then repeat the process for your Raw view and rename your original view to Master.
You should now have 3 distinct views:


And that’s it! Your client’s Google Analytics account is all set up.
Now, let’s turn our attention to setting up e-commerce conversion tracking for your client.
How to Set up E-Commerce Conversion Tracking
Once you set up Google Analytics for your client, you’ll show them how to manage their account and properly use the different views to choose which filters provide the most important data.
They’ll be able to track general KPIs for things like:
Users
Sessions
Bounce rates
Referral traffic
And much more. But let’s be honest, your client is likely most concerned with one piece of data in particular: are they making sales and, if so, where are those sales coming from?
This is hands down the most important part of setting up Google Analytics for your client’s e-commerce store. And it’s not something Google automatically sets up for you.
If you are going to use GA4, Google has thoroughly documented the process in this E-Commerce (GA4) Developer Guide.
Otherwise, let’s look at how to set up e-commerce tracking with Google Analytics' old version.
First, make sure you’re in your Test view. Remember, this is to make sure you don’t disrupt the data in your Master view as you're testing out your custom e-commerce event.
From the Admin dashboard, locate your Test view, click E-commerce Settings and flip the toggle switch to On:

Now here’s where things get a little… messy.
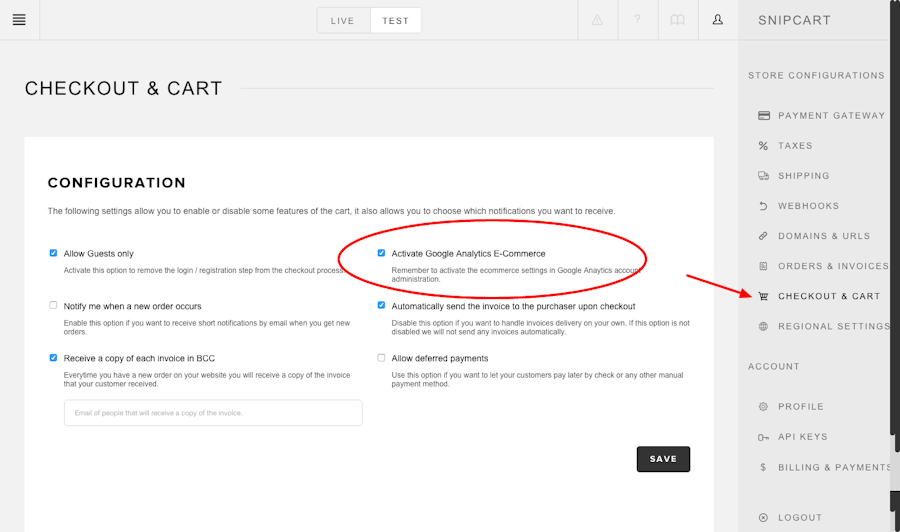
The way you track custom e-commerce sales will depend on which service or platform you use for your shopping cart.
With Snipcart, for example, all you have to do is go to your account dashboard. Then head to Store Configurations > Checkout & Cart and check the box Activate Google Analytics E-Commerce:
For a more detailed guide, check out this article: Setting Up Google Analytics E-Commerce Tracking With Snipcart.

So, as you can imagine, each tool you use for your shopping cart will have a different method for working with Google Analytics. Here is a list of the most popular shopping carts used:
Again, most of these platforms make it (almost) as easy as Snipcart.
And once you’ve configured the e-commerce tracking according to your client’s platform, they may want a quick and easy way to check conversions and revenue driven from specific channels.
You can build reports in Google Analytics, but this can be time-consuming, tedious, and prone to errors.
Another solution would be to use a report building tool like Metrics Watch or a similar report building tool to pull KPIs from various marketing sources.
That way you can automate the reports, send them at different frequencies, and give your client a more digestible UI than Google Analytics tends to offer.
Finally, what do you do if your client’s Google Analytics account isn’t working? Let’s take a look at a few common problems and give you a free resource to help troubleshoot these issues.
Google Analytics E-Commerce Tracking Not Working
In some cases, you might find that your e-commerce tracking isn’t working the way you want it to.
When that happens, you’ll want to run a Google Analytics audit to see what the problem is.
There could be many issues you’re facing, so it’s hard to give general troubleshooting advice.
Here are some of the most common problems:
Filters not created or applied properly
Cross-domain tracking (especially if your product is an app with a different URL than your marketing site)
Spam and/or bot attacks
Tracking code wasn’t properly installed
Query strings being miscounted (or misunderstood) by Google Analytics
Internal structures for UTMs or Events not properly configured
And about a million other things that could (and will) go wrong somewhere down the road.
For that, you can check out the free extensive Google Audit guide I’ve written.
It’s likely too long to read in one sitting, but you can bookmark the tab to have handy if a problem should arise in your client’s Google Analytics account.
I should also mention that this is the same guide I’ve used with paying clients when I was a Google Analytics consultant. It’s the accumulation of working with GA for years, and I’m happy to have it now publicly available for free.
Closing Thoughts
Google Analytics is a great resource that your clients can use to improve their marketing strategy and tighten up their sales funnels.
That’s why it’s so important for the sake of your brand’s reputation that you understand the process of setting up Google Analytics for a client before actually setting it up with them on the call.
If you’re struggling through the conversation or making small errors during the Google Analytics configuration, it might make your clients second-guess your overall skill set.
Before working with a client on this project, remember these main key points:
Make sure THEY are the owners of the account.
Decide if you want to use Universal Tracking (the old Google Analytics) or the newer Google Analytics 4.
Create at least 3 views for your client (if you’re using the older version): Master, Test, and Raw.
Understand your client’s shopping cart requirements to set up e-commerce tracking events.
Make sure to test EVERYTHING before going live, and feel free to use my free Google Analytics audit guide if you run into problems.
Best of luck setting up Google Analytics for your client!
Questions or comments? Let us know your biggest struggles when setting up Google Analytics for YOUR clients in the comments section below!
If you've enjoyed this post, please take a second to share it on Twitter. Got comments, questions? Hit the section below!


