Adobe Muse E-Commerce: Quick Shopping Cart Integration
Some web designers don't like to play with code too much. And I can't blame them.
Because I get it: aesthetics and logic don't always get along in our industry (you should see our frontend developer and designer argue).
Good news is there are a bunch of awesome tools for web designers to create websites without stepping too much into code territory.
Adobe Muse is one of them.
Bad news is, more often than not, e-commerce functionalities for these tools suck. Or, like in Adobe Muse's case, they simply don't exist!
How do we know? Well, for starters, we received dozens of support and email requests from designers regarding Adobe Muse. And they can all be summed up into one simple question:
Can you show us how to add your shopping cart platform to my site so I can finally run e-commerce on Adobe Muse?
The answer? Yes, we can—and will—teach you how to add e-commerce to your Adobe Muse site with Snipcart.
And the extra good news? It's even simpler than you'd imagine.
In this post, I'm going to show you how to enable Adobe Muse e-commerce by integrating a simple shopping cart and buy buttons to your site.
We'll be putting together a simple demo store to sell Pokémon Go gear for aspiring hunters. Because why not.
Ready? Let's go.
IMPORTANT UPDATE: Since we published this post, two full-fledged Snipcart widgets for Muse were released. We strongly advise checking out both Muse-Themes' widget) and Pure Presence Creative's widget.
Step 1: Adding the shopping cart to your Adobe Muse site
Please note that, for this tutorial, we assume you're already familiar with Adobe Muse. If you're not, go ahead and check out this tutorial.
The first thing you need to do is include Snipcart's required scripts on your site. The code snippet looks like this:
<script src="https://ajax.googleapis.com/ajax/libs/jquery/2.2.2/jquery.min.js"></script>

<script src="https://cdn.snipcart.com/scripts/2.0/snipcart.js" data-api-key="YOUR_API_KEY" id="snipcart"></script>

<link href="https://cdn.snipcart.com/themes/2.0/base/snipcart.min.css" rel="stylesheet" type="text/css" />
You can find it in your merchant dashboard as soon as you sign up for free.
More specifically, you have to put it on every page where you want to sell products. You can achieve this by including the snippet manually on every required page, or by injecting it into a layout page your other pages will depend on.
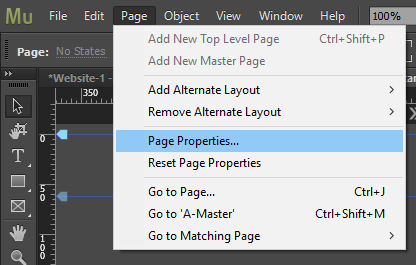
To do so, click on Page > Page Properties in the task bar.

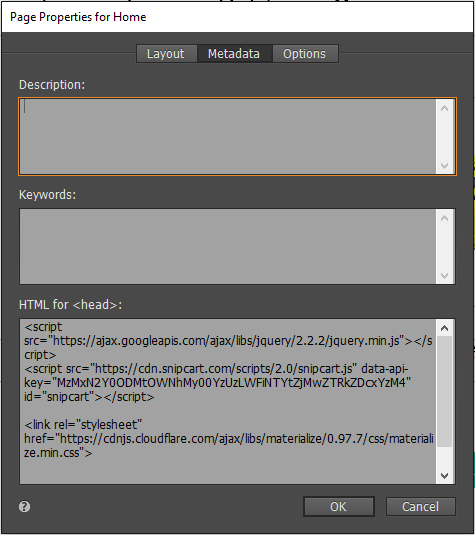
Then, click on Metadata. You will see a box called: HTML for . This is where you want to put the code snippet that will include Snipcart.
Here's what it should look like:

Step 2: Adding products to enable e-commerce in Adobe Muse
Okay, so you've successfully added our shopping cart to your site.
Now it's time to create pages that will contain your products' buy buttons (if you haven't done it already).
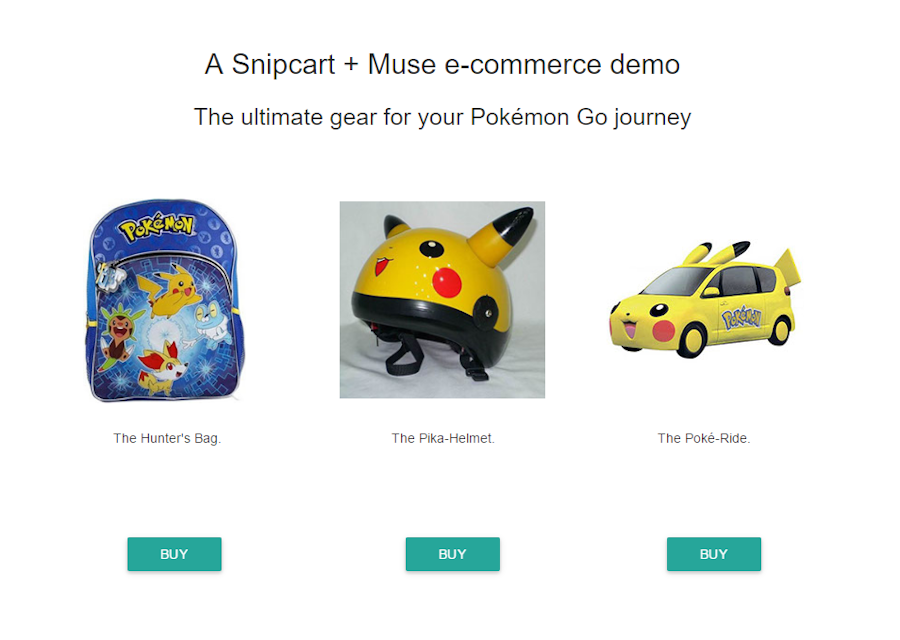
For this demo, we'll create a basic homepage with three products that you can buy. These products will also have individual pages.
Note that the scripts on the homepage have been included only for this page. For the individual pages, they are included within the layout they extend.
Once you've created your pages and styled them to your liking, you'll need to create the buy buttons for your products.
Since Snipcart doesn't have any Adobe Muse widget to create buttons out of the box, you will have to create Muse embedded HTML objects.
To do so, click on Object panel > Insert HTML... in the task bar.
From there, you can define the buy buttons that will make Snipcart's shopping cart pop.
Here's one of the definition we'll use for the demo:
  <button
      class="snipcart-add-item waves-effect waves-light btn"
      data-item-id="1"
      data-item-name="The Hunter’s Bag"
      data-item-price="45.00"
      data-item-weight="20"
      data-item-url="/"
      data-item-image="http://muse-snipcart-demo.businesscatalyst.com/images/pokemon-ccg-16-backpack.jpg?crc=3879992281"
      data-item-description="Your best travelling companion. Fill it with food, water, an emergency flare gun, and maybe a taser for muggers.">
      BUY NOW!
  </button>
At this point, if you preview the page in your browser, you should already be able to add the newly created product in the cart. Awesome, right?
You can repeat this step for every product you want, and position your buttons with Muse as desired.
Note that, for our demo, we also included an external CSS in the <head> tag to style our buttons.
I also decided to go a little deeper for our demo site and create individual pages for each product. With Muse, you can simply copy and paste HTML embeds. So I used this technique to transfer the buy buttons on the new pages.
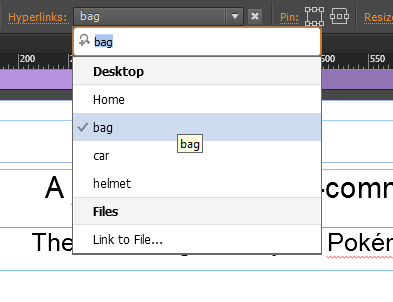
Using Muse's hyperlink functionality, I added direct links on the homepage's product images leading to the new individual pages.

Here's the homepage of our final demo store:

Conclusion
As you can see, setting up a basic Snipcart e-commerce integration for Muse is pretty straightforward.
I really liked how easy it is to start creating a website in Adobe Muse. There's next to no learning curve, and that makes for fast design/development! Once Muse was installed on my computer and I started understanding how it worked, it took me about 30 minutes to create the store.
I'm now convinced it's a great asset for web designers who don't want to juggle with too much code.
We could have pushed the integration further by creating a full MuCow Widget, enabling users to input data directly into a Muse interface. If we get lots of requests regarding that, we'll consider updating the post! :)
If you enjoyed this post and found it valuable in any way, go ahead and send a tweet our way. I'd really like that! Got any questions regarding Adobe Muse & Snipcart? Feel free to hit the comments. :)


