Crafting a Webpack-Powered Static Site with Spike
In a rush? Skip to tutorial steps or GitHub repo & live demo.
In our research for a new static site generator to discuss on the blog, we stumbled upon Spike.
While it's nowhere near the most popular static generation tools out there, there's one characteristic that caught our attention and made us eager to take a closer look:
Spike is powered by webpack.


If you're unfamiliar with this module bundler, don't worry, we explore all the basics in this webpack static site tutorial.
We'll be using Spike to craft a webpack-powered online shop in five simple steps:
Declaring products
Tweaking our app.js
Creating views in Spike
Booting the webpack static site
Deploying on Netlify
Let's start by introducing webpack and see why any developer should care about it.
What is webpack?
Like I mentioned earlier, it's a module bundler which takes modules with dependencies and generates static assets representing those modules.

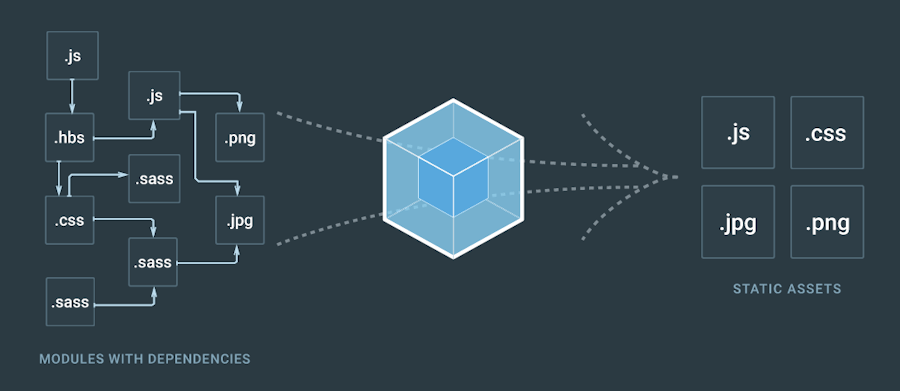
Modules bundled into static assets [Source]
For a more comprehensive definition, here's how webpack developers put it:
webpack is a module bundler for modern JavaScript applications. When webpack processes your application, it recursively builds a dependency graph that includes every module your application needs, then packages all of those modules into a small number of bundles - often only one - to be loaded by the browser.
As we're evolving towards web apps and relying more and more on JavaScript, it becomes mandatory to find ways to organize all that code on the frontend.
It's the most popular tool of this kind right now, and if you're remotely working with JavaScript you should get to know its capabilities.
Note that webpack is highly configurable, thanks in great part to its plugin system.
A word on webpack static site generator Spike
Knowing what webpack is capable of, seeing static site generators built around it emerge makes sense. While Spike might not be the first one to do so—we already wrote about React & webpack-powered Gatsby—it's made by the talented folks at Carrot Creative, which sounds pretty promising.
They are the same creators behind the now unmaintained static generator Roots. Spike is able to produce anything that Roots did in an even better way, acting as its successor.

Spike is based on a simple principle:
Out of the box, Spike will just take standard HTML, CSS, and JS files and copy them over without any modification. It is up to you to build your ideal system out of plugins that transform your content.
In other words, it's a thin layer that leverages different "ecosystems" like webpack to bundle and generate a static website. You’re the one in charge of defining the build process.
Luckily enough, Spike makes the whole thing feel quite intuitive. This way, you can easily start with a beginner build without having to worry about losing any extensibility that might be required were you to expand your integration.
Oh, it's also free & open source! :)
Here's Jeff Escalante, lead developer on the project, talking about Spike on JAMstack Radio:
Now let's build a static, e-commerce ready website with webpack. If flexibility is what you’re after, then you’ll find yourself very pleased with a Spike & Snipcart combination for your online store.
For this demo, the only prerequisite is a Snipcart account (free in test mode). That’s it!
Webpack static site tutorial with Spike
First, you’ll have to install Spike with the following command: npm install -g spike.
Next, you can use Spike's default template for our project using the following scaffolding command: spike new spike-snipcart.
If you plan on building and deploying your website on a VM, you’re also going to have to add Spike as a dependency with npm install --save spike.
1. Getting started: declaring our products
Before we can move forward, we’re going to declare our products. For this demo, we’ll keep it simple and not use any external data. That being said, we still don’t want to input them directly into our views.
Let's place a data folder within our assets folder. From there, we’ll declare a new folder called products with the index.js file containing the following:
module.exports = [
    {
        name: 'The Revolver',
        price: 15,
        description: 'Easy to carry, perfect while roaming.',
        sku: '1',
        image: 'https://snipcart.com/media/10191/nerf-1.jpg'
    },
    {
        name: 'The Heavy Duty',
        price: 65,
        description: 'Spray and pray.',
        sku: '2',
        image: 'https://snipcart.com/media/10192/nerf-2.jpg'
    },
    {
        name: 'The One Hit Wonder',
        price: 70,
        description: 'One shot, one opportunity',
        sku: '3',
        image: 'https://snipcart.com/media/10193/nerf-3.jpg'
    }
]
2. Tweaking our app.js
Now that we have the data, we’re going to have to inject it into our pages so we can actually use it.
To do this, we’ll have to go to our app.js file and use the following declaration to load it:
const products = require('./assets/data/products/index.js')
Then, we’re going to use the following reshape declaration to inject our products into the locals variable:
reshape: htmlStandards({
  locals: (ctx) => { return { products: products } }
})
3. Generating our views
We’ve got access to products in our views: let's use it! To keep this demo simple, we’ll wipe out the default index.sgr page and replace it with a new one. We’ll use it to display our products instead.
extends(src='layout.sgr')
  block(name='content')
    div(class='columns')
      each(loop='product of products')
        div(class="column")

          img(src="{{ product.image }}" alt="{{ product.name }}" class="thumbnail product_image")
          div(class="title") {{ product.name }}

          button(class="snipcart-add-item"
            data-item-name="{{ product.name }}"
            data-item-id="{{ product.sku }}"
            data-item-image="{{ product.image }}"
            data-item-description="{{ product.description }}"
            data-item-url="/"
            data-item-price="{{ product.price }}") Buy it for {{ product.price }} $
As you can see, each product is iterated and a buy button is created for each and every one of them. Now, we’re only missing the necessary scripts for Snipcart, which we’ll add right into our layout.
Note that, if you were to have multiple pages, we recommend you use an include to do so.
Here's our new layout:
doctype html
html
  head
    block(name='meta')
      meta(charset='utf-8')
      meta(http-equiv='X-UA-Compatible' content='IE=edge')
      meta(name='description' content='')
      meta(name='author' content='maximelaboisson')
      meta(name='viewport' content='width=device-width, initial-scale=1')

    block(name='title')
      title Spike & Snipcart e-commerce powered demo store

    block(name='stylesheets')
      link(rel='stylesheet' href='https://cdnjs.cloudflare.com/ajax/libs/bulma/0.4.1/css/bulma.min.css')
      link(rel='stylesheet' href='css/index.css')
      link(href="https://cdn.snipcart.com/themes/2.0/base/snipcart.min.css" rel="stylesheet" type="text/css")

  body

    div(class='header title')
      | Spike & Snipcart e-commerce powered demo store

    main(role='main' id='{{ pageId }}')
      block(name='content')

    block(name='javascript')
      script(src='js/main.js' defer)
      script(src='https://cdnjs.cloudflare.com/ajax/libs/jquery/3.2.1/jquery.js')
      script(src="https://cdn.snipcart.com/scripts/2.0/snipcart.js" data-api-key="{{ APIkey }}" id="snipcart")
Notice how we entered our Snipcart API key as follows: {{ APIkey }}.
For it to work, we’ll have to inject it into our locals using the same process as with products.
To do this, head on back into your app.js file and change the reshape declaration to:
reshape: htmlStandards({
   locals: (ctx) => { return { products: products, APIkey: 'YOUR_API_KEY' } }
 })
4. Booting up our webpack static site
Let's see how it looks now! With the Spike CLI, use the spike watch method in your project folder. It’ll create a neat dev server serving your public build folder without reloading all code changes.
Now, if you hit the website, this is what you should see.


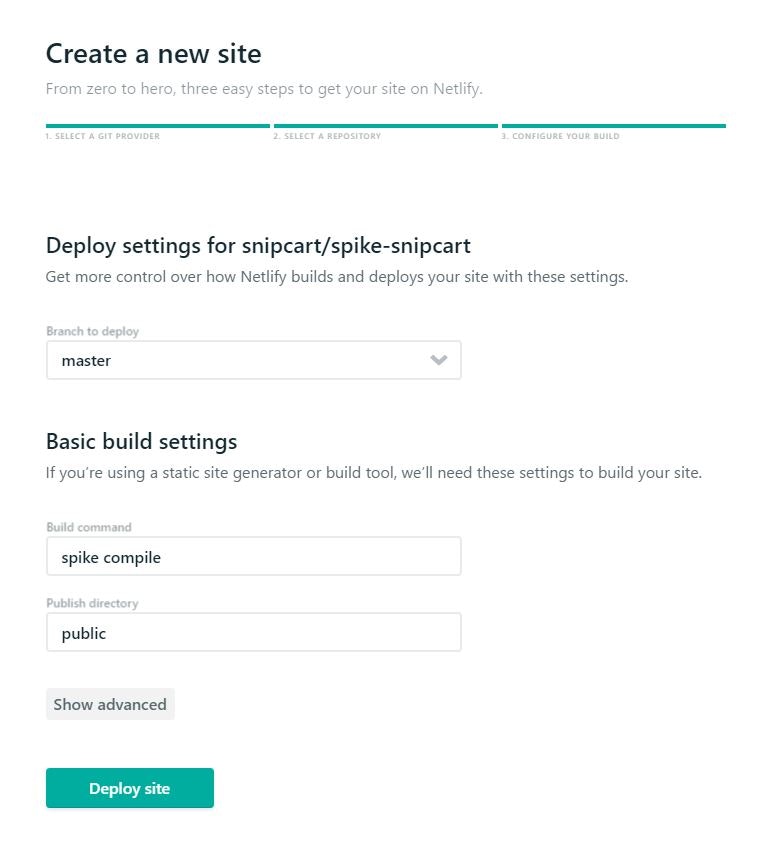
5. Deploying on Netlify
Now that it’s all done, we’ll use Netlify to deploy our site. It’s pretty straightforward, simply push your project to a Git repo and then hit up Netlify's website.
From there, use Spike compile as your build command, and "public" as your publishing directory.
Take a look at our example:

You're all done! Netlify will take charge of the rest. Your website should be working as it was locally.
Webpack static site live demo & GitHub repo
Now go ahead, browse our demo site and sift through our open source code!
See live demo here
See GitHub repo here
Closing thoughts
It took me an hour or so to put this demo together. Although Spike has a good documentation, I still had to do some extra digging to find some good examples for this demo.
Fortunately, there’s an open source website that was created using Spike, which offers a wide variety of solid examples.
At the end of the day, I feel as though Spike is really powerful. However, it does take some time getting used to it if you really want to make the most of it. I think it would be time well-invested though: webpack is a tool you want to include in your stack, and Spike is worth exploring further.
Personally, I could have fetched some external data for the product build process, but I held back for the purpose of this demo. But it’s something that I do plan on exploring in the future. It should be interesting, and I’ll definitely keep you guys posted once I’ve given it a go!
In the meantime, I remind you that Spike is open source, so feel free to take a look and participate!
If you've enjoyed this post, please take a second to share it on Twitter. Got comments, questions? Hit the section below!


