The Complete JavaScript Module Bundlers Guide
Jump directly to the top 5 JavaScript module bundlers!
The JavaScript world has changed a lot in the last few years. Gone are the days of manually including jQuery, Bootstrap, and React on every page of your site. Nowadays, it's all about bundling everything up into one static file that you can load with just a single line of code.
Module bundlers are the way to organize and combine many files of JavaScript code into one file. A JavaScript bundler can be used when your project becomes too large for a single file or when you're working with libraries that have multiple dependencies. In this blog post, we'll walk through what bundlers do and how they work in detail.
Bundle Up!


What is a JavaScript module bundler?
A bundler is a development tool that combines many JavaScript code files into a single one that is production-ready loadable in the browser. A fantastic feature of a bundler is that it generates a dependency graph as it traverses your first code files. This implies that beginning with the entry point you specified, the module bundler keeps track of both your source files’ dependencies and third-party dependencies. This dependency graph guarantees that all source and associated code files are kept up to date and error-free.
You can only imagine how complicated the procedure was before bundlers. Keeping all of the files and their dependencies up to date and ready was a herculean task for web developers.
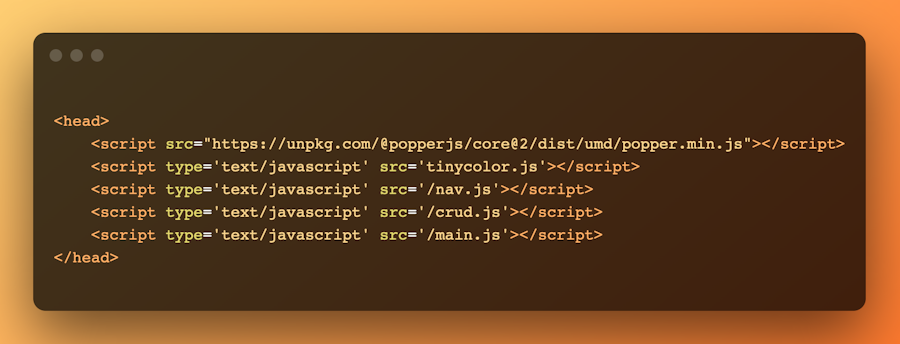
Consider a basic JavaScript CRUD (Create, Read, Update, and Delete) app like a grocery list. In the pre-bundler era, you might have constructed these functions in separate JS files. You could even opt to make your app a little more fancy by incorporating third-party libraries, and this would need your file to make several queries upon loading, like in this example.

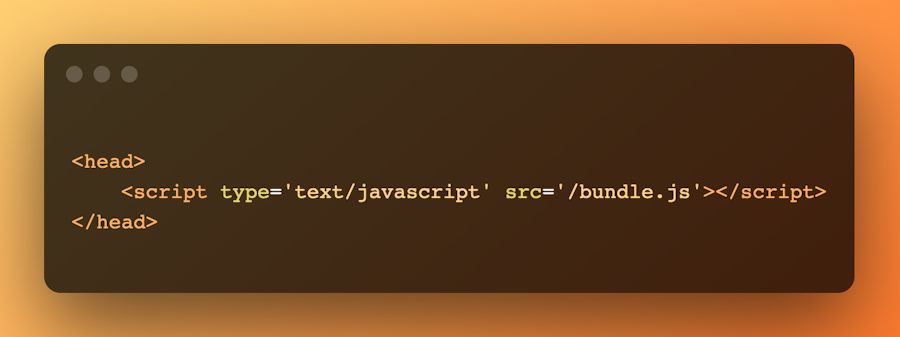
However, using a bundler will merge the files and their dependencies into a single file.

Suppose you’re developing or maintaining a large app like an e-commerce site that provides access to thousands of products to several users. For a use case like this, you most likely will need to employ custom or third-party libraries to power some of your more complex tasks. In that case, developing without a JavaScript module bundler would make keeping all the dependencies updated to the latest version an exhaustive process.
Apart from providing a consistent tooling environment that saves you from the pain of dependencies, many popular module bundlers also come with performance optimization features. Code splitting and hot module replacement are examples of these functionalities. JavaScript bundlers also have productivity-enhancing features such as robust error logging, which lets developers easily debug and repair errors.
How does a bundler work?
After discussing what bundlers are and how crucial they are in today's web development ecosystem, let's look at how these dependency management tools work. Overall, a bundler's operation is divided into two stages: dependency graph generation and eventual bundling.
Mapping a Dependency Graph
The first thing a module bundler does is generate a relationship map of all the served files. This process is called Dependency Resolution. To do this, the bundler requires an entry file which should ideally be your main file. It then parses through this entry file to understand its dependencies.
Following that, it traverses the dependencies to determine the dependencies of these dependencies. Tricky, eh? It assigns unique IDs to each file it sees throughout this process. Finally, it extracts all dependencies and generates a dependency graph that depicts the relationship between all files.
Why is this process necessary?
It enables the module to construct a dependency order, vital for retrieving functions when a browser requests them.
return { id, filename, dependencies, code, };It prevents naming conflicts since the JS bundler has a good source map of all the files and their dependencies.
It detects unused files allowing us to get rid of unnecessary files.
Bundling
After receiving inputs and traversing its dependencies during the Dependency Resolution phase, a bundler delivers static assets that the browser can successfully process. This output stage is called Packing. During this process, the bundler will leverage the dependency graph to integrate our multiple code files, inject the required function and module.exports object, and return a single executable bundle that the browser can load successfully.
Top 5 JavaScript module bundlers
Now that we’ve discussed the importance of JavaScript module bundlers and how they work, you might be wondering which kind of bundler is best for you. There are many different module bundlers in the JavaScript ecosystem and each with its unique bundling method. We'll look at five of the most popular module bundlers in the Javascript ecosystem, exploring how they function as well as their benefits and drawbacks.

Webpack

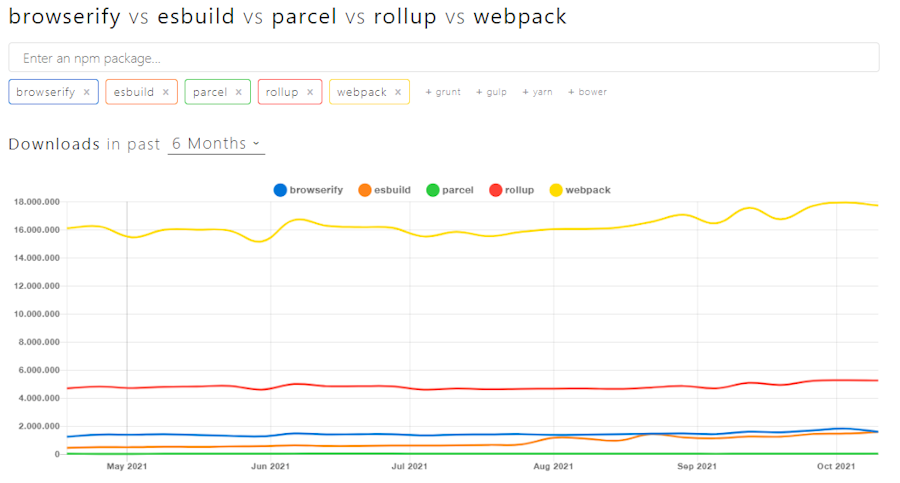
With over 18 million weekly downloads and 60k GitHub stars, Webpack is currently the most popular JavaScript module bundler. As a static module bundler, it comes with a host of sophisticated and highly customizable features, making it a module bundler for JavaScript files and a transformer, minifier, and optimizer of all types of file resources and assets. That’s not all. Webpack has a very rich plugin and loaders ecosystem as well.
How does it work?
Like all modern JavaScript bundlers, Webpack begins the bundling process by assembling a dependency graph. To understand how it performs the dependency resolution step, you must first grasp six key concepts:
Entry: specifies where Webpack should initiate its dependency graph. You can have one or more entry points depending on your app’s architecture. Webpack iterates through the module(s) listed in the webpack.config.js config file identifying the entry point’s direct and indirect dependencies.
module.exports = { entry: './app/index.js', };Output: specifies the desired destination for the final output after Webpack completes the packing process. The Output property contains two sub-values: the file path, usually the
/distfolder, and the desiredfilename.
const path = require('path'); module.exports = { entry: './app/index.js', output: { path: path.resolve(__dirname, 'dist'), filename: 'webpack-app.bundle.js', }, };Loaders: allow Webpack to transform and bundle non-JS files.
Plugins: allow Webpack to perform more advanced actions like custom resource optimization and management.
Mode: allows Webpack to configure its operations to production or development modes dynamically.
Browser Compatibility: allow Webpack to build bundles that support modern and old browsers with features like promises and polyfills.
After creating the internal modules map, Webpack then uses functions to wrap the associated modules bundling all together to be invoked by one singular runtime function called webpackStart.
Getting started is as simple as running npm i webpack
Pros
Multi-resource support
In addition to providing out-of-the-box support for JS files, Webpack has a rich Plugin ecosystem it relies on to bundle other files like CSS and Images.
Asset optimization
Features like code-splitting allow you to break code files into chunks, thereby reducing load time. There’s the Hot module replacement that helps you to manage modules without fully reloading the browser. Developers can employ Loaders in preprocessing their files, resulting in a faster app runtime. These and more highly customizable optimization features have made Webpack the most popular JS bundler.
Developers’ productivity
When working with a complicated task like Module bundling as a developer, it’s crucial to have:
Extensive documentation.
A solid ecosystem of third-party tools you can lean on.
Efficient error debugging process that makes your work easier.
Webpack fulfills these three requirements by offering a massive ecosystem of plugins and loaders, as well as source map-powered debugging. That’s not all. Webpack has an internal caching system that empowers developers to build apps in a short time.
Cons
Complex
Webpack’s sophistication is a double-edged sword for many developers who have a love-hate relationship with it. It also is complex and has a steep learning curve.
Buggy and Slow
Webpack’s all batteries included approach can sometimes cause Webpack app integrations to be overengineered. Over-reliance on plugins to do simple functions can cause the bundler to slow W necessitating technical debugging to make it well-optimized.
Browserify


Browserify is an open-source Javascript bundler that allows you to bundle Node.js files that the browser can run. With Browserify, developers can use node-style require() to load npm modules in the browser. Initially released in 2010, the JS bundler has enjoyed decent success amongst developers. It’s downloaded nearly 2 million times every week and has over 13k GitHub stars.
How does it work?
Like all other JavaScript bundlers, Browserify goes through defined stages when bundling modules. The first is the Dependency graph formation. In this stage, Browserify starts from the specified entry point files and then recursively searches for all require() calls in your files. Each require() call is resolved with a file path, and each file path is further traversed for more require() calls.
After the entire app’s dependency graph has been fully mapped, it creates a self-contained bundle comprising files that have been merged and mapped to unique IDs. It's worth noting that Browserfy also offers advanced customizations, such as the ability to replace these IDs with hashed ones.
You can then place the final bundle in a single <script> for eventual browser loading. Getting started with Browserify is as simple as running npm i webpack and running Browserify against your entry file.
$ browserify main.js > bundle.jsThe bundler also provides some inbuilt options like --debug and --ignore-missing.
Pros
Simplicity
For most applications with fewer features, many developers find Browserify perfect for their needs. It provides straightforward npm integrations that allow you to re-use your node code without needing a native CLI.
Developers productivity
Browserify’s most significant selling point is that it allows you to take advantage of the rich npm ecosystem. It's easy to learn and has excellent documentation. Furthermore, it comes with an inbuilt automatic build system that makes building modules fast and straightforward. All of this adds up to a great experience while developing your application.
Cons
No multi-resource support
Unlike Webpack, Browserify doesn’t provide multi-asset support. You can, however, use a Gulp workflow to find your way around this. The process nevertheless introduces unnecessary complexity.
Lack of advanced management features
Browserify limits you to the Node.js npm ecosystem and lacks powerful asset management tools that can assist you in optimizing your modules. This includes a lack of support for dynamic loading.
Parcel

Parcel is a plug-and-play, zero-configuration build tool that allows developers to configure multi-assets quickly (e.g., JS, CSS, and HTML) modules necessary for development. It has over 39k stars on Github, making it the second most popular JS bundler behind Webpack.
How does it work?
Parcel’s bundling process involves three steps:
Asset Tree construction: In this stage, Parcel takes an entry point asset and traverses through the file to identify the dependencies used to create a tree of assets similar to the dependency graph.
Bundle Tree construction: Here, individual assets in the Asset Tree are combined with their linked dependencies to form a bundle tree.
Packaging: This is the final stage where each bundle on the bundle tree is associated with its specific packager file types and transformed into a final compiled file.
After that, you can then provide a single entry asset against Parcel. Make sure to note that Parcel supports multiple entry points.
To get started, run npm i parcel.
Let’s say you have a sample HTML boilerplate.
<html>
  <body>
    <script src="./index.js"></script>
  </body>
</html>
You can then use Parcel to build the HTML file by running: parcel index.html. What’s impressive is that Parcel will compile the HTML file pointed to it and the index.js that the HTML links to.
Pros
Zero configuration
Parcel solves the configuration issues faced with Webpack and Browserify providing developers with a performant architecture needed for rapid web development. There’s also multi-asset support like Webpack enabling bundles for all kinds of non-JavaScript assets like CSS, HTML, and images.
Fast
Parcel is fast providing premium resource optimization features like hot module replacement and lazy loading of split code. According to the most recent benchmarks, Parcel's bundling speed is 9.98s, compared to Browserify's 22.98s and Webpack's 20.71s. Using Parcel's built-in caching technique can even deliver quicker results, with a benchmark time of 2.64s.
Cons
Lack of advanced customizations
As a highly-opinionated bundler, Parcel is perfect for small and medium-sized applications. Nonetheless, making it work for complex applications where you need to modify the configurations might be tedious. In this situation, most developers prefer to use Webpack.
Fusebox

Fusebox is an open-source Javascript and Typescript bundler and loader. It combines Webpack's best optimization techniques into a fast, lightweight bundler that gives a rich API experience.
How does it work?
The Fusebox bundling process provides a couple of defaults that keep things easy to get started without requiring extensive modifications.
To get started, install Fusebox with the command: npm i fuse-box. After that, you need to create the main configuration script file, usually titled fuse.js or fuse.ts. Here's an example code snippet that includes the entry point and destination file, as well as the required mode.
import { fusebox } from 'fuse-box'; fusebox({ target: 'browser', entry: 'src/index.tsx', webIndex: { template: 'src/index.html', }, devServer: true, }).runDev();Fusebox initiates the bundling process by building a virtual file structure that mimics a dependency graph. These files are then emitted and bundled together.
Pros
Excellent developer experience
Fusebox has a minimum defaults style resulting in a simple learning curve for beginners. This allows for a quick start without much configuration.
Fast
It provides a fast experience due to a couple of asset optimization features it has. Features like HMR (Hot Module Replacement) allow the bundler to manage assets without fully refreshing the browser. There’s a powerful cache system and inbuilt code-spilling, resulting in faster browser loads.
Cons
Poor multi-asset support
Fusebox is Javascript and Typescript-centric, rendering inbuilt support for both files. Working with other files like CSS would require integrating the CSSPlugin or the SassPlugin. Because it is a newer bundler, it lacks the robust ecosystem seen in Webpack.
Rollup

Released in 2018, Rollup is a next-generation JavaScript bundler whose primary selling point is its tree-shaking feature, enabling it to sieve out unused resources before bundling single, smaller modules into larger ones. Because of this capability has gained some traction among developers and has been downloaded over 4 million times every week, and it also has more than 20,000 GitHub stars.
How does it work?
Rollup uses the main configuration file, usually named rollup.config.js, to define bundling specifications. Next, it analyzes the entry point file and then sorts the dependencies while creating a dependency order. During this parsing process, the tree shaking feature is also implemented. Finally, all the declared functions encountered in the specified modules are compiled into a single global scope while paying attention to potential name collision.
To get started, run npm i rollup to install rollup. You can perform the bundling process either through a CLI with the aid of a config file or via the bundling JavaScript API.
Here’s a sample config file containing the entry point, output file destination, and format type.
export default { input: 'src/app.js', output: { file: 'bundle.js', format: 'cjs' } };Like many other JavaScript bundlers, Rollup also supports multiple entry points.
Pros
Asset optimization
Rollup provides rich asset management features allowing you to code-split your bundles for faster browser loads. There’s also the Tree-shaking feature that helps developers get rid of unnecessary variables or functions.
Native ES6 support
For better browser compatibility in sharing imports and exports, Javascript’s ES6 version was released. Rollups supports this new ES6 module system keeping existing import and export functions while allowing you to transform them to other module formats like CommonJS and AMD.
Cons
Budding developer ecosystem
One of the growing pains of a new development tool is the time it takes to build a fully-fledged ecosystem. While Rollup is ideal for quick tasks, developers may be disappointed when creating large, complex apps due to a lack of plugins for required functionalities.
Honorary Mention: Vite.js
Vite.js

Vite.js is a next-generation, open-source frontend building tool. Vite.js is a next-generation, open-source frontend building tool. Vue.js creator Evan You created Vite.js in 2020 to enhance the bundling ecosystem by exploiting the latest ES modules improvements to solve some of the building performance issues prior bundlers encountered.
Currently, Vite.js has over 33.9k stars on Github and has over 340,000 downloads every week.
How Does It Work?
One of Vite.js's unique features is that it comes with a dev server and a bundling build command. The Dev server parses your application modules and separates them into two groups: The dependencies which are mostly not frequently updated are pre-bunded using esbuild, a JavaScript bundler that's extremely faster than Webpack, Rollup, and Parcel. The application source code's other group requires frequent updates and is served on-demand without bundling to the browser leveraging the browser's powerful ESM module capability.
On the other hand, the build command bundles your code using Rollup, a JS bundler we've examined earlier. Vite.js starts from an entry point when traversing your codebase to convert them into production-ready static assets. Like several other JS bundlers, Vite.js also supports multiple entry points.
// vite.config.js
const { resolve } = require('path')
const { defineConfig } = require('vite')

module.exports = defineConfig({
 build: {
   rollupOptions: {
     input: {
       main: resolve(__dirname, 'index.html'),
       nested: resolve(__dirname, 'nested/index.html')
     }
   }
 }
})
Pros
Lean and Fast
By leveraging the Native ES6 module system, Vite.js can serve application code faster by reducing the number of browser requests it makes. That's not all. Vite.js also comes with Hot Module Replacement (HMR), making editing a quicker, near-instant process.
Multi-Framework Support
Vite.js is framework-agnostic with out-of-box support for many popular Javascript frameworks like React.js, Vue.js, Typescript, and Preact. Recent releases have also integrated support for CSS modules, pre-processors, and other static assets. For example, you can quickly set up a Vue.js app with Vite using the following command:
npm init vite@latest my-vue-app -- --template vue
It also has a rich plugin ecosystem that leverages other bundlers like esbuild and Rollup plugin ecosystems to provide developers with an extensive set of options.
Cons
Reliance on ESM Modules
Vite.js heavily relies on the browser's native ESM system to produce the mindblowing speed it's known for. This means developers might run into issues when dealing with older browsers that don't support these upgrades.
Closing thoughts
Honestly, it's tough to determine which of these bundlers is the best overall because each offers distinctive features that may be ideal for your requirements. For example, if you're creating a large app with complex features, such as an e-commerce app, and want complete control over your configurations, Webpack is a fantastic option. On the other hand, Fusebox might be an attractive alternative if you're developing a hobby project and enjoy working with Typescript.
I’d say that regardless of the option you take, performance and development workflow metrics should be your north star.


Do you have a preferred bundler? Why do you like it? Let us know in the comments.


