Introducing TinaCMS: Inline Content Editing for React
In a rush? Skip to technical tutorial or live demo.
“Jamstack is great for developers, but it’s too tech-savvy to get my clients on board.”
I can’t count the number of times we’ve heard this comment from devs.
In all fairness, it was true of the Jamstack in 2015. However, many solutions to get around this issue have popped up since then.
Take the multiple competent headless CMSs or static site builders such as Stackbit, for instance. They’ve paved the way for a user-friendly modern web development experience.
Another relatively new player, TinaCMS, is pushing static website editing to a whole new accessibility level.
In this post, I’ll try out this editing toolkit by integrating it on a Next.js app and showcasing its main features.
The steps to build the live demo are as follow:
Creating a Next.js project
Adding markdown content
Generating markdown helpers
Integrating TinaCMS & the inline editing feature
Ready to do this?
What is TinaCMS?


The team at Tina has made it pretty clear that it isn’t a CMS. Not in the traditional sense anyway.
What is it then? The definition you’ll find on their site is that Tina is an open-source site editing toolkit for React-based sites.
It allows users to manage content directly on their website instead of working from another platform. It exposes an editing interface to handle and update content in real-time.
Once installed, users get an edit icon that reveals the editing screen containing the CMS fields. The content you input in there is then written to external data sources such as Markdown or JSON files.
Another important advantage of TinaCMS is that it’s not a one-size-fits-all CMS. It starts as a straightforward toolkit that can be extended depending on the project, thanks to an extensive plugin ecosystem.
Noticed that I mentioned that Tina is “for React-based sites”? For now, it can be integrated on site built with Gatsby, Next.js, or React SPAs. However, if you’re more of a Vue.js aficionado, don’t lose interest here as the support for Vue, Gridsome, and Nuxt projects is on the roadmap.
Interestingly, TinaCMS comes from the minds of team members at another great Jamstack-related product: Forestry.io. They are now actively maintaining both projects, offering two different approaches to content management; a headless CMS with Forestry, and the on-page editing toolkit that is TinaCMS.
Alternatively, Stackbit also offers inline editing features. We’ve written this post about it.
Tina as a CMS for Next.js
I’ve chosen Next.js to craft my demo app’s frontend. Why this over Gatsby? In all honesty, it’s mostly because we’ve been writing about Gatsby a lot lately.
Time to try something different.
It’s not to say that I’m not thrilled to work with Next.js, though. The Vercel-backed framework has become one of the staples of modern frontend development. More than a static site generator, it really does it all—from PWAs to pre-rendered & mobile apps.
The TinaCMS integration isn’t the same for Next and Gatsby, so if the latter is the one you want to go with, I suggest reading this guide.
Note that the following tutorial isn’t focused on the Next.js app building. For more Next-centered content, we have this post or this post.
I’ve got quite a long tutorial ahead, so let’s jump right in!
Integrate & use TinaCMS on a Next.js app

Prerequisites
Basic knowledge of React and Next.js.
Node v12 or higher installed.
Yarn installed.
A free Snipcart account—optional. To enable the e-commerce part of the demo.
1. Creating a Next.js project
Before leveraging TinaCMS, you need to have a Next.js or a GatsbyJS project running. In the following demo, I’ll be using Next.js.
To do so, use create-next-app to set up the project automatically.
2. Adding markdown content
Next, you need to add markdown content.
In this example, all the markdown files will be in the /data directory. From there, you need to add a “pages” directory. This folder will contain all the pages' markdown.
    .
    ├── components
    │   └── inlineNumber.js
    ├── data
    │   ├── pages
    │   │   └── home.md
    │   └── products
    │       └── shoe.md
    ├── helpers
    │   ├── markdown.js
    │   └── products.js
    ├── package.json
    ├── pages
    │   ├── _app.js
    │   ├── index.js
    │   └── products
    │       └── [slug].js
    ├── public
    │   ├── favicon.ico
    │   ├── images
    │   │   └── shoe.webp
    │   └── vercel.svg
    ├── server.js
    └── yarn.lock
Then, add the markdown for your home page. In the pages directory, add a file called home.md.
Here’s the content of that file:
    ---
    title: Home
    ---
This file should live in /data/pages/home.md path.
3. Adding a product page
Now, you probably want to add dynamically generated pages. In this case, it’ll be a product page.
3.1. Generating the products markdown
First, you need to create a product directory in the /data directory.
In this newly created folder, add a file named shoe.md:
---
title: Awesome shoe
price: 100
excerpt: Lorem ipsum dolor sit amet, consectetur adipiscing elit. Cras eget ornare enim.
image: /images/shoe.webp
---
****Lorem**** ipsum dolor sit amet, consectetur adipiscing elit. Praesent sed orci id urna dapibus rutrum. Vivamus at eleifend orci. Aenean tristique sed nunc non elementum. Aenean eget aliquet lectus, non efficitur massa.
You also need to add the image in the /public directory.
4. Adding helpers
To display the data contained in the markdown files, you need to parse it first. To do so, let's create a markdown helper.
4.1 Installing the npm dependencies
To parse the markdown files' front-matter, install the following packages: “fs” and “gray-matter”:
yarn add fs gray-matter
4.2 Generating the parser
Create a file named markdown.js in the /helpers directory, with the following content:
import fs from 'fs'
import { join } from 'path'
import matter from 'gray-matter'
const dataDirectory = join(process.cwd(), 'data')
const parseMdFile = (filePath) => {
  const fullPath = join(dataDirectory, filePath)
  const fileContents = fs.readFileSync(fullPath, 'utf8')
  const parsed = matter(fileContents)
  return {
    fileName: `${filePath.replace('.md', '')}`,
    fileRelativePath: `${filePath}`,
    frontmatter: parsed.data,
    markdownBody: parsed.content
  }
}
export { dataDirectory, parseMdFile }
4.3 Building the products helper
Still in the /helpers directory, add a file named products.js:
import fs from 'fs'
import { join } from 'path'
import {parseMdFile, dataDirectory} from './markdown'
const productsDirectory = join(dataDirectory, 'products')
const getAllProductSlugs = () => {
  return fs.readdirSync(productsDirectory).filter(f => f.endsWith('.md'))
}
const getAllProducts = () => {
  return getAllProductSlugs().map(f => parseMdFile(`products/${f}`))
}
export {
  getAllProductSlugs,
  getAllProducts,
}
5. Using the parsed markdown file
Now, you need to put all the previous steps together.
5.1 Importing npm dependencies
To output HTML from the markdown files, you will need react-markdown:
yarn add react-markdown
5.2. index.js
Your Next.js component needs to export this function. getStaticProps will allow you to pass properties to the component at build time. In the index.js page, add the following content:
import { parseMdFile } from '../helpers/markdown'
import { getAllProducts } from '../helpers/products'
const Home = ({ markdownFile, products }) => {
  return (
    <div>
        <h1>{markdownFile.frontmatter.title}</h1>
    </div>
  )
}
const getStaticProps = async () => {
  return {
    props: {
      markdownFile: parseMdFile('pages/home.md'),
      products: getAllProducts()
    }
  }
}
export default Home
export {
  getStaticProps
}
5.3. [slug].js
In the /pages directory, create a directory named products and add a file called [slug].js. This will be used to display the product pages.
getStaticPaths is only needed for pages using dynamic routes. In this case, /pages/products/[slug].js needs to export it but not /pages/index.js.
This function will return an array of paths (pages) to generate.
In the [slug].js file, add the following content:
import { parseMdFile } from '../../helpers/markdown'
import { getAllProductSlugs } from '../../helpers/products'
import ReactMarkdown from 'react-markdown'
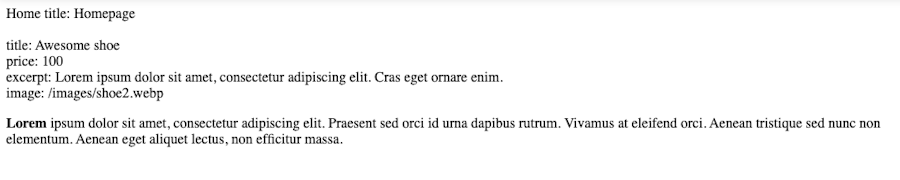
const Product = ({ markdownFile }) => {
return (
<div>
<div>title: {markdownFile.frontmatter.title}</div>
<div>price: {markdownFile.frontmatter.price}</div>
<div>excerpt: {markdownFile.frontmatter.except}</div>
<div>image:{markdownFile.frontmatter.image}</div>
<ReactMarkdown source={markdownFile.markdownBody}/>
</div>
)
}
const getStaticProps = async ({ params }) => {
return {
props: {
markdownFile: parseMdFile(`products/${params.slug}.md`),
}
}
}
const getStaticPaths = async () => {
return {
paths: getAllProductSlugs().map((slug) => ({
params: {
slug: slug.replace('.md', ''),
},
})),
fallback: false,
}
}
export default Product
export {
getStaticProps,
getStaticPaths
}
6. Integrating TinaCMS
Alright, we’re getting to the core of this tutorial.
Right now, the app is pretty basic, and there is no way to edit the content. Adding TinaCMS will make content editing a breeze with its inline editing functionality.
6.1 Installing the npm dependencies
To use TinaCMS with markdown files, use the following command to install the necessary dependencies:
yarn add next-tinacms-markdown react-markdown react-tinacms-editor styled-components tinacms react-tinacms-inline
6.2 Setting up TinaCMS

Inside the pages directory of the root folder, add a file named _app.js.
Important: it has to be named like this for Next.js.
import React, { useMemo } from 'react'
import { TinaProvider, TinaCMS } from 'tinacms'
const App = ({ Component, pageProps }) => {
  const cms = useMemo(() => {
    return new TinaCMS({
      enabled: process.env.NODE_ENV !== "production",
      toolbar: { hidden: false },
      sidebar: true
    })
  }, [])
  return (
    <TinaProvider cms={cms}>
      <Component {...pageProps} />
    </TinaProvider>
  )
}
export default App
7. Adding the inline editing feature
Now that you got TinaCMS working, you probably want to add the inline editing. After all, it’s TinaCMS's flagship feature!
Here’s how to do it.
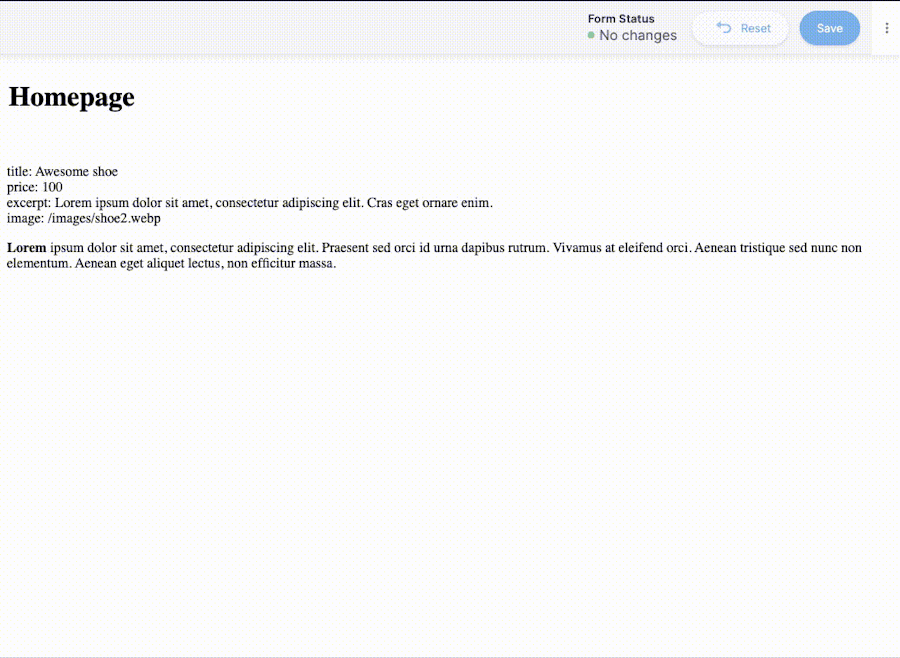
The first page to edit is the /pages/index.js:
import Product from "./products/[slug]"
import { parseMdFile } from '../helpers/markdown'
import { getAllProducts } from '../helpers/products'
import { useForm, usePlugin } from 'tinacms'
import { InlineForm, InlineText } from 'react-tinacms-inline'
const Home = ({ markdownFile, products }) => {
  const [_, form] = useForm(
    {
      initialValues: markdownFile,
      id: markdownFile.fileName,
      label: markdownFile.fileName,

          fields: []

    }
  )
  usePlugin(form)
  return (
    <div>
      <InlineForm form={form}>
        <h1><InlineText name="frontmatter.title" focusRing={false} /></h1>
      </InlineForm>
    </div>
  )
}
const getStaticProps = async () => {
  return {
    props: {
      markdownFile: parseMdFile('pages/home.md'),
      products: getAllProducts()
    }
  }
}
export default Home
export {
  getStaticProps
}
Notice that I use useForm here? Frank at Tina also told me that there are helpers that could also be used to make the config more readable. Good to know ;)
Here's the editor at work:

7.1. Creating the InlineNumber component
This step will allow inline editing of number values. We have to create our own custom InlineField since TinaCMS doesn’t have one built-in for number.
Create the file /components/inlineNumber.js, containing this content:
import React from 'react'
import { useCMS } from 'tinacms'
import { InlineField } from 'react-tinacms-inline'
import { InputFocusWrapper } from 'react-tinacms-inline/dist/react-tinacms-inline.cjs.development'
const InlineNumber = ({
name,
className,
focusRing = true,
dir = 'ltr'
}) => {
const cms = useCMS()
return (
<div>
<InlineField name={name}>
{({ input }) => {
if (cms.enabled) {
if (!focusRing) {
return <input type="number" {...input} className={className} />
}
return (
<InputFocusWrapper>
<input type="number" {...input} className={className} />
</InputFocusWrapper>
)
}
return <>{input.value}</>
}}
</InlineField>
<style jsx>
{`
input{
width: 100%;
display: block;
font-size: inherit;
font-family: inherit;
font-weight: inherit;
box-sizing: border-box;
color: inherit;
letter-spacing: inherit;
line-height: inherit;
max-width: inherit;
background-color: inherit;
text-align: inherit;
outline: none;
resize: none;
border: none;
overflow: visible;
position: relative;
-ms-overflow-style: none;
direction: ${dir};
text-align: ${dir === 'ltr' ? 'left' : 'right'}
}
`}
</style>
</div>
)
}
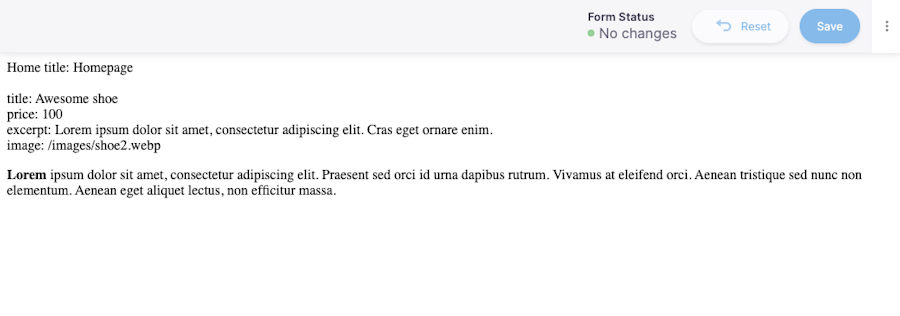
export default InlineNumber7.2. Editing the product page
Now, let’s edit the product page. We will add the inline editing for the product properties and a sidebar form for the excerpt since this is not visible on the product page.
This file is located at /pages/products/[slug].js:
import { parseMdFile } from '../../helpers/markdown'
import { getAllProductSlugs } from '../../helpers/products'
import ReactMarkdown from 'react-markdown'
import { useForm, usePlugin } from 'tinacms'
import { InlineForm, InlineTextField, InlineImage } from 'react-tinacms-inline'
import { InlineWysiwyg } from 'react-tinacms-editor'
import InlineNumber from '../../components/inlineNumber'
const Product = ({ markdownFile }) => {
  const [product, form] = useForm(
    {
      initialValues: markdownFile,
      id: markdownFile.fileName,
      label: markdownFile.fileName,
      fields: [{
        name: 'frontmatter.excerpt',
        description: 'This will be used for the product description in Snipcart',
        label: 'Excerpt',
        component: 'text',
      }],
    }
  )
  usePlugin(form)
  return (
    <div>
      <InlineForm form={form}>
        <div>title: <InlineTextField name="frontmatter.title" focusRing={false}/> </div>
        <div>price: <InlineNumber name="frontmatter.price" focusRing={false} /></div>
        <div>excerpt: <InlineTextField name="frontmatter.excerpt" focusRing={false} /></div>
        <div>image:
                  <InlineImage
            name="frontmatter.image"
            parse={(filename) => `/${filename}`}
            uploadDir={() => '/public'}
            previewSrc={formValues => formValues.frontmatter.image}
            focusRing={false}
          />
        </div>
        <InlineWysiwyg name="markdownBody" format="markdown" focusRing={false}>
          <ReactMarkdown source={product.markdownBody} />
        </InlineWysiwyg>
      </InlineForm>
    </div>
  )
}
const getStaticProps = async ({ params }) => {
  return {
    props: {
      markdownFile: parseMdFile(`products/${params.slug}.md`),
    }
  }
}
const getStaticPaths = async () => {
  return {
    paths: getAllProductSlugs().map((slug) => ({
      params: {
        slug: slug.replace('.md', ''),
      },
    })),
    fallback: false,
  }
}
export default Product
export {
  getStaticProps,
  getStaticPaths
}
9. Adding a product creator
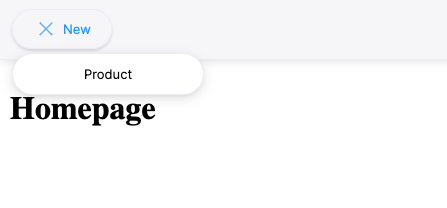
Let’s make a way to create new products easily, directly in the editor.
Inside the /pages/_app.js file, add the product creator. This is used to create the form when adding new products, leveraging TinaCMS plugins.
const ProductCreatorPlugin = {
  __type: 'content-creator',
  name: 'Product',
  fields: [
    {
      name: 'frontmatter.title',
      label: 'Title',
      component: 'text',
      validate(title) {
        if (!title) return "Required"
      }
    },
    {
      name: 'frontmatter.price',
      label: 'Price',
      component: 'number',
      validate(price) {
        if (price == null) return "Required"
      }
    },
    {
      name: 'frontmatter.image',
      label: 'Image',
      component: 'image',
      parse: (filename) => `/${filename}`,
      uploadDir: () => '/public',
      previewSrc: formValues => formValues.frontmatter.image
    },
    {
      name: 'frontmatter.excerpt',
      description: 'This will be used for the product description in Snipcart',
      label: 'Excerpt',
      component: 'text',
    },
    {
      name: 'markdownBody',
      label: 'Description',
      component: 'markdown'
    }
  ],
}
const App = ({ Component, pageProps }) => {
  const cms = useMemo(() => {
    return new TinaCMS({
      enabled: process.env.NODE_ENV !== "production",
      toolbar: { hidden: false },
      sidebar: true,
      plugins: [ProductCreatorPlugin]
    })
  }, [])
  ...
}
export default App
You’ll now be able to create new products by clicking the “New” button:

10. Binding forms with local files
At the moment, when saving the forms, you will get an error. Yikes. This is because you haven’t set up the onSubmit methods of the forms.
You’ll need to fix this and write the files locally. This will allow you to commit the new/updated files and then deploy a new version of your website.
10.1. Installing the npm dependencies
To bind the forms, you will need the following packages: express, cors, next, @tinacms/api-git and slugify:
yarn add add express cors @tinacms/api-git @tinacms/git-client slugify
10.2. Adding server.js
The next thing to do is add the file /server.js at the project’s root. This will allow you to create a custom server.
const express = require('express')
const next = require('next')
const cors = require('cors')
const gitApi = require('@tinacms/api-git')
const port = parseInt(process.env.PORT, 10) || 3000
const dev = process.env.NODE_ENV !== 'production'
const app = next({ dev })
const handle = app.getRequestHandler()
app.prepare().then(() => {
  const server = express()
  server.use(cors())
  server.use('/___tina', gitApi.router({
    pathToRepo: process.cwd(),
    pathToContent: "data",
  }))
  server.all('*', (req, res) => {
    return handle(req, res)
  })
  server.listen(port, err => {
    if (err) throw err
    console.log(`> Ready on http://localhost:${port}`)
  })
})
You will also need to update the package.json to use the new custom server.
{
   ...
  "scripts": {
    "dev": "node server.js",
    "build": "next build",
    "start": "NODE_ENV=production node server.js"
  },
  ...
}
10.3. Setting up TinaCMS to use the Git-Client API
Update the /pages/_app.js file to:
import { GitClient, GitMediaStore } from '@tinacms/git-client'
...
const App = ({ Component, pageProps }) => {
  const gitClient = useMemo(() => {
    return new GitClient(`/___tina`)
  }, [])
  const cms = useMemo(() => {
    return new TinaCMS({
      enabled: process.env.NODE_ENV !== "production",
      toolbar: { hidden: false },
      sidebar: true,
      plugins: [ProductCreatorPlugin],
      apis: {
        git: gitClient,
      },
      media: {
        store: new GitMediaStore(gitClient),
      },
    })
  }, [])
  return (
    <TinaProvider cms={cms}>
      <Component {...pageProps} />
    </TinaProvider>
  )
}
export default App
10.4. Persisting product files
The last step to have a fully working inline CMS is to update the forms’ onSubmit methods.
This will allow saving the updates to the markdown files, so it persists the product info to markdown files in our file system and commits them to our git repository.
First, you want to update the onSubmit of the ProductCreatorPlugin located in the /pages/_app.js file.
import slugify from 'slugify'
import { toMarkdownString } from 'next-tinacms-markdown'
...
const ProductCreatorPlugin = {
  __type: 'content-creator',
  name: 'Product',
  fields: [
    ...
  ],
  onSubmit(formValues, cms) {
    const fileRelativePath = `products/${slugify(formValues.frontmatter.title, '_')}.md`
    return cms.api.git.writeToDisk({
      fileRelativePath: fileRelativePath,
      content: toMarkdownString(formValues),
    }).then(() => {
      cms.alerts.success('product created! Reload page to see new product')
    })
  },
}
Next, update the product form located at /pages/products/[slug].js to:
import { useForm, usePlugin, useCMS } from 'tinacms'
import { toMarkdownString } from 'next-tinacms-markdown'
const Product = ({ markdownFile }) => {
  const cms = useCMS()
  const [product, form] = useForm(
    {
      ...
      onSubmit: (formState) => {
        return cms.api.git.writeToDisk({
          fileRelativePath: markdownFile.fileRelativePath,
          content: toMarkdownString(formState),
        }).then(() => {
          cms.alerts.success('product saved!')
        })
      },
    },
  )
  ...
}
You should now be able to create products and save the product page!
11. Going further (optional) - Snipcart integration
Now you might want to enable e-commerce functionalities to sell your newly created products. To do so, you need to update the /pages/_app.js file to include Snipcart.
Here’s what the content of this file should look like:
import Head from 'next/head'
...
const App = ({ Component, pageProps }) => {
  ...
  return (
    <TinaProvider cms={cms}>
      <Head>
        <link rel="preconnect" href="https://app.snipcart.com" />
        <link rel="preconnect" href="https://cdn.snipcart.com" />
        <link rel="stylesheet" href="https://cdn.snipcart.com/themes/v3.0.18/default/snipcart.css" />
        <script src="https://cdn.snipcart.com/themes/v3.0.18/default/snipcart.js"></script>
      </Head>
      <TinaProvider cms={cms}>
        <Component {...pageProps} />
      </TinaProvider>
      <div hidden id="snipcart" data-api-key={process.env.SNIP_API_KEY}></div>
    </TinaProvider>
  )
}
export default App
11.1. Adding a buy button
Create a Snipcart add item button. Add the file /components/snipcartButton.js:
import React from 'react'
const SnipcartButton = ({product}) => {
  return (
    <button className="snipcart-add-item"
    data-item-id={product.fileName.split('/')[1]}
    data-item-price={product.frontmatter.price}
    data-item-description={product.frontmatter.excerpt}
    data-item-image={product.frontmatter.image}
    data-item-name={product.frontmatter.title}
    data-item-url={product.frontmatter.fileName}
    >
      Add to cart
    </button>
  )
}
export default SnipcartButton
Next, you want to use this button in /pages/products/[slug].js:
import SnipcartButton from '../../components/snipcartButton'
...
const Product = ({ markdownFile }) => {
  ...
  return (
    <div>
      <InlineForm form={form}>
        <div>title: <InlineTextField name="frontmatter.title" focusRing={false}/> </div>
        ...
        <SnipcartButton product={product} />
      </InlineForm>
    </div>
  )
}
...
And here you go! You now have a functioning e-commerce site powered by Next.js on which the content can be edited through TinaCMS.
Live demo & Github repo


Try the live demo here.
See the GitHub repo here.
Closing thoughts
I think TinaCMS has a lot of potentials. It's easy to work with, and it yields fantastic results. And it does it fast. Its best feature is currently the inline editing, no doubt. It allows us to update a website while seeing the result in real-time. It brings all the CMS functionality that other frameworks bring while making it easy to update for non-developers.
It’s perfect for teams that need to empower everyone to work on the website, from developers to marketing folks.
That being said, I think there’s still room for improvement. In the future, I'd like to see more inline components like the InlineNumber we created. The documentation also needs some work to make it easier to get started and understand how the core features work.
It’s still a young project, though. I’m sure that the team at TinaCMS is aware of these issues and that it’ll only get better as the product evolves.
If you've enjoyed this post, please take a second to share it on Twitter. Got comments, questions? Hit the section below!


