Drupal Headless Architecture with JS Framework [Live Demo]
In a rush? Skip to tutorial steps or GitHub repo & live demo.
A few years back, I couldn't fathom having any real interest in old-school CMSs like Drupal or WordPress.
And I wasn't alone:
Security exploits! Bloated! Expensive! PHP nightmare!
All echoes from developers' past experiences with these platforms.
Yet, the times they are a-changing, as Bob Dylan sang.
Not so long ago, we experimented with the WordPress REST API, which allows a decoupling of WP's backend and frontend.
Conclusion? Developers can finally focus on using these CMSs solely for what they are good at—content management & administrative process. Other (much better) services can handle the rest!
Today I'm going to try the same thing, this time going headless with Drupal.


I'll use Drupal as a backend for a small e-commerce app powered by the React-like framework Inferno.js. My steps:
Setting up Drupal
Enabling Drupal headless mode
Creating views for our products
Consuming data in Inferno.js
Generating the cart with Snipcart
First, a bit of context.
Looking for alternative tools to build your headless stack? Visit our developer's guide to headless e-commerce!
The age of headless Drupal
Drupal is one of the biggest free open-source CMS in the world.

Just like WordPress, it's mainly known for it's monolithic CMS capacities. This is slowly shifting though. Since the release of Drupal 8 back in 2015, the REST API is at the CMS' core.
This feature opened up a whole new world of possibilities for Drupal developers. Why? Because for the first time, it made it easy to take a decoupled approach to site building.
To better understand this step's importance, here are some problems Drupal users had with its traditional architecture—problems a headless Drupal solves:
→ There is no such thing as a "smooth" upgrade from Drupal 6 to 7 to 8. Each time a new major version is released, adopting that new version requires a time-consuming rebuild. This pain is relieved with Drupal only used as the backend.
→ In tightly-coupled Drupal development, members of the frontend team need to become Drupal developers in order to properly style a website. With a decoupled approach, frontend developers can use whatever framework they know or need.
→ With Drupal, customizing a site is... tedious. Even if you know the CMS by heart (see point above). With a Drupal headless architecture, the CMS no longer holds you back. All the flexibility of frontend frameworks is in your hands.
→ In the traditional approach, your content can become trapped inside Drupal’s sprawling web of database tables. When decoupling, all your content becomes available & portable through the API.
For a real-life example of headless Drupal in action, visit this case study with an Angular frontend.
The Manifesto
Core Drupal users even wrote this manifesto, envisioning the headless, powerful future of Drupal:
We want Drupal to be the preferred backend content management system for designers and frontend developers.
We believe that Drupal's main strengths lie in the power and flexibility of its backend; its primary value to users is its ability to architect and display complex content models.
We believe that client-side frontend frameworks are the future of the web.
It is critically important for Drupal to be services oriented first, not HTML oriented first, or risk becoming irrelevant.
We're big proponents of similar JAMstack approach here at Snipcart, so I'm happy to try this one!
A word on Inferno.js
Any frontend framework can be strapped to our Drupal backend.
In my case, I've wanted to try for a while the fast, React-like library that is Inferno.

Why Inferno? Well, I'd already had fun with React in our post about the WP REST API, and this gave me a chance to try something new.
Some features that draw me towards it are:
React compatibility—it's as near as you'll get to a smaller version of React.
Real fast—supposed to be one of the fastest frontend frameworks.
Dynamic rendering on both client and server.
It's also community-driven and looks great overall so let's jump right into it!
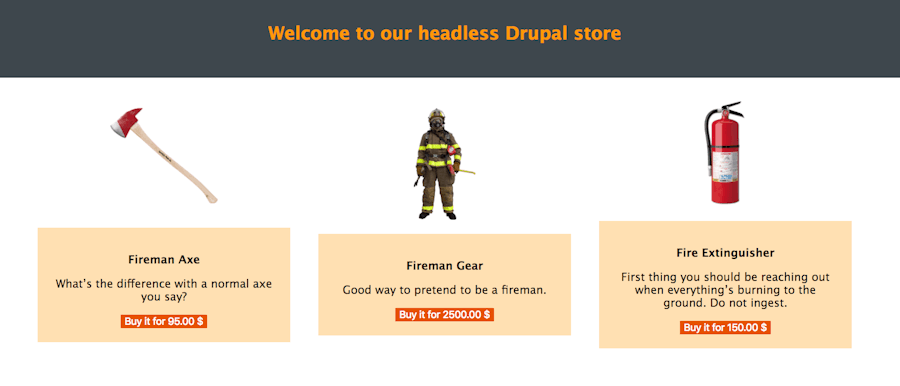
To prevent you from burning everything down with your flaming hot Inferno app we'll craft a small fire protection gear shop.
Drupal as headless CMS tutorial: e-commerce app
Pre-requisites:
An up & running Drupal instance (v8.5 for our demo)
A Snipcart account (forever free in test mode)
Disclaimer: This tutorial uses nodes to store our products. As I painfully learned, anything in Drupal can be done in a thousand different ways. The approach I took is, I think, the easiest one for a beginner. But it doesn't leverage modules from the Drupal community. If you were to use integrations later on, such as shipping providers, you couldn't do it with this setup without writing more code.
For a more enterprise integration, check out this existing Snipcart module. It uses Drupal Commerce entities which will support any of its integrations.
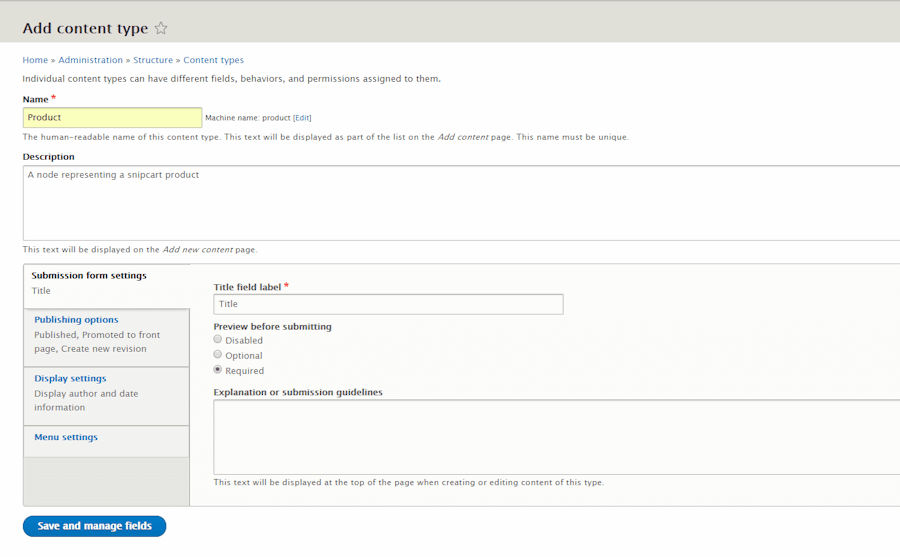
1. Creating a new content type in Drupal
First thing on the menu: create a new content type to declare a product's specific attribute. Hop in your Drupal dashboard, go to the structure panel, and hit Content types.
There you will be able to add a new content type by clicking on the Add content type button. Here's how I defined mine:


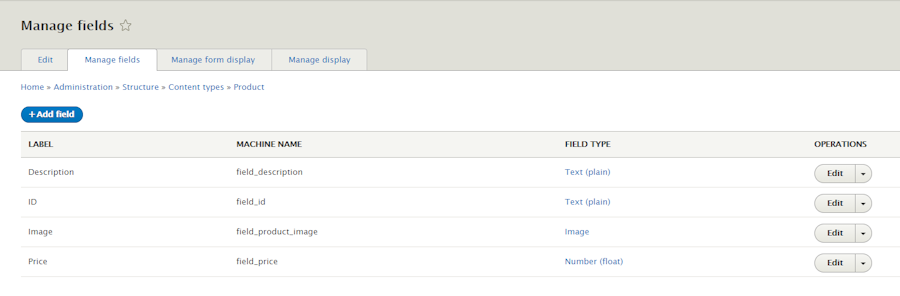
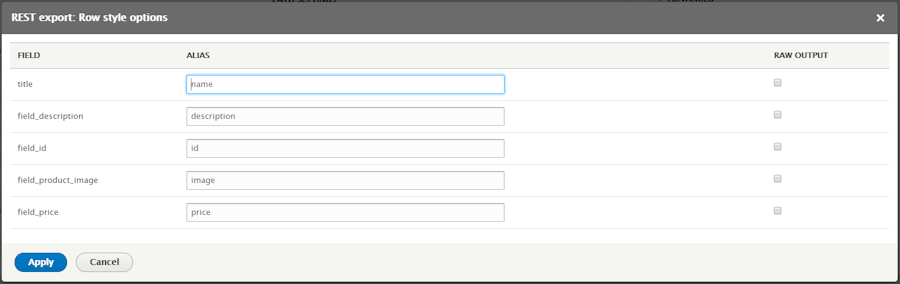
Now that we've added the necessary fields, we need to alias their names so Snipcart's JSON crawler can do the mapping properly.
Under the Format section click on the Settings link. There, you can declare any alias to your fields.
It's this new alias that will be served in the responses instead of the field_{fieldname} format.
Put it this way:

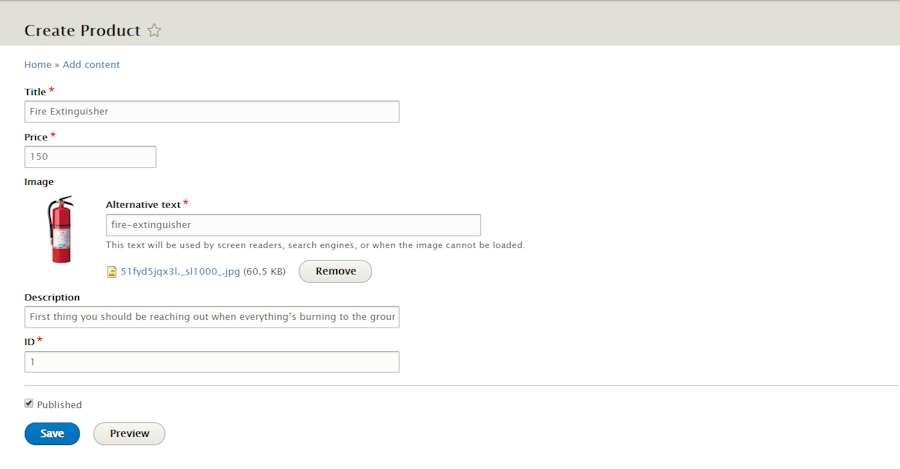
With this done, you can already create products. Click on the content section, then Add content.
Here's how it should look like:

2. Enabling Drupal headless mode
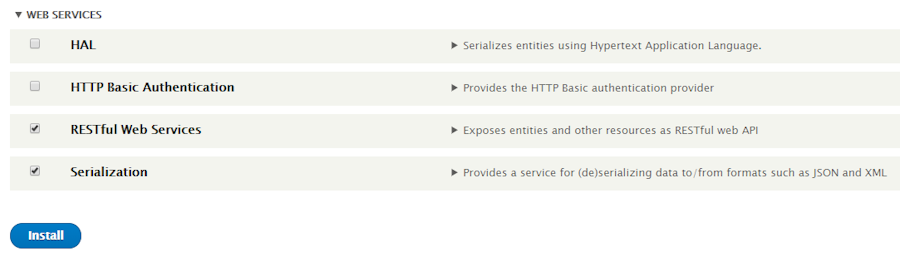
At the moment, our products can only be shown in traditional Drupal views. We want to consume these products without a view—only the products data. To do so we'll use the RESTful Web Services native module.
Go to the extended tab of the admin panel and scroll all the way down.
Check the RESTful Web Services and the Serialization one, and hit the Install button.

Now let's add json to our supported format.
To do so hit the /admin/config/development/configuration/single/import route of your dashboard.
For the Configuration type, choose the REST ressource configuration and paste the following config:
langcode: en
status: true
dependencies:
  module:
    - basic_auth
    - hal
    - node
id: entity.node
plugin_id: 'entity:node'
granularity: resource
configuration:
  methods:
    - GET
    - POST
    - PATCH
    - DELETE
  formats:
    - json
  authentication:
    - basic_auth
Hit import and confirm after this. Note that this is the default configuration, but for the format.
We can already consume data via the HTTP API at the moment.
I strongly recommend you to test it via an HTTP client such as Postman. Knowing everything works A1 can save you lots of time at this point.
To test it, simply send a GET request to http://your domain/node/1?_format=json. Don't forget that you need to have defined products for this to work.
Serving all your products
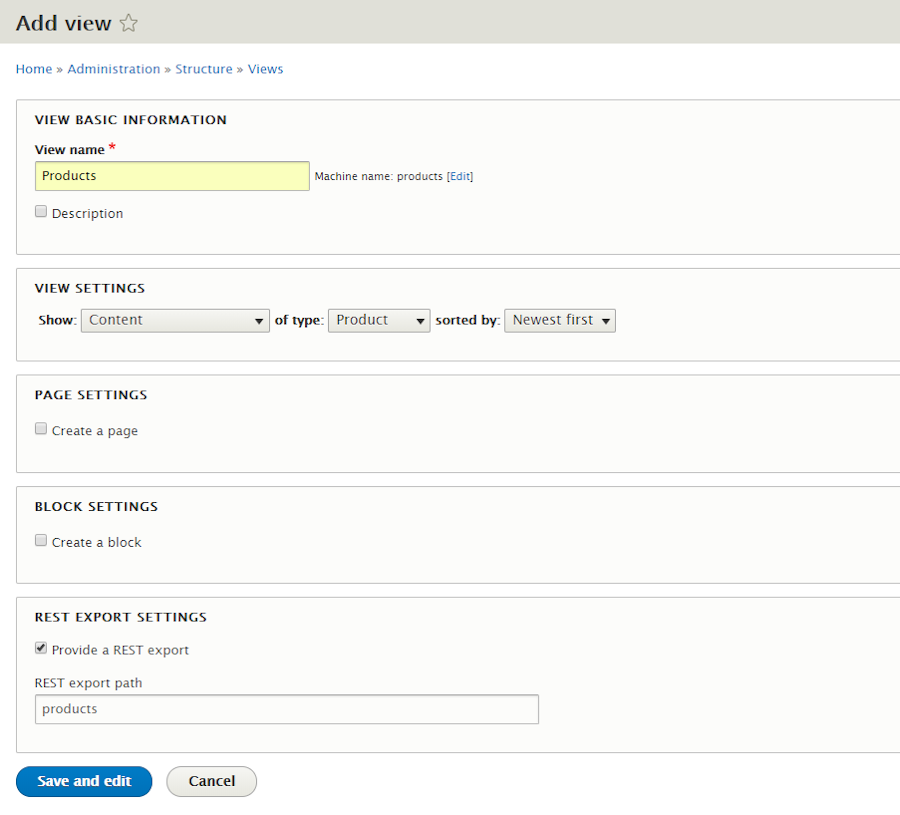
Right now we can only consume specific nodes, but there's no easy way for us to fetch all products. To do so, let's create a new view.
Hit the Structure panel, then click on the Views section followed by the Add view button. Define the configuration as follows:

Once you saved the route you can test it again with a GET at the corresponding route. If everything is set correctly you should see all your defined products.
You'll also see that there's a lot more than only the products info. There's also all of Drupal's metadata about the entities, which we don't want to send to our frontend.
To select what you want to serve, click on the Show attribute of the view and select Fields.
Now click the Add button to the right of the Fields section. You'll be able to select only what you want to be public.
Here's how it looks now:

![[picture-7]](https://www.datocms-assets.com/48401/1627661672-picture-7.png?fit=max&w=900)
3. Enabling CORS requests
At the moment, we can consume data but only over an HTTP client; CORS (Cross-Origin Resource Sharing) requests would be blocked as they're not enabled by default.
There are a couple of ways to do this, but the easiest is to jump right in the config files and override them using an IDE.
Fire your editor in your Drupal folder and open the /core/core.services.yml.
Override the cors.config section as follows:
cors.config:
    enabled: true
    allowedHeaders: ['x-csrf-token','authorization','content-type','accept','origin','x-requested-with', 'access-control-allow-origin','x-allowed-header','*']
    allowedMethods: ['GET']
    allowedOrigins: ['*']
    exposedHeaders: true
    maxAge: false
    supportsCredentials: true
If you ran tests before getting here, I recommend clearing Drupal's cache to reload config files. Hit the Configuration panel and then the Performance button to do so.
You'll see a Clear all caches button: hit it.
4. Consuming data in Inferno.js
We're now ready to fetch and show data in our store!
I recommend a quick read of the Inferno guidelines if you haven't played with similar frameworks before.
For the demo, I decided to use their basic scaffolding to create something fast. I used the following commands:
npx create-inferno-app my-app
cd my-app
npm start
Open up your favorite editor in the project's folder and access the App.js file.
First thing to do is overriding the constructor to give a default value to our products array.
constructor() {
    super();

    this.state  = {
        products: []
    }
}
Now let's define a componentDidMount function. This is a hook into Inferno's component lifecycle. It allows us to execute code once the component is mounted.
That's where you want to run any async calls, such as fetching products. Here's how:
componentDidMount() {
    fetch('http://{your_drupal_server}/products?_format=json')
        .then(x  =>  x.json())
        .then(x  => this.setState({ products:  x}));
}
Once the component is mounted, it'll fetch the products on your Drupal instance and put the result in the products variable.
We now only need to iterate over the products array in order to render them. Do so in the render function as such:
  render() {
    let products = this.state.products;

    return (
      <div className="App">
        <header className="App-header">
          <h1> Welcome to our Inferno powered store </h1>
        </header>

        <div class="products">
          {  products.map(x => (
            <div class="product-details">
              <img src={ `https://drupal-snipcart.herokuapp.com/${x.image}` }
                height='200'
                class="thumbnail"/>

              <div class="product-description">
              <p class="title">{ x.name }</p>
              <p>{ x.description }</p>

              <button class="snipcart-add-item"
                data-item-name={ x.name }
                data-item-id={x.id }
                data-item-image={ `https://drupal-snipcart.herokuapp.com/${x.image}` }
                data-item-description={ x.description }
                data-item-url="https://drupal-snipcart.herokuapp.com/products?_format=json"
                data-item-price={ x.price }>
                Buy it for { x.price } $
              </button>
            </div>
          </div>))
        }
        </div>
      </div>
    );
  }
5. Setting up Snipcart
Quick note: Snipcart products are defined directly in the HTML, using simple product attributes markup.
Last thing needed before actually testing the cart is Snipcart's required scripts.
For this purpose, let's put these directly in the index.html file:
<script  src="https://ajax.googleapis.com/ajax/libs/jquery/2.2.2/jquery.min.js"></script>

<script  src="https://cdn.snipcart.com/scripts/2.0/snipcart.js"  data-api-key="YjdiNWIyOTUtZTIyMy00MWMwLTkwNDUtMzI1M2M2NTgxYjE0"  id="snipcart"></script>

<link  href="https://cdn.snipcart.com/themes/2.0/base/snipcart.min.css"  rel="stylesheet"  type="text/css" />
And there you have it!
You can run npm run start in your project's folder and you'll be able to add products to the cart!
I've also added a little bit of custom CSS in main.css to make my demo a little stylish. You could make yours look and feel the way you want!
Live demo & GitHub Repo

See the live demo here.
See GitHub repo here.
Closing thoughts
I have to be honest with you guys, this one gave me more trouble than I thought it would. Like I said earlier, Drupal offers thousands of different ways to do the same thing.
It's probably better to carefully read the documentation first than to start coding blindingly. The Drupal ecosystem is so huge that feeling natural while developing takes time.
Now that the wanderings are done, I would say following the post should take about an hour max. with an up & running Drupal instance.
On the bright side, once I found the proper way to go it was actually quite easy to do and well documented.
The community is big, you'll likely find a solution to any issue since someone probably had it before.
For our demo, we could have developed the product entity to support more fields than only the required ones. Also, as said earlier, using a more enterprise module to leverage Drupal Commerce integrations could have been nice to play with.
Maybe for another time!
Now I'd like to hear from you. Have you worked with Drupal as headless CMS? WordPress maybe? How do you think they compare with out-of-the-box headless CMSs? Let's start a discussion in the comment section below!
If you've enjoyed this post, please take a second to share it on Twitter.


