Astro: Bringing the Power Back to HTML
On this blog, we've talked about a lot of static site generators over the years. From Jekyll to Next.js, we've explored and seen how we can build a fast website using those platforms.
Whether you're an active "Jamstacker" or have just been lurking in the community for a bit, you've probably seen Astro scattered through your Twitter feeds. There's a reason for all the hype — Astro is pioneering a new (but actually pretty old and simple) way of building websites. The folks at Snipcart had me do a little experimenting recently, so I figured I'd document what I found in a helpful article. A lot of the following information comes from my experience with Astro, the docs, and Cassidy's talk with Certified Fresh Events.
Let's dive in!
What is Astro?


If you haven't looked into Astro yet, it's essentially a new static site generator made to build web apps with less JavaScript. It is an open-source project released under the MIT license and build by the team behind Snowpack. It can render JavaScript interactive components from a few different frameworks into pre-built HTML pages (it does this with a fantastic tool called Vite, pronounced veet) without any extra JavaScript.
This new static site builder supports Markdown (which we'll use later in the tutorial), TypeScript, Sass, Scoped CSS, CSS Modules, Tailwind, and any other npm packages.
With Astro, you can use UI components from any JavaScript framework (React, Svelte, Vue). During build time, they will be rendered to static HTML.
When you really need JavaScript, Astro load the component (and its dependencies) that you need, the rest of the site is in static HyperText Markup Language. It's basically HTML with some kind of JSX going on.
It's made backward


...In a good way!
Many tools we use in web development have a “start big - trim the fat later” approach. Take Tailwind, for example; it offers an incredible assortment of utility classes for CSS that have won the hearts of folks like Kent C. Dodds, who I interviewed recently. But as I pointed out midway through, Tailwind can be pretty massive, and it takes a compilation process to weed out all the stuff we don't actually use. It seems a little backward, right? But this is the standard among tools of its class.
Astro works the other way around with a more intuitive approach. You start from scratch and just add what you need. That means that understanding what's going on isn't as big of a task, and setup becomes super simple. All you need are two commands (npm init astro && npm run build or astro build), and off you go!
It’s. That. Easy.
Astro focuses on HTML and CSS
Most tools, like React, focus on JavaScript, but not Astro! The web was built on the backs of three languages, but HTML and CSS don't seem to get as much love as they should. They're incredibly useful and powerful and deserve a little more credit. We see a common pattern where an AJAX request is made to the server, then user-inputted data is validated and finally redirected to a new page from the client-side JavaScript. But while this approach might be convenient for "JavaScripters", it has its issues:
You're making two round-trips to the server! It's a little excessive and slows down the whole process.
It hurts the user experience a lot. The page seems to pause, and only then will it redirect to a new page. It could confuse some users and make them restart the whole process. We all know somebody who did, right?
Astro encourages us to do like it's 1999: with a <form>! This is precisely what the <form> element is for. It does it all in one step: by POSTing to a new endpoint, it automatically redirects there and gives the server the information it needs at once.
Astro gives you all the building blocks
Think of your website like a skyscraper. Astro may start you out with nothing, but you can build as high as you want. Thankfully, it gives you everything you need to work back up to the level of big tools like Next.JS or Gatsby, just without all the overhead they bring along with them. Take a look at this example of the built-in <Markdown> component:
---
import { Markdown } from 'astro/components';
---
<Markdown>
  # You can write **Markdown** in here!
</Markdown>
That's pretty much all I use Eleventy for, so unless you're using an older template system like Liquid, we've already pretty much reached that level.
Astro takes it a step further and gives you the component model and partial-hydration that you would otherwise require third-party tools like Slinkity for. Check it out:
---
import NavBar from './navbar.astro';
---

<body>
  <NavBar />
  <section>
    Some content
  </section>
</body>
I've just imported some component called NavBar and used it in my project! That's one of the most fundamental features that actually makes us choose bigger frameworks. Most of the other benefits that tools like Next.JS offer are matched (and occasionally raised) by the leaner and faster Astro.
Quick definition:
Partial hydration is a technique where only the JavaScript needed for a particular component is loaded. The rest of the site outside of those components is treated as static HTML. You might be thinking, "well, duh, Jaden! That's how websites are usually made." You'd be right, mostly. SPA-focused frameworks tend to look at everything as one significant component, so all JS is loaded at once because it's needed to actually render the page. Astro thinks that's a bad idea, and I'd tend to agree, so it only loads JS for the necessary components.
The focus on serving static pages with less JavaScript also has a big benefit on SEO and performance.
So how does it work IRL?
The simplest way to get started with Astro is just to rename some of your HTML files in a typical project. It helps, though, to get some folder scaffolding set up so that you're not dealing with the clumsy organization later. Just create a new project folder and run this command:
npm init astro && npm run devSuper easy. The first part creates the scaffolding, and the second part runs the app and equips you with hot refreshing to see your results live.
Now usually, we'd want to create ourselves an HTML file like this:
<!DOCTYPE html>
<html>
  <head>
    <title>Jaden's Awesome Guitar World</title>
  </head>

  <body>
    <h1>Jaden's Awesome Guitar World</h1>

    <ul>
      <li>
        <span>My favorite acoustic</span>
        <img src="/acoustic1.png" alt="My favorite acoustic">
      </li>

      <li>
        <span>My favorite electric</span>
        <img src="/electric1.png" alt="My favorite electric">
      </li>
    </ul>
  </body>
</html>
Well, here's the cool thing: that's a valid Astro code! It's just basic markup for a list of my guitars.
But instead of naming that file guitars.html, I'm going to call it guitars.astro, which unlocks all these powerful new features! For example, let's modify guitars.astro to use build-time JavaScript in a section that looks like Markdown frontmatter:
---
import { Markdown } from 'astro/components';
const title = "Jaden's Awesome Guitar World";
const guitarMD = [
{
name: "acoustic1",
alt: "My favorite acoustic"
},
{
name: "electric1",
alt: "My favorite electric"
}
].map(guitar =>
`- ${guitar.alt} `
).join("\\n");
---
<!DOCTYPE html>
<html>
<head>
<title>{title}</title>
</head>
<body>
<Markdown>
# {title}
</Markdown>
<Markdown content={guitarMD} />
</body>
</html>Since JavaScript runs at build time, you get all the benefits of building the page dynamically without the delay of server-side or client-side processing. To create that HTML I showed earlier, we just map over the listOfGuitars array and generate the Markdown required to create the <ul>.
As for why I'm switching to Markdown here, I much prefer the ease of its syntax to how verbose HTML can get. With the built-in <Markdown> component, I don't really have to worry about the confusion I'd encounter if I tried to convert Markdown to HTML manually (trust me, been there before). Plus, we'll use this later on.
As a side note, I added a variable for the title, so we didn't have to repeat that twice.
Let's build an Astro web app
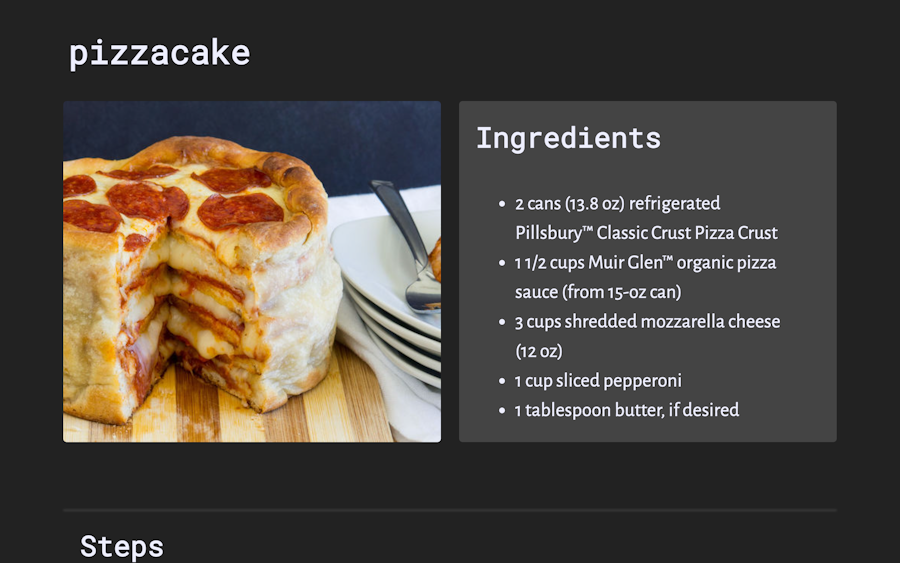
We covered the basics, but Astro lets us take it a little further. For example, say I'm creating myself a blog with some recipes from friends and colleagues, starting out with this eponymous PizzaCake recipe from Pillsbury. Here's my plan:
I've got all my code in this GitHub repo.
Now, I'm going to set up a second GitHub repo, just for Markdown recipes. This way, the content of the site can be edited by outside contributors with pull requests without them being exposed to the codebase.
Then, in Astro, I'm going to use a built-in function to pull the right recipe into the page.
Let's get into the action and build ourselves a recipe website.


First, we'll create a new directory and navigate to it.
Once in our new directory, let's start a new Astro project:
npm init astroAdding the recipe page
Now, let's create our first recipe component.
Here's my first attempt at that recipe page, titled [...recipe].astro:
---
export async function getStaticPaths() {
  const resp = await fetch(`https://raw.githubusercontent.com/jadenguitarman/pizzacake-recipes/main/__filelist__.txt`);
  const filelist = await resp.text();
  return filelist
    .split("\\n")
    .filter(x => !!x)
    .map(filename => ({
      params: {
        recipe: filename.trim()
      }
    }));
};

import { Markdown } from 'astro/components';
const { recipe } = Astro.request.params;
const resp = await fetch(`https://raw.githubusercontent.com/jadenguitarman/pizzacake-recipes/main/${recipe}.md`);
const pageContent = await resp.text();
---

<!DOCTYPE html>
<html>
  <head>
    <title>{recipe}</title>
    <link rel="stylesheet" href="/styles/recipe.css" />
  </head>

  <body>
    <Markdown>
      # {recipe}
    </Markdown>
    <Markdown content={pageContent} />
  </body>
</html>
To recap, because this page title has a slug in it (it's called [...recipe].astro), it has to export a getStaticPaths function. That function retrieves a list of recipes from a file called__filelist__.txt and returns them in a special array format. Astro takes that list and the HTML body below and generates a static page for each recipe. The recipe variable becomes whatever the URL segment we've selected!
For example, if I go to localhost:3000/pizzacake (with the server running locally on my machine), recipe becomes pizzacake, the script builds a page from the data in pizzacake.md in the recipes GitHub repo. The only exception to this is when someone goes to the index page, which would mean recipe is empty. To solve this, I've created a blank index.astro file. That's still helpful though because eventually, we'd want this project to have a homepage! That might seem a little complicated when laid out in text, but it's actually the most intuitive solution I've used recently.
One last thing before this website starts looking nice. I inserted a line of HTML earlier referencing recipe.css, and now I've just got to create that. I added in a few extra features by making clever use of CSS selectors (which is exactly the kind of thing Astro encourages us to do without any JavaScript). For example, not every recipe needs an image, and the page adapts accordingly to whether the image is present. It also adapts the positioning of the sections based on screen size, which is pretty standard at this point.
@import url('<https://fonts.googleapis.com/css2?family=Alegreya+Sans&family=Roboto+Mono&display=swap>');

:root {
  --background: #222;
  --background-secondary: #444;
  --text: #eef;
  --radius: 5px;
}

* {
  color: var(--text);
  margin: 0;
  padding: 0;
  border: 0;
  outline: 0;
}

body {
  font-family: "Alegreya Sans";
  background: var(--background);
  display: grid;
    grid-template-columns: 5vw 42vw 42vw 5vw;
  grid-column-gap: 2vw;
}

body > * {
  grid-column: 2 / 4;
}

h1, h2, h3, h4, h5, h6 {
  font-family: "Roboto Mono";
}

h1 {
  font-size: 6vh;
  padding: 5vh 1vh;
}

h2 {
  font-size: 5vh;
  padding: 3vh;
}

#recipe + p > img {
  width: 100%;
  height: 100%;
  border-radius: var(--radius);
  object-fit: cover;
}

#ingredients {
  background: var(--background-secondary);
  border-top-left-radius: var(--radius);
  border-top-right-radius: var(--radius);
}

#ingredients + ul {
  padding: 3vh 10vh;
  font-size: 3.5vh;
  background: var(--background-secondary);
  line-height: 1.5;
  border-bottom-left-radius: var(--radius);
  border-bottom-right-radius: var(--radius);
}

@media (min-width: 800px) {
  #recipe + p {
    grid-row: 2 / 4;
    grid-column: 2;
  }

  #recipe + p + #ingredients,
  #recipe + p + #ingredients + ul {
    grid-column: 3;
  }
}

#steps::before {
  border-top: 2px solid var(--background-secondary);
  width: 100%;
  position: absolute;
  left: 0;
  top: 0;
  filter: blur(1.5px);
  content: " ";
}

#steps {
  margin-top: 12vh;
  position: relative;
}

#steps + ol {
  font-size: 3vh;
  line-height: 1.5;
  padding: 0 5vw;
}

#steps + ol > li {
  margin: 1vh 0;
}
And there we have it: a simple, static recipe collection website with no runtime JavaScript, a flexible HTML layout, a design styled only with CSS, and a super-quick build duration.
GitHub repo & live demo

View the live demo deployed on Netlify here
View website GitHub repo here
View recipe GitHub repo here
Wrapping up
That's pretty much it! Astro is super simple to get started with and easy to maintain. Over the course of this rather short article, I've already created a working recipe book that pulls Markdown from a GitHub repo and parses it onto its own static recipe page, and that's no simple task! Astro just gives us the abstractions to make this all work without hiccups. I will say, I did run into one or two little quirks that didn't make sense to me at first, but it ended up being my misunderstanding, not Astro's fault. I figured all that out because I'm in the awesome Astro Discord community, which you should absolutely join if you want to learn more.
This was a rather technical overview, but if you want to keep the party going, I'm going to recap most of this, while talking a little more about how it feels to use Astro and what Astro's emergence means for the wider frontend community over on TakeShape's blog.
Let us know what you think!


