Scully Tutorial: A Static Site Generator for Angular Websites
In a rush? Skip to step-by-step tutorial or live demo
No matter how many content pieces we’ve written on the subject, not often have we mentioned the words JAMstack and Angular next to each other.
That’s kind of shocking, yet understandable.
I mean, when it comes to the JAMstack, Angular’s community is undeniably late to the party. But hey, there’s still well enough cake for everyone to enjoy!
Good news is devs have started to build the tools necessary to bridge the empty gap between Angular and static websites.
Case in point: Scully.io, the first Angular static site generator.
In this tutorial, I’m going to use Scully to craft an Angular static website. While I’m at it, I’ll push the demo further by integrating our shopping cart, thus creating a simple e-commerce app in no time.
Tutorial steps 🛠
Create a new Angular app
Install external dependencies
Write an Angular service
Create the necessary components
Add Scully to generate an Angular static website
First, let’s see what Scully is and what new opportunities it brings to the Angular community.
Introducing Scully.io: the First Angular Static Site Generator


Scully is the first legitimate attempt at bringing the JAMstack to Angular developers.
It’s still a young product, as it made its first public steps at the end of 2019. For now, we’ll call it a static site generator for Angular development. I say “for now” because the long term ambition for Scully is wider than this definition.
You can hear Aaron Frost, its creator, talk in-depth about Scully’s origin and vision in this recent That’s my JAMstack episode.
In a nutshell, the idea for this SSG came from looking at what Gatsby & Next were doing for React or Gridsome & Nuxt for Vue.js.
If they’re all powerful tools, Aaron found the same flaw in each of them. If we take Gatsby, for instance, it’s pretty hard to include it in an existing React project. The reason for this is that the SSG (Gatsby) and the framework it’s built on (React) present two different paradigms. It means that if you plan on using Gatsby in a project, you better start from scratch. It’s highly opinionated.
Scully is built differently.
The man behind Scully is clear about it, you should consider pre-rendering over server-side rendering for your apps.
When I said that its ambition was broader than being an Angular SSG, it’s because the plan is to bring support for React development as well eventually. The need for this kind of tool was obviously more urgent in the Angular community, but sooner than later, Scully.io could be a direct, less opinionated alternative to Gatsby & Next.
But I’m getting ahead of myself for now. The plan today is to test out static site generation for Angular. So let’s see what Scully can do for you, right now.
Why use Scully.io?
It’s all good, but if you’re an Angular developer new to concepts like static websites and the JAMstack, you might ask yourself: “What will I gain for using something like Scully?”
Well, SSGs bring many benefits. Three pillars are mentioned over and over, and Aaron Frost as also brought them forwards:
Better performance—no slow server-side calls, content served through CDNs.
Increased security—no server-side operations also means less potential breaches.
Saved development time & cost—no complex infrastructure to build and maintain.
… and developing static websites doesn’t mean you can’t have dynamic functions! That’s what we’ll see with the following e-commerce example.
I invite you to visit Scully.io's documentation for more technical info.
Technical tutorial: Build an Angular Static Website with Scully

Prerequisites
Basic knowledge of Angular concepts.
A free Snipcart account—If you want to follow the e-commerce side of this demo.
1. Create a new Angular application
Scully lives on top of Angular applications. So to build the demo, the first step will be to create a new Angular app.
Make sure you have Angular CLI installed:
npm i -g @angular/cliThe following steps are really more about Angular. We'll wire Scully with it later in the tutorial.
Create a new Angular project:
ng new scully-snipcartAnswer “yes” to add Angular routing. In my case, I'm going to use SCSS, which I prefer over plain CSS.
Your application will be scaffolded automatically.
Now, open app.component.html and replace its content with the following:
<router-outlet></router-outlet>
<div id="snipcart" data-api-key="<API_KEY>" hidden>
</div>
So this component renders the router-outlet component, and will also contain the div that Snipcart will be mounted in.
Don't forget to replace <API_KEY> by your own public Snipcart API key.
2. Install external dependencies (Materialize & Snipcart)
In this demo, I'll use Materialize, a CSS framework to build web applications with Material Design, a design language created by Google.
So let's open the index.html file and add necessary stuff for Materialize:
In the head element, add this stylesheet:
<link rel="stylesheet" href="https://cdnjs.cloudflare.com/ajax/libs/materialize/1.0.0/css/materialize.min.css">And while you're at it, add Snipcart stylesheet as well:
<link rel="stylesheet" href="https://cdn.snipcart.com/themes/v3.0.11/default/snipcart.css" />Finally, add Snipcart JavaScript file, just before the closing </body> tag, under <app-root> component:
<script src="https://cdn.snipcart.com/themes/v3.0.11/default/snipcart.js"></script>You can close index.html. You won't need to change anything else in it.
3. Write service to access products
Before creating components, let's generate a service that will be responsible for calling an API to fetch products. In this case, I uploaded a simple JSON file that you can find here: https://scully-snipcart-api.netlify.com/products.json.
In a real-world project, you could build an API or a serverless function that would return products in JSON format.
This service will need a HttpClient. You’ll need to make sure to import HttpClientModule, open app.module.ts, and in the imports array, add HttpClientModule:
import { HttpClientModule } from  '@angular/common/http';

@NgModule({
  declarations: [
    AppComponent,
  ],
  imports: [
    BrowserModule,
    AppRoutingModule,
    ScullyLibModule,
    HttpClientModule,
  ],
  providers: [],
  bootstrap: [AppComponent]
})
export class AppModule { }
Let's generate the service:
ng g service productsOpen products.service.ts file. Let's start by creating a new interface to define the Product object returned by the API.
export interface Product {
  name: string;
  id: string;
  price: number;
  image: string;
  url: string;
  description?: string;
}
Then, the service will have two methods, getProducts that will return the list of all products, and getProductById.
import { Injectable } from '@angular/core';
import { HttpClient } from '@angular/common/http';
import { Observable } from 'rxjs';
import { map } from 'rxjs/operators';

@Injectable({
  providedIn: 'root'
})
export class ProductsService {

  constructor(private http: HttpClient) { }

  getProducts() {
    return this.http.get<Product[]>('https://scully-snipcart-api.netlify.com/products.json');
  }

  getProductById(id: string): Observable<Product | null> {
    return this.getProducts()
      .pipe(map(products => {
        const filtered = products.filter(x => x.id === id);

        if (filtered.length > 0) {
          return filtered[0];
        }

        return null;
      }));
  }
}
The first component to create will manage the layout. It’ll contain the navigation bar and stuff like that.
Let's name this component layout.
4. Generate layout component
ng g component layoutOpen layout.component.ts and replace it with:
import { Component, OnInit, Input } from '@angular/core';

@Component({
  selector: 'app-layout',
  templateUrl: './layout.component.html',
  styleUrls: ['./layout.component.scss']
})
export class LayoutComponent implements OnInit {

  constructor() {
  }

  @Input() title = 'Store';

  ngOnInit(): void {
  }

}
This component will have one prop, named title.
Now, open layout.component.html and replace content with:
<div class="layout">
    <nav>
        <div class="nav-wrapper container">
            <a [routerLink]="['/']" class="brand-logo">
                #workfromhome
            </a>
            <ul id="nav-mobile" class="right hide-on-med-and-down">
                <li>
                    <a href="#" class="snipcart-checkout">
                        View cart
                    </a>
                </li>
            </ul>
        </div>
    </nav>

    <div class="container layout__content">
        <header>
            <h1>
                {{ title }}
            </h1>
        </header>

        <main class="layout__content">
            <ng-content></ng-content>
        </main>
    </div>

    <nav>
        <footer class="nav-wrapper container layout__footer">
            Made with 💓 with <a href="https://scully.io">Scully</a> & <a href="https://snipcart.com">Snipcart</a>.
        </footer>
    </nav>
</div>
This component will render the navigation bar. I also added a link to show the cart in it. It's as simple as adding snipcart-checkout class on any HTML element.
Also, ng-content component is used; the layout component will be used to wrap our other components.
5. Create products related components
Now let's add a product listing. For this, generate a new component named products:
ng g component productsOpen app-route.module.ts and add this route to the routes array:
const routes: Routes = [{
  path: '',
  component: ProductsComponent,
}];
Open products.component.ts file and replace it with:
import { Component, OnInit } from '@angular/core';
import { Observable } from 'rxjs';
import { Product, ProductsService } from '../products.service';

@Component({
  selector: 'app-products',
  templateUrl: './products.component.html',
  styleUrls: ['./products.component.scss']
})
export class ProductsComponent implements OnInit {
  products$: Observable<Product[]>;

  constructor(
    private productsService: ProductsService) { }

  ngOnInit(): void {
    this.products$ = this.productsService.getProducts();
  }
}
As you can see, this component receives the products service created earlier, and it exposes the list of products via the products$ property.
Now, open products.component.html, which is the markup file for this component. Replace its content with:
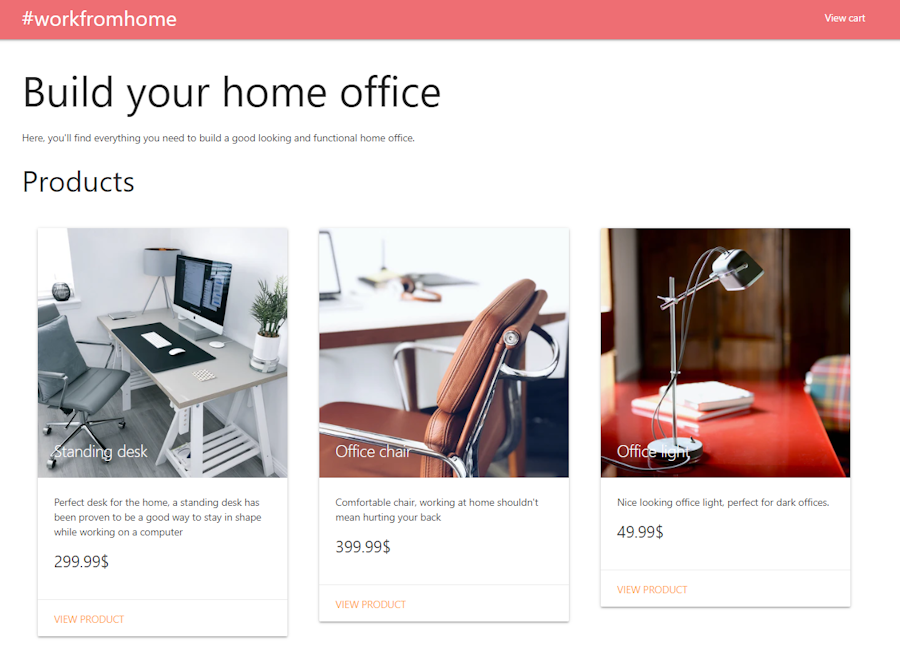
<app-layout title="Build your home office">
    <p>
        Here, you'll find everything you need to build a good looking and functional home office.
    </p>

    <h3>
        Products
    </h3>

    <div class="products-list">
        <div *ngFor="let product of products$ | async" class="products-list__item">
            <app-product-card  [product]="product">
            </app-product-card>
        </div>
    </div>
</app-layout>
You may have noticed the app-product-card; it’s the next component you'll need to create.
ng g component product-cardThis component will have 3 properties:
First, the
productto displaySecondly, a property named
typethat will be used to specify how the card should look. Becauseproduct-cardwill be used in the product details page as well, but it will look a bit different.Finally, a boolean to indicate if the buy button should be included or not in the component instance.
Open product-card.component.ts:
import { Component, OnInit, Input } from '@angular/core';
import { Product } from '../products.service';

@Component({
  selector: 'app-product-card',
  templateUrl: './product-card.component.html',
  styleUrls: ['./product-card.component.scss']
})
export class ProductCardComponent implements OnInit {

  constructor() { }

  @Input() product: Product;
  @Input() type: 'horizontal' | 'vertical' = 'vertical';
  @Input() showBuyButton: boolean;

  ngOnInit(): void {
  }

}
Then, it's markup in product-card.component.html:
<div class="card" [ngClass]="{'horizontal': type === 'horizontal'}">
    <div class="card-image">
        <img [src]="product.image" />
        <span class="card-title" *ngIf="type !== 'horizontal'">{{ product.name }}</span>
    </div>
    <div [ngClass]="{'card-stacked': type === 'horizontal'}">
        <div class="card-content">
            <p class="product-card__description">
                {{ product.description }}
            </p>
            <p class="product-card__price">
                {{ product.price }}$
            </p>
        </div>
        <div class="card-action">
            <a [routerLink]="['/products/' + product.id]" *ngIf="!showBuyButton">
                View product
            </a>
            <button class="snipcart-add-item waves-effect waves-light btn-large btn"
                *ngIf="showBuyButton"
                data-item-url="https://scully-snipcart-api.netlify.com/products.json"
                [attr.data-item-price]="product.price"
                [attr.data-item-image]="product.image"
                [attr.data-item-name]="product.name"
                [attr.data-item-description]="product.description"
                [attr.data-item-id]="product.id">
                Add to cart
            </button>
        </div>
    </div>
</div>
This component also adds a Snipcart buy button, with attributes coming from the product itself.
Note that the data-item-url points to our API, the model exposed by our API is compliant with our JSON crawler, so we can use this to keep it simple.
You're now ready to test your application. Start Angular dev server with this command:
ng serveNow, open your browser to http://localhost:4200, and you should see your product listing.

Let's add some CSS to make it look even better.
First, open layout.component.scss and add these CSS rules:
.layout {
    &__content {
        min-height: calc(100vh - 64px - 200px);
    }
    &__footer {
        text-align: center;
    }
}
Then, in products.component.scss:
$breakpoint-tablet: 768px;
$breakpoint-desktop: 1200px;

.products-list {
    display: flex;
    flex-wrap: wrap;

    &__item {
        padding: 24px;
        width: 100%;

        @media (min-width: $breakpoint-tablet) {
            width: 50%;
        }

        @media (min-width: $breakpoint-desktop) {
            width: 33%;
        }
    }
}
Finally, in products.component.scss:
.product-card {
    &__price {
        font-size: 24px;
        padding: 16px 0;
    }
}
Now, let's implement the product details component.
ng g component product-detailsThen, open app-routing.module.ts, and add the route for product specific pages:
import { ProductDetailsComponent } from './product-details/product-details.component';

const routes: Routes = [{
  path: '',
  component: ProductsComponent,
}, {
  path: 'products/:productId',
  component: ProductDetailsComponent,
}];
Open product-details.component.ts and use this code:
import { Component, OnInit } from '@angular/core';
import { ActivatedRoute } from '@angular/router';
import { map } from 'rxjs/operators';
import { Product, ProductsService } from '../products.service';

@Component({
  selector: 'app-product-details',
  templateUrl: './product-details.component.html',
  styleUrls: ['./product-details.component.scss']
})
export class ProductDetailsComponent implements OnInit {
  id: string;
  product: Product;

  constructor(
    private route: ActivatedRoute,
    private productsService: ProductsService) {
  }

  ngOnInit(): void {
    this.route.params
      .pipe(map(p => p.productId))
      .subscribe(id => {
        this.productsService.getProductById(id)
          .subscribe(product => this.product = product);
      });
  }

}
This component will get the product id from the route and will use the product’s service to fetch the product information.
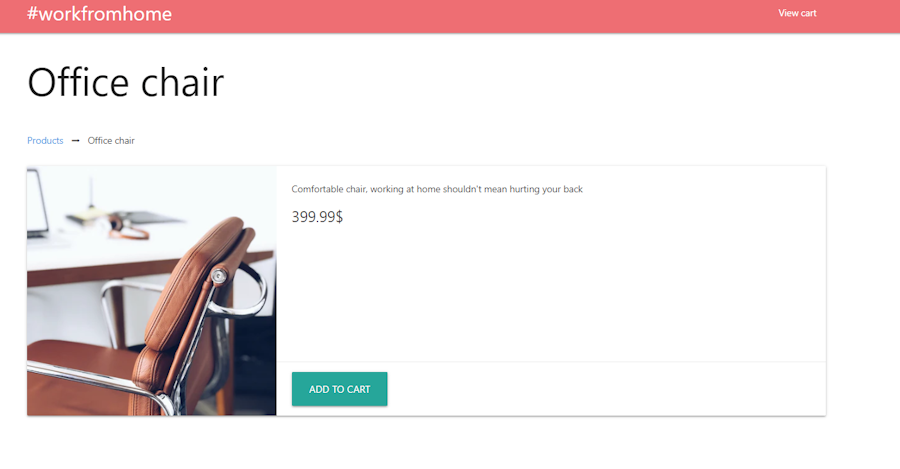
Now, open its template file product-details.component.html:
<app-layout [title]="product.name" *ngIf="product">
    <div class="actions">
        <a [routerLink]="['/']" class="actions__link">Products</a>
        <span class="actions__separator">➡</span>
        <span>{{ product.name }}</span>
    </div>
    <app-product-card [showBuyButton]="true" type="horizontal" [product]="product">
    </app-product-card>
</app-layout>
I added a breadcrumb on top of the page. Then I use the product-card component created earlier. This component is wrapped by the layout component, of course.
And the styles for this component in product-details.component.scss:
.actions {
    padding: 24px 0;

    &__link {
        margin-right: 12px;
    }

    &__separator {
        margin-right: 12px;
    }
}
You can update your browser, and routing should work. You should be able to see the product details page.

6. Add Scully to generate Angular static website
Now that we’re done with the Angular application, it's now time to plug Scully on top of that. Scully can be added via the Angular CLI:
ng add @scullyio/initOnce it's installed, you have to help Scully know which pages it has to pre-render. Since our product detail pages are generated with a route parameter, Scully needs to know all the possible routes so it can pre-render each page.
To do so, open scully.{projectName}.config.js
Replace the routes property by:
routes: {
  '/products/:productId': {
      type: 'json',
      productId: {
          url: 'https://scully-snipcart-api.netlify.com/products.json',
          property: 'id'
      }
  }
}
Scully comes with a bunch of plugins, one of them named json plugin is a router plugin that will be helpful here.
Remember the route you added in app-module.routing.ts? Well, you will need to indicate to Scully how to obtain the productId parameter. Specify the URL that will be used to get all products and the property name of each product that will be mapped to the productId URL parameter.
Before running Scully, you will need to build your Angular application:
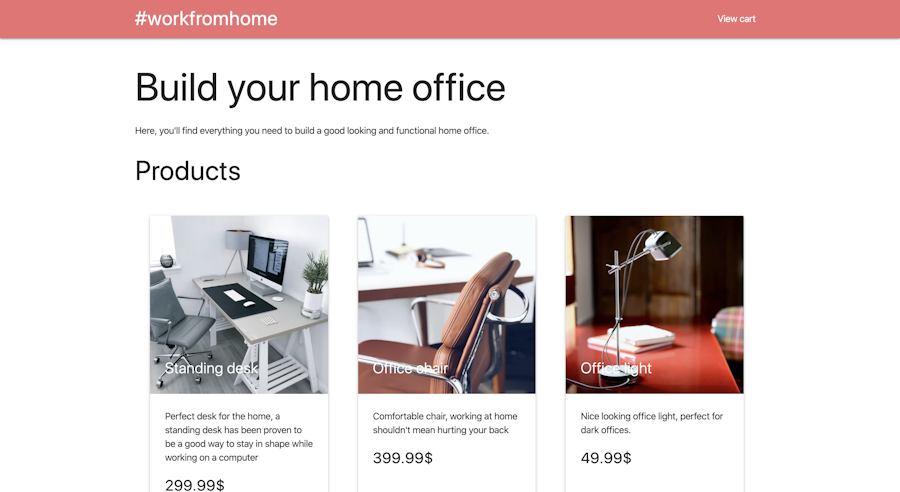
ng buildThen, you can execute Scully. It's important to pass the flag --scanRoutes so it will discover all routes to generate.
npm run scully:serve -- --scanRoutesOpen the URL that is shown in your terminal, and you should have the same application as you had before, but pre-rendered.
As simple as that!
To build your site for production:
npm run scully -- --scanRoutesYou can take a look at the dist/src folder, and you'll see that each page is already completely rendered:


Live demo & GitHub repo

Try live demo here
See GitHub repo here
Closing thoughts
It's been a while since I had the chance to play around with Angular, and I had a good time building this demo, which took me +/- a day.
What I love about Scully is that it sits on top of Angular in a very clever way. You don't need to change the way you build your Angular applications; simply add Scully on top of your application, make sure you handle dynamic routes, and you're all set.
On this, I can honestly say that Scully delivers on its promises. Most other SSGs we’ve tried out, Gatsby or Nuxt for instance, require you to learn a bunch of concepts related to their library,
Scully really doesn't get in the way at all.
If I had one constructive comment, it’s that I found that their documentation is not always clear. It’s still a young project, though, so I'm pretty sure it’s something that will improve eventually!
If you've enjoyed this post, please take a second to share it on Twitter. Got comments, questions? Hit the section below!


