Svelte.js Guide: The Framework to Write Faster JavaScript
Have you ever used a library or framework and thought to yourself, "Wow, I really like this framework. I'm going to use it on all of my projects from now on!" If so, then you're going to want to read about Svelte.js.
Svelte has been making waves over the past year. In fact, according to the Stack Overflow survey, it is the most loved and the fifth most popular framework. I'm not usually excited about new tools, but Svelte is different. It provides a unique point of view and has features that make it stand out from the rest.
For example, Svelte automatically bundles your code to achieve faster loading times, making it ideal for SEO-driven projects and mobile devices.
In this guide, we will cover:
What is Svelte?


Svelte.js is an open-source JavaScript framework that simplifies the creation of fast, static web apps by turning raw code into sleek and interactive user interfaces. One key difference with this framework is that it compiles and serves code at build time rather than runtime, making it faster than React or Vue.
Svelte's speed comes from its architecture. The framework compiles code into small, independent JavaScript modules, ensuring that the browser does as little work as possible, resulting in faster loading speeds
Side note: While Svelte is a framework of sorts, it’s not exactly a framework. It has framework functionalities, but since Svelte’s code is compiled into vanilla JS, it’s often regarded as a frontend compiler or a Framework. You will find both terms used almost interchangeably in this article and in most articles out there.
There are three main reasons behind Svelte’s blazing-fast speeds and solid developer experience:
No virtual DOM: Svelte achieves much of the same functionality as React and Vue’s without a virtual DOM. This means you can use it without relying on virtual elements and get even better performance benefits in return. In other words, Svelte works directly on the code without a DOM, and it moves most of the code processing to the compilation stage.
Less code: In Svelte you achieve the same results as you would with React, but with fewer lines of code. For instance, this experiment shows it takes 442 characters in React, 263 in Vue, and 145 in Svelte to create the same component.
Reactivity: Svelte, like React, reacts on its own to data changes, It doesn’t require the browser to do extra work to convert the components into DOM operations, rendering data changes as they are as JavaScript code.


Svelte users looking to use a framework can leverage SvelteKit without any significant learning curve. The framework extends Svelte’s native capabilities and allows web developers to build web applications of all sizes while keeping a solid developer experience and snappy performance for visitors.
Now that we know more about Svelte, let’s dive deeper and compare it with other JavaScript frameworks.
Svelte vs. React and Vue.js
Here’s a handy chart for you to see the differences between each framework at a glance.
| Svelte | React | Vue | |
|---|---|---|---|
| App Performance | Faster than React and Vue | Slower than Svelte and slightly slower than Vue | Slower than Svelte but slightly faster than React |
| Architecture | JavaScript compiler | DOM | Virtual DOM |
| Average app size | 15 kb | 193 kb | 71 kb |
| Learning curve | Easy to learn | Relatively easy to learn | Relatively easy to learn |
In simple terms, Svelte allows you to be more efficient. By letting you use languages and notation you’re familiar with (HTML, CSS, and JavaScript), even beginners can get started quickly. On the other hand, React and Vue require TypeScript and JSX skills.
In addition to that, Svelte doesn’t rely on complex libraries loaded at runtime. Instead, it compiles your code and loads a tiny bundle that’s smaller than React’s. This weight difference translates into faster loading times for visitors.
Unlike Vue and React, Svelte requires almost no boilerplate code because it’s written using basic HTML, CSS, and JavaScript. As a result, Svelte’s scripts look similar to vanilla JS because it uses standard HTML tags.
The benefits of using Svelte.js
Now that we’ve looked at Svelte vs. its alternatives more closely, let’s talk about the reasons that make it the most loved framework:
Better developer experience: Svelte is the most loved framework because it’s easy to set up and focuses on creating an environment where developers can write less code and do more.
Built-in accessibility linting: Svelte's accessibility linter is a big help to make apps error-free. Svelte automatically checks the compiled code before launch and reports any violations such as missing alt text or too few contrast ratio points.
Modular CSS: Svelte styles are scoped by default, which means that when you compile your Svelte files to assets, they will generate unique class names for each element. This ensures consistency in design across pages or applications.
Built-in animations: Working with animations in Svelte is a fantastic experience. It comes built-in with powerful and delightful interactions without the need for extra packages.
When should you use Svelte.js?
Frankly, it all boils down to what you intend to build with it. Just because it delivers fast performance that doesn’t make it the magic hammer that fixes all your problems. Generally, I’d recommend using Svelte when:
Building fast, responsive websites: Svelte's small bundle size ensures that whatever you create will run fast. This makes it perfect for customers who want fast, SEO-driven websites and a superior web experience.
Creating web apps for devices with poor connectivity: Since Svelte uses less code, that means less Kbs to download and execute, making it ideal for building applications meant for devices with limited access to the internet and limited process power.
Designing interactive pages: Animations and transitions come built-in in Svelte. Developers can create interactive content using the svelte/animate module, which is a great way to keep visitors engaged with your content that won’t harm your loading speeds and SEO.
Does Svelte.js have a big learning curve?
Svelte is the perfect platform for beginners who are new to coding. With just an HTML/CSS & JavaScript skillset, you're able to start building your first website from scratch without the need for extra knowledge.
This makes for a very small learning curve, unlike most of its alternatives. Beyond that, Svelte offers solid learning resources that ensure that you will grasp the specifics in just days– not weeks or months like you would with React, Vue, or Angular.
Getting started with Svelte.js
By now I’m sure you want to get your hands dirty and start tinkering with Svelte.
This time, I prepared a beginner’s tutorial to show you how to create a to-do list using Svelte components. We will build an interactive form where you can both mark your to-dos as completed or erase them if you made a mistake.
Full-disclosure, I’m not the most organized person, and I’m building this to-do with the hopes it will help me become one.
Join me on this spiritual journey, and let’s build this app together.
Prerequisites
This is what you need to get started with Storybook:
Basic understanding of HTML, CSS, and JavaScript
A code editor like Visual Studio Code
Node.js installed on your machine
npm installed on your machine
Git and degit
We need to install two things to get started with this tutorial: git and degit. Git enables us to search packages directly in GitHub without a registry, and degit allows us to make copies of git repositories and use them in our own projects.
Since we’ll be using a Svelte template for our to-do list, we need both before getting started.
To install Git, run:
npm install -g git-installSide note: Take in mind that if you’re using Windows, you might need to download and install Git for Windows rather than using the CLI.
To install degit, run the following command in your CLI:
npm install -g degit1. Creating a Svelte.js app
With git and degit installed, let’s create a clone of Svelte’s project app template and run it. This boilerplate code built by the Svelte team will serve us to get started quickly. To do it, type the following command on your CLI.
npx degit sveltejs/template svelte-appI named it svelte-app, but you can call it however you want.
Once the project has been cloned, you should have a new 'svelte-app' directory. That directory contains the template files we’ll need to build our to-do list.
Head to your folder in the terminal with cd your-folder-path/ and install all the project’s dependencies by running:
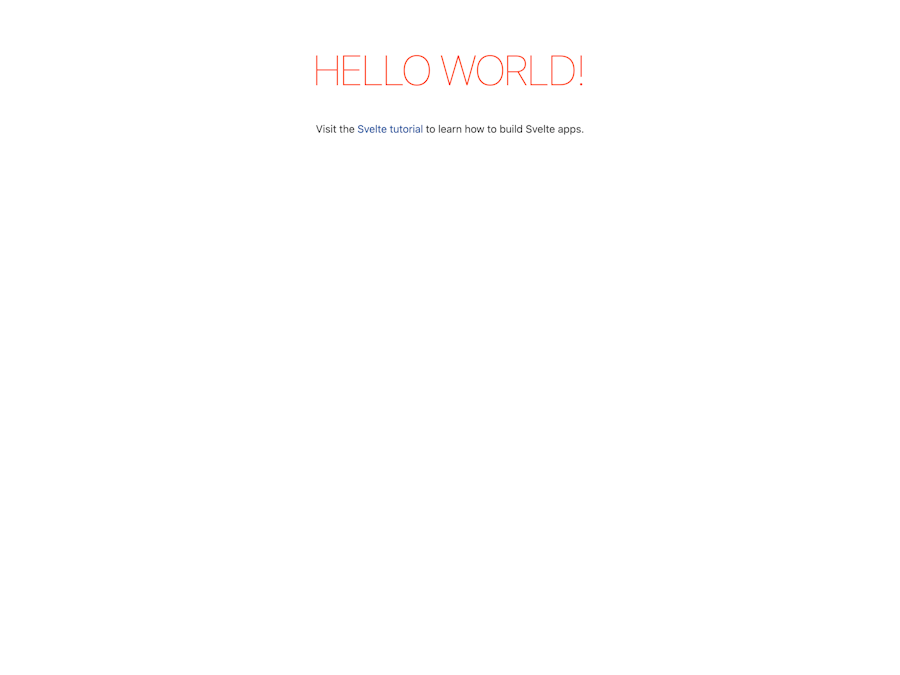
npm installOnce the dependencies are installed, let’s run our template app with the following command:
npm run devThis command runs our Svelte dev environment and readies our application. You can see how the template looks by going to http://localhost:8080. If we did things right, we should get a page that looks like this:

We’re ready to create our first component and start fleshing out our to-do app.
2. Creating a Svelte container
To create the container that will house our app, we need to go to src/App.svelte. This is where the magic happens. A container is usually composed of the following parts:
<script>: A block containing executable JavaScript code.<html tag>: A block containing the central functionality of an application.<style>: A block containing CSS styles.
Once we’re in the file, replace the existing code with the following:
<script>
</script>
<main>
</main>
<style>
</style>
This should have created a container where our to-do app will live.
Now that we have our empty container, let’s build the form.
3. Building a form to submit to-dos
To create the form where we will submit our to-dos, we’ll need to add the following lines of code inside the <main> tag:
<!-- Form -->
<form on:submit|preventDefault={add}>
    <input bind:value={newItem} placeholder="Enter to-do" />
    <button class="add-todo" on:click={add}><span>+</span></button>
    </form>
This container executes a JavaScript event when a form is submitted.
We still need a few more things to ensure our to-do list will be able to store the data and render the to-dos on our app’s page. To do so, let’s go to our <script> tag and add the following code inside:
let newItem = "";
let todoList = [];
function add() {
  if (newItem !== "") {
    todoList = [
      ...todoList,
      {
        task: newItem,
        completed: false,
      },
    ];
    newItem = "";
  }
}
This JavaScript function is called each time a user interacts with our form submit button which triggers the on:submit event we created earlier. It then renders the content below the submit button.
4. Styling the form
Now that we have created a form to submit our to-dos, let’s add some style to it. To do so. Let’s add the following inside the <style> tag:
main {
    display: flex;
    flex-direction: column;
    align-items: center;
    min-height: 100%;
    padding: 5vmin;
    box-sizing: border-box;
    background: antiquewhite;
    }
5. Styling your form button
Now that we have a working form, it’s time to add some styles to it. So, let’s add the following code inside the <style> tag:
form {
    width: 100%;
    max-width: 500px;
    display: flex;
    align-items: center;
    margin-bottom: 1rem;
  }

  input {
    flex-grow: 1;
    width: 0;
    border: none;
    border-bottom: 1px solid black;
    background: transparent;
    box-shadow: none;
    font-size: 1.2rem;
    margin: 0;
    outline: none;
  }
6. Rendering and styling the to-dos
By now our form should be styled and ready to accept our to-dos, but we need to make sure the items appear on our page once we add them as to-dos. To do that, we’ll use Svelte’s #each function, which enables us to loop over lists of data and make them appear in our list.
Let’s add the following line of code to App.svelte at the section below the form tag:
<!-- To-dos -->
<div class="todos">
    {#each todoList as item, index}
	    <span class="todo__text">{item.task}</span>
        <div class="todo__buttons"></div>
    {/each}
</div>
Once we’ve done this, we’ll add some style to our to-do list. To do this, let’s go in our <style> tag and add this new CSS style:
.todos {
width: 100%;
max-width: 500px;
}
.todo {
display: flex;
padding: 20px;
border-radius: 20px;
box-shadow: 0 0 15px rgb(0 0 0 / 20%);
background-color: hsla(0, 0%, 100%, 0.2);
margin-top: 1rem;
font-size: 1.2rem;
justify-content: space-between;
align-items: center;
}
.todo__buttons {
display: flex;
align-items: center;
margin-left: 1rem;
}
.todo button {
width: 32px;
height: 32px;
padding: 4px;
margin: 0;
flex-shrink: 0;
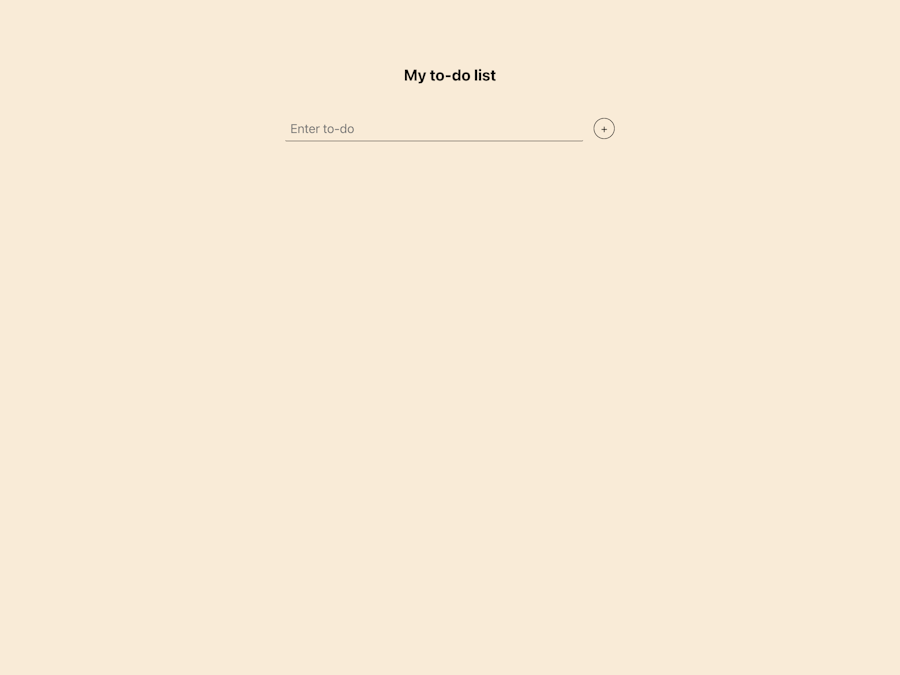
}7. Adding a header to your list
Now that the basic functionalities of our form are ready, it’s time to add a header and some extra style to make our to-do list looks more appealing.
First, let’s add an H1 header to our list. Place it right below the <main> tag.
<!-- Header -->
<h1>My to-do list</h1>
To style the header, let’s add the following code to our <style> tag:
h1 {
    text-align: center;
    font-size: 1.5rem;
    margin: 2em 0;
}
By now, your to-do list should look like this:
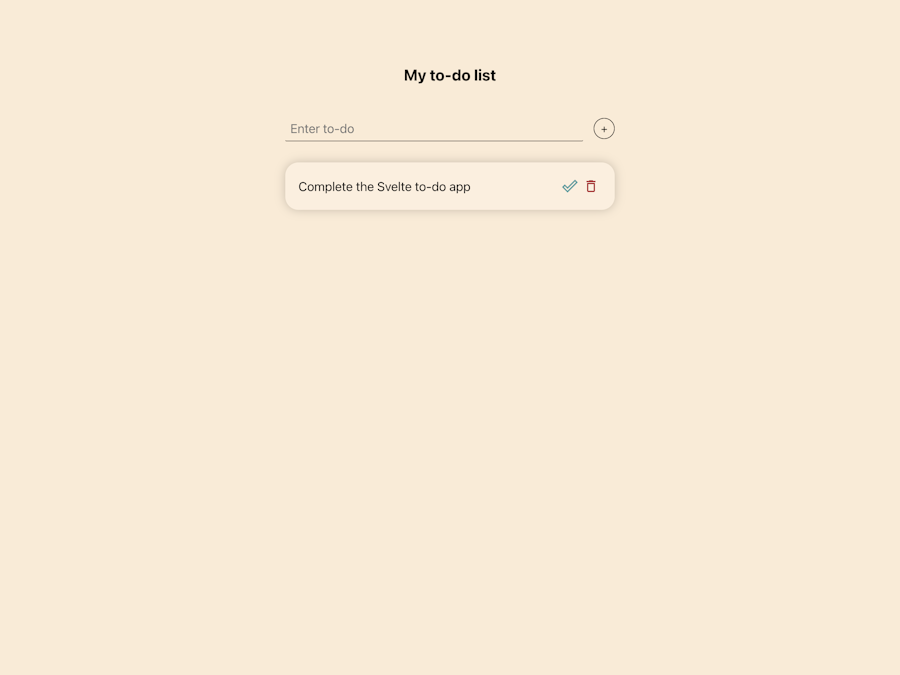
8. Adding complete and delete functionality using icons
Let’s make it more functional by adding a delete and completed button.
To add the buttons, we’ll first create a component containing icons that we’ll use as the button. Let’s create an Icon.svelte file in the /src directory and add the following code:
<script>
  export let name;
  const icons = [
    {
      name: "check-mark",
      path: '<path d="M19.77 4.93l1.4 1.4L8.43 19.07l-5.6-5.6 1.4-1.4 4.2 4.2L19.77 4.93m0-2.83L8.43 13.44l-4.2-4.2L0 13.47l8.43 8.43L24 6.33 19.77 2.1z" fill="currentColor"></path>',
    },
    {
      name: "delete",
      path: '<path d="M6 19c0 1.1.9 2 2 2h8c1.1 0 2-.9 2-2V7H6v12zM8 9h8v10H8V9zm7.5-5l-1-1h-5l-1 1H5v2h14V4h-3.5z" fill="currentColor"></path>',
    },
  ];
  let icon = icons.find((item) => item.name === name);
</script>

<svg viewBox="0 0 24 24" class={$$props.class}>
  {@html icon.path}
</svg>
This component can receive an icon name and displays the associated SVG so they can be used by other components with the import statement.
Feel free to change the icons if you want something different.
Now, let’s do take advantage of the #each function we created earlier to show the icons in our app. Under the <span class="todo__text">{item.task}</span> tag in the todos class inside the App.svelte file replace the content with the following code just before the closing </div>:
<div class="todo__buttons">
          <button class="complete" on:click={() => complete(index)}>
            <Icon name="check-mark" />
          </button>
          <button class="delete" on:click={() => remove(index)}>
            <Icon name="delete" />
          </button>
        </div>
      </div>
    {/each}
When done, let’s import the Icon component from the /Icon.svelte component by adding the following line of code below the <script> in the App.svelte file:
import Icon from "./Icon.svelte";Now, to create the delete function, let’s add this below our add function:
function remove(index) {
    todoList.splice(index, 1);
    todoList = todoList;
  }
Finally, let’s add some styling to make our buttons look great. To do it, go to the <style> tag in the same file and add the following code:
button.delete,
button.delete:hover {
  color: brown;
  transition: color 100ms ease-out;
}
button.complete,
button.complete:hover {
  color: cadetblue;
  transition: color 100ms ease-out;
}
By now, our to-do list should look like this. As you can see, the icons are visible and interactive.
While we could leave our to-do list like this, let’s do one last thing to make our to-do list look even better.
9. Striking complete to-dos
As our last thing, the proverbial cherry on top of our tutorial, we will add an optional class to our to-do list to automatically strike the task when we complete it.
To do that, let’s add a new function in the <script> element:
function complete(index) {
  todoList[index].completed = !todoList[index].completed;
}
This function adds a style element to the items in your to-do list, striking them if the item is completed.
Now we need to add some styles to our new element by going to <style> and adding the following code:
.todo.completed {
  color: slategray;
}

.todo.completed .todo__text {
  text-decoration: line-through;
}

.todo.completed button {
  color: silver;
}
If you’ve been following the steps, you should have something like this.

And that’s it. We’ve successfully created a to-do list on Svelte.
High five!
Live demo and GitHub repository
Try out the live demo here
See the GitHub repo here
Conclusion
After using Svelte, I understand why developers love it. It’s a promising compiler (or framework) that, while not perfect for every project, can help you build something fast and interactive.
It is less convoluted than other tools and enables you to hit the ground running in minutes. In addition, you’ll find plenty of resources on the internet to guide you if you hit a roadblock, and the community is friendly to beginners.
If you're looking to learn a new framework or want to try something different, Svelte is definitely worth a closer look.
Have you used Svelte already? Tell me what you think of it in the comments.


