A Tutorial to Bundle Cockpit CMS & Nuxt.js in a full JAMstack
In a rush? Skip to tutorial steps or GitHub repo & live demo.
Three years ago, we fell down a rabbit hole.
We landed in a strange frontier of web development.
Talks of "static" and "serverless" sites, dedicated APIs, and burgeoning frontend wonders were common. JavaScript was everywhere. Developers were excited to build sites again. We had entered the JAMstack universe.
On the blog, we've already discussed countless headless CMS to store content and JS frameworks to render it.
Today, we keep exploring: 1) Cockpit CMS, an API-first CMS recommended by a friend, and 2) Nuxt.js, a kickass Vue.js framework (we've wanted to use it ever since we fell in love with Vue).
We'll cover:
How to set up a Cockpit CMS installation & plug it with Snipcart.
How to use Nuxt.js static generation to render the frontend of our app.
The result? A full JAMstack app: headless content management, frontend rendered in a JS framework, & shopping through an e-commerce API. We'll also throw in a live demo and code repo at the end!
But first, a few important definitions.
Looking for alternative tools to build your headless stack? Visit our developer's guide to headless e-commerce!
What is Cockpit CMS?

Our content data will be stored in Cockpit:
Cockpit is an open source, API-driven CMS that lets you implement your site without compromises.
Developer Artur Heinze crafted a system made to build simple dynamic websites without jumping through the hoops of WordPress, Drupal and the likes.
Its API-first approach (aka "headless") allows for content management that is decoupled from content rendering. You can learn more about it in this primer on headless CMS.
Cockpit runs on PHP and is, at its core, a developer-first CMS.
Here are some of its cool features:
Self hosted
Fast & lightweight: runs on a lightweight database engine, no need for full SQL server
Flexible: implement on your site the way you want
Expandable: easy for devs to create their own modules
Modern & simple UI
Built-in tools: markdown, assets, thumbnails, etc.
What is Nuxt.js?

Nuxt.js will have our frontend covered for this one.
We had the chance to play with Vue.js a lot lately, and were naturally intrigued by the Vue application framework that is Nuxt.
In a nutshell, Nuxt allows you to create Universal Vue.js apps where your JavaScript can execute on both client and server.
Its main scope is UI rendering while abstracting away the client/server distribution.
Inspired by React's Next.js, Nuxt is a go-to solution for building SSR (Server Side Rendered) Vue apps. It's also pretty good at generating static sites, thanks to its generate command.
And here's a peek at how this little marvel actually works:

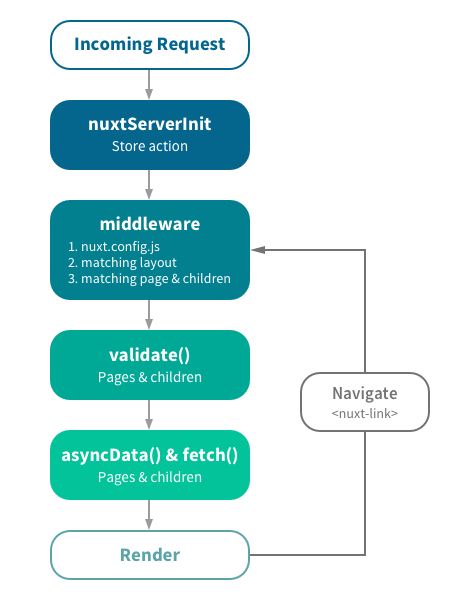
Nuxt.js rendering process [source]
We've seen comprehensive Nuxt.js examples & tutorials pop up (here & here) recently. In this one, we'll see how an actual integration of Nuxt.js with an API-first CMS can work.
Cockpit CMS Tutorial with Nuxt.js & Snipcart
Pre-requisites
Before building our awesome cosplay shop demo (yup, that's right), you'll need:
If you are hosting Cockpit locally
PHP >= 5.4
PDO with SQLite support (or MongoDB)
GD extension enabled
If you are hosting it somewhere
A web server with the above specs
A Snipcart account (forever free in Test mode)
1. Installing Cockpit CMS
Go to the CMS download page. We'll use the "Official release" here, to avoid unstable features.
I'll install Cockpit on its own instance. It'll then be possible to access it with cockpit.local, and the public website with snipcart-shop.local.
Once the installation is complete, go to cockpit.local/install to finish up.
If you intend to push this installation live, you should change your username and password.
2. Creating products to sell with Snipcart
We'll create products in our CMS first.
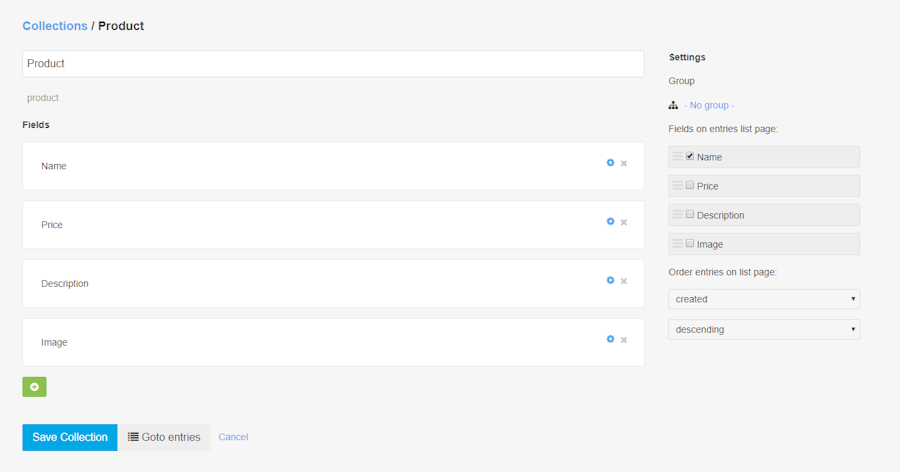
Start a new collection called Product. A collection is a way to hold all the content from a data structure. It's in a way the bread and butter of Cockpit CMS; lots of operations are done in this section.
In this collection, we add the following fields:
A field
textnamedName.A field
textnamedDescription.A field
medianamedImage.A field
textnamedPrice.

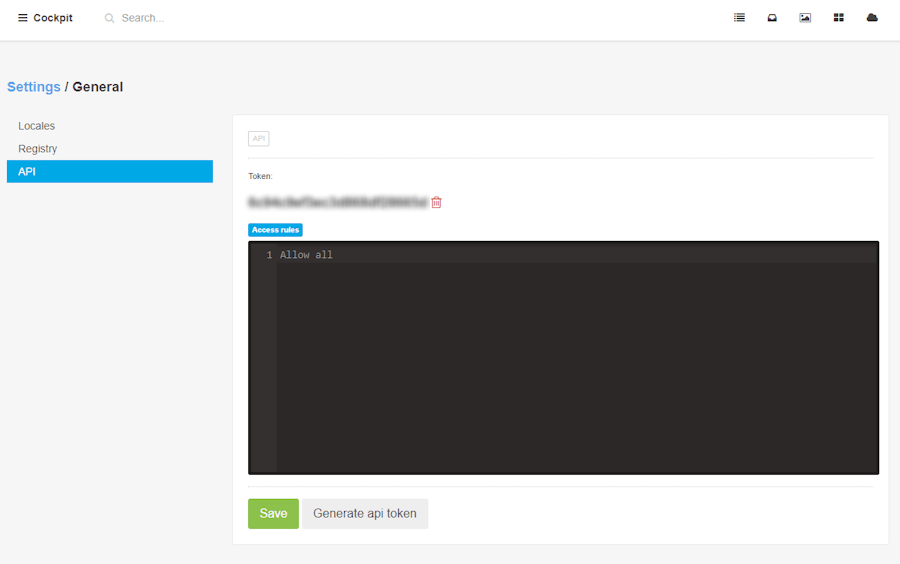
We now have to generate an API key to use Cockpit's services, to do so, go to Settings (hamburger menu, top left corner), then General > API > Generate API token.

Finally, we only need to add our products to our shop's content repo:
CAPTAIN AMERICA - SHIELD
captain_America_Shield.png
99.99

Life size, exact copy of Captain America's infamous shield.
Made of real steel. This item will make you the most patriotic cosplayer in town.
WONDER WOMAN - HEADBAND
WW-Headband.jpg
49.99
We have stuff for the ladies too!
The Wonder Woman headband from the 2017 version.
Shiny, comfy, and BAD-ASS.DEADPOOL - FULL KIT
deadpool-full-kit.jpg
249.99
100% leather, all items included.
For real cosplayers, this kit will surely make you the king of Comic-con
or any other nerd-fest out there.For this demo, we installed Cockpit on an Azure free site. It was very easy to set up: we pushed our code on GitHub and enabled automatic Git deploys in Azure.
3. Using & understanding Nuxt.js
For the client-facing store itself, we'll dive into Nuxt.
First off, I must say I loved working with Nuxt. It's super straightforward, their documentation is neat, and, as you already know, we're currently on a honeymoon with Vue.js.
First thing to get started is to install Nuxt and scaffold our project. We'll need vue-cli installed. If you don't have it, run: npm install vue-cli -g.
Then, we'll scaffold the project with the Nuxt starter template:
vue init nuxt/starter <project-name>
cd <project-name>
npm install
That's it for the installation. You can start the dev server using:
npm run devNuxt.js key concepts
Let's talk a bit about how Nuxt works. The first thing to understand is the pages. A page in Nuxt is kind of a route. It's a Vue component that will be automatically added to the application routes. For instance, in the default files, you have this component: pages/index.vue. This component will be rendered when you hit your application root URL at http://localhost:3000 (if you're running the dev server).
If you want to create a products page, you could add a component named products.vue in the pages folder and then you would get this URL working: https://localhost:3000/products.
Nuxt takes care of the routing automatically; you don't have to register routes or anything. The component will be mounted instantly, and you will even be able to render a statically generated site with it. We'll do this later in the tutorial.
There's also another important concept in Nuxt: components. You'll see this folder in the project created by the starter template. In it, you'll want to add child components to be used in your pages. We'll create one in the post.
Another thing we'll see are the layouts. Layouts are used to define the skeleton of your site, it's usually where you will add your navigation and footer for example.
Last thing we'll tackle is the nuxt.config.js file. It allows you to define which libraries or CSS you want to include globally and much more.
You can also add your own configuration settings if needed. This is what we'll do first, with Cockpit settings. We'll use these when calling Cockpit CMS API to retrieve products data.
Configuring Nuxt.js
Open nuxt.config.js and add:
env: {
  cockpit: {
    apiUrl: 'https://<cockpit-url>/index.php/rest/api',
    apiToken: '<api-token>',
    baseUrl: 'https://<cockpit-url>'
  }
}
We'll replace <cockpit-url> with our own URL and <api-token> with the API token we've generated in Cockpit.
You'll now have access to these environment variables in your pages.
Creating our layout
Before creating the first page, we'll need to make some changes to the layout. In addition to pages and components, Nuxt also has a concept of layouts. Consider it a "master" page. This page must contain a special tag: <nuxt />.
Mine looks like:
<template>
  <div>
    <div class="container">
      <nav class="navbar">
        <div class="navbar-menu">
          <div class="navbar-start">
            <a href="/" class="navbar-item">Products</a>
          </div>
          <div class="navbar-end">
            <a href="#" class="navbar-item snipcart-checkout snipcart-summary">
              <span>View cart (<span class="snipcart-total-items">0</span>)</span>
            </a>
          </div>
        </div>
      </nav>
    </div>

    <section class="section">
      <div class="container">
        <nuxt />
      </div>
    </section>

    <script src="https://ajax.googleapis.com/ajax/libs/jquery/2.2.2/jquery.min.js"></script>
    <script id="snipcart" src="https://cdn.snipcart.com/scripts/2.0/snipcart.js" data-api-key="<snipcart-api-key>"></script>
  </div>
</template>

<script>
export default {
}
</script>
Page components will be rendered inside the <nuxt /> tag.
Creating pages
Now for our first page. Open index.vue and remove everything. Let's start from scratch.
We'll begin by creating the template part of the component. This template will be in charge of rendering all products.
<template>
  <div class="columns is-mobile is-multiline is-centered">
    <div class="column is-one-third-desktop" v-for="p in products">
      <small-product :product="p" />
    </div>
  </div>
</template>
Asking yourself where do the columns, is-mobile, is-multiline, is-centered, etc. classes come from? I used Bulma, a CSS framework for the demo. It provides useful components and styles to get a good looking demo quickly.
To add the reference to Bulma, I opened nuxt.config.js and added this object in the link array:
{ rel: 'stylesheet', href:'https://cdnjs.cloudflare.com/ajax/libs/bulma/0.5.1/css/bulma.min.css'}While we're here, we'll also add Snipcart's default CSS:
{ rel: 'stylesheet', href:'https://cdn.snipcart.com/themes/2.0/base/snipcart.min.css'}Our head object should now look like:
  head: {
    title: 'snipcart-nuxt',
    meta: [
      { charset: 'utf-8' },
      { name: 'viewport', content: 'width=device-width, initial-scale=1' },
      { hid: 'description', name: 'description', content: 'Nuxt.js project' }
    ],
    link: [
      { rel: 'icon', type: 'image/x-icon', href: '/favicon.ico' },
      { rel: 'stylesheet', href:'https://maxcdn.bootstrapcdn.com/font-awesome/4.7.0/css/font-awesome.min.css'},
      { rel: 'stylesheet', href:'https://cdnjs.cloudflare.com/ajax/libs/bulma/0.5.1/css/bulma.min.css'},
      { rel: 'stylesheet', href:'https://cdn.snipcart.com/themes/2.0/base/snipcart.min.css'}
    ]
  }
Any stylesheets added there will be included automatically in all pages.
Notice the small-product tag? This is a component we'll create later.
Now, we need to fetch our products. Nuxt provides a very awesome method for pages component: asyncData. It's important to know that this method can't be used in child components, only in pages components.
This method will allow us to fetch data remotely before rendering the page itself. It's especially useful when creating a static site!
To interact with Cockpit API, we'll use Axios, a popular HTTP client in JavaScript:
npm install axios --saveOur component should look like:
// pages/index.vue
<script>
import axios from 'axios'
import SmallProduct from '~/components/SmallProduct.vue'

export default {
  components: {SmallProduct},
  async asyncData ({env, params}) {
    let {data} = await axios.get(`${env.cockpit.apiUrl}/collections/get/Product?token=${env.cockpit.apiToken}`)

    let products = await Promise.all(await data.map(async (p) => {
      let result = await axios.post(`${env.cockpit.apiUrl}/mediamanager/thumbnails?token=${env.cockpit.apiToken}`, {
        images: [p.Image],
        w: 300,
        h: 300,
        options: {
          quality: 80,
          mode: 'resize'
        }
      })

      p.ThumbUrl = `${env.cockpit.baseUrl}${result.data[p.Image]}`
      return p
    }))

    return {
      products
    }
  }
}
</script>
In the asyncData method, I used Axios to fetch my products and generate thumbnails. Cockpit offers API endpoints for that. Notice the parameters the method receives: {env, params}. The env object will contain the settings set in nuxt.config.js.
Your page component will receive a list of products when mounted. Awesome, right?
Creating components
For this to work, we'll need to create the component SmallProduct.vue. In the components folder, create a new file named SmallProduct.vue.
This component will render product details and Snipcart's buy button.
// components/SmallProduct.vue
<template>
<div class="card">
<header class="card-header">
<div class="card-header-title is-centered">
{{ product.Name }}
</div>
</header>
<div class="card-image">
<img v-bind:src="product.ThumbUrl" />
</div>
<div class="card-content">
<div class="content">
{{ product.Description }}
</div>
</div>
<div class="card-footer">
<a href="#" class="snipcart-add-item card-footer-item"
data-item-url="/"
v-bind:data-item-name="product.Name"
v-bind:data-item-price="product.Price"
v-bind:data-item-id="product._id"
v-bind:data-item-url="product.ThumbUrl"
v-bind:data-item-description="product.Description">
<i class="fa fa-cart-plus"></i> Add to cart
</a>
</div>
</div>
</template>
<script>
export default {
props: {
product: {
type: Object,
required: true
}
}
}
</script>Now run:
npm run devOpen your browser to http://localhost:3000 and you should see something awesome!
4. Deploying our JAMstack bundle
Job's (almost) done! Our Cockpit + Nuxt store lacks one last thing: deployment. As we often do, we'll use Netlify for hosting. Just create a new site in Netlify and use:
npm install && npm run generateWe'll set the publish directory to dist.

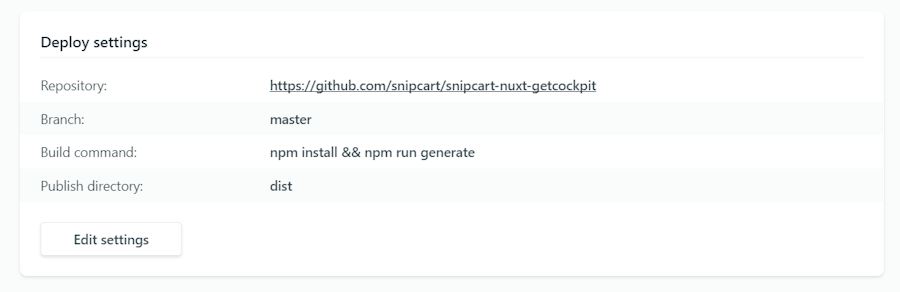
Give Netlify some time to build your site, and you're done!
GitHub repo & live demo


Go ahead, check out the demo & code repo for this tuts!
Conclusion
Well, this was a long one. I'll keep the outro brief. ;)
While Cockpit doesn't offer hosted instances, it provides developers with a very malleable content API. Especially if you're a PHP fan. Based on my tests, perf looks quite good & stable too. It's still a young, free headless CMS, and there's room to improve, visually and functionally speaking. Good news is: it's open source! So don't hesitate to jump in and collaborate.
As for Nuxt, well, I loved it! I guess it transpired enough in the post. Please give it a try if you want to fast-track SSR or static Vue apps development.
If you've enjoyed this post, please take a second to share it on Twitter. Comments, questions? Section below is all yours!


