Statamic Headless Tied to a Gatsby Blog [Tutorial & Live Demo]
It’s hard to mention any other languages than JavaScript when writing about the Jamstack.
As with most modern web trends, JavaScript is everywhere.
However, it would be false to say that this paradigm can’t open its arms to “traditional” programming language like, say, PHP.
Case in point: the Laravel-powered CMS, Statamic. Changes made in its latest version now allow developers to use it as a headless CMS, making it a perfect fit for Jamstack projects.
And that’s exactly what I’m going to do today. In this tutorial, I’ll use Statamic headless to manage and feed data to a Gatsby frontend, resulting in a neat little blog.
Here’s what I’ll cover:
Installing Statamic as headless
Creating a new Gatsby project
Setting up the Statamic GUI
Adding new collections
Using Statamic to feed the Gatsby blog
Handling Statamic’s data
Creating a blog post layout
I’m no PHP expert, so I’ll certainly learn a thing or two along the way as well. Let’s dive right in!
What is Statamic?


Statamic (and its latest version, v3) is many things:
It's a Content Management System (CMS) where data can be pulled via an API endpoint. You can use it as a headless CMS (as I’ll do in the tutorial below.)
It's a Static Site Generator (SSG) that can be deployed to any Content Delivery Network (CDN) known to man.
It's a content creation tool, enabling content creators to write posts and store and distribute videos.
It's an open-source, PHP-based, Laravel package designed to scale and be used as both a front and backend.
Phew, that was a lot of joy to be throwing Statamic’s way. As a first time user, I found the experience of setting it up and grabbing data rather painless. Of course, I stumbled a few times; we’ll go over those together so that you don't have to do it alone.
But all in all, I'd have to say that I'm mightily impressed! Also, the site and docs are just super cool to look at. Reading the copy feels like chatting with a mate down at the pub on a Sunday.
With the release of v3, Statamic introduced a formal way of grabbing the data stored and making it headless: the content API. In v2, there was the possibility to use an addon called Fetch, which would supply JSON endpoints, but with the introduction of the content API, getting your hands on that lovely data has become a first-class citizen. It's now fully supported with a read-only endpoint.
At the time of writing, the Content API feature is a PRO only feature, though we can still use it and try it out on a trial basis until we decide to purchase a license.
Statamic headless tutorial: building a blog with Gatsby

So what’s on today’s menu?
We're going to be using Statamic as a headless CMS. We'll create a new Statamic project from scratch, and a new Gatsby project from scratch and join the two as one, super Jamstack baby from the future.


Oh gosh! I hope super Jamstack babies from the future look better than this.
Prerequisites
Basic knowledge of React and JavaScript
Basic knowledge of the command line
Positivity! Ain't nothing getting done on a downer, let's have some fun!
Cool beans, let's get started!
1. Installing Statamic as headless
1.1 Getting everything in place
I'm one of those devs that use a Windows machine (and not apologizing for it.) What I’ll do here is front up some handy info for the other rebels out there who dare operate outside the cool-belt. For Mac users, I send you to Laravel Homestead to get your basic setup going.
Now, assuming you’re coming at this having no PHP installed on your machines, I point you towards Laragon, which will cover local Apache server, PHP and other goodies installations.
Follow the instructions by downloading the installer and hitting “Yes/Next” until it's done.
Once you have Laragon installed, open it up by double-clicking the big blue elephant that has taken up residence on your desktop.

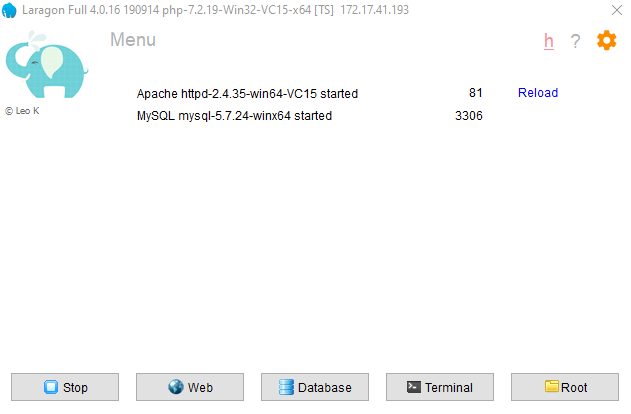
In the bottom right corner, there’s a button called “Root”. Hit that. The file explorer will open inside the www folder; it's in here that we’ll install our Statamic project. But before we do, we have to make sure that we have Composer installed.
For the uninitiated, Composer is the npm of the PHP world, i.e., a package manager. Head on over to getcomposer.org/ and follow the installation guide.
1.2 Actually installing Statamic
Now that we have our pieces in place, we can install Statamic.
Open your terminal. Go to the www folder inside Laragon and run:
composer create-project statamic/statamic statamic-gatsby --prefer-dist --stability=devI chose to name the project statamic-gatsby, but you can rename this to whatever you like. We created our project in this folder because Laragon makes a virtual host for us and maps the folder name in www to a URL appended with .test.
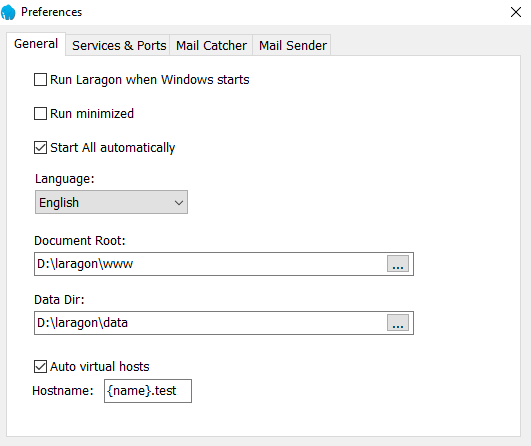
In the Laragon GUI, click the settings cog in the top right corner. Go to the “General” tab and then the “Document” root. This is the place where the project folder names are mapped to the URL. If you wish to change this, then go ahead and create your new project in your new folder’s path. I personally had issues with Apache running on port 80, so changed it to 81—just a heads up, this may not affect your installation.

Open the new Statamic project in your fav code editor (I'll be using VSCode) and install all the dependencies:
composer installAn “out of memory” warning will likely hit you. You can first try running the following:
COMPOSER_MEMORY_LIMIT=2G composer installThis attempts to set the memory limit to 2GB, though I have to confess that this particular approach didn't work for me. Instead, I had to input the new memory limit in the php.ini file manually.
To do so, go back to the Laragon GUI and click the “Menu” button > PHP > php.ini.
On line 401, change the memory allocation. I just whacked it up to 6GB (memory_limit = 6G). This obviously depends on your setup and what you can afford to spare, but anything above 3GB and you should be super safe!
Run Composer install again, and a vendor folder should be created at the Statamic project’s root.
Now we are cooking! Next, we’ll want to open the .env file at the project root and alter/add a few values:
// At the top
APP_URL=http://statamic-gatsby.test:81/
// Towards the bottom
STATAMIC_API_ENABLED=true
STATAMIC_API_ROUTE=api
Add the new site’s URL as the APP_URL. If you changed the port from 80, then append this. Otherwise, you may encounter a 404 page and be scratching your head for a few hours (you're welcome, and my head hurts).
The two bottom lines are telling Statamic that we want to use the new content API and setting the URL endpoint to API.
Now, open config/statamic/api.php and change the following:
// From
'enabled' => env('STATAMIC_API_ENABLED', false),
// To
'enabled' => env('STATAMIC_API_ENABLED', true),
Then, you can open config/statamic/editions.php and change the license to “Pro”, like so:
'pro' => true,This will enable us to use the content API feature, thus Statamic as a headless CMS.
2. Creating a new Gatsby project
I love Gatsby. I especially love creating brand new, sparkling Gatsby sites. So let's do just that.
Create a new project folder at your location of choice and enter the following from the command line:
yarn init -y
yarn add react react-dom gatsby @chakra-ui/core gatsby-source-statamic
yarn add prettier -D
That will give you a project folder with a package.json and node_modules and not much else.
Create a src/pages folder with an index.js inside the pages folder. Then, add the following to your package.json (above the dependencies always seems right to me):
  "scripts": {
    "dev": "gatsby develop",
    "build": "gatsby build",
    "clean": "gatsby clean",
    "pretty": "prettier --write \"src/**/*js\"",
    "z": "gatsby clean && gatsby develop"
  },
All pretty standard stuff:
dev will spin up a development server.
build will make it ready for the outside world.
clean will tuck in its shirt and re-do its hair.
pretty will apply makeup and tighten its belt.
z will start it all over again from scratch. A clean plate, if you will.
Next, we’re going to take advantage of a handy package called “gatsby-source-statamic”. This is basically a wrapper around a fetch request to our API endpoint that takes care of sorting out all our collections and assets.
We have installed Chakra so that we can add some quick styling to our site. This tutorial won't be a deep dive into styling and will keep things pretty basic. Chakra should at least make the experience a little more pleasant on the eye.
Finally, we have added Prettier as a dev dependency. It’s all about peace of mind when getting those tabs in the wrong place, and our spacing all mucked up from copying code from one file to another.
Now we can create a gatsby-config.js file and add the following code:
module.exports = {
  plugins: [
    {
      resolve: `gatsby-source-statamic`,
      options: {
        baseUrl: `http://statamic-gatsby.test:81`,
        collections: [`posts`],
        assets: [`photos`],
      },
    },
  ],
};
This is adding the Statamic plugin to our Gatsby app and passing in some basic options. We have added our Statamic URL (along with the port; you might not have to do this), as well as defining a post collection and photos assets container. We’ll create these soon.
Because we are using Chakra, we have to tell our app where the styles are coming from. Chakra asks that you wrap the root of your app in a provider which will pass down its styles throughout the application tree. You can optionally also pass in a custom theme that would override whatever styles you like, but we won’t be covering that today.
As we are using Gatsby for our React app, we can use the wrapRootElement function, which, as the name suggests, allows us to wrap our applications root with a provider. It's recommended to do this in both the gatsby-browser and gatsby-ssr files.
Let's go ahead and create a single file that we can export from both, rather than duplicating code in both files. Create a new file at the root of the project called wrap-root-element.js and add the following code:
import React from 'react';
import { ChakraProvider } from '@chakra-ui/core';
export const wrapRootElement = ({ element }) => (
  <ChakraProvider resetCSS>{element}</ChakraProvider>
);
Now create both gatsby-browser.js and gatsby-ssr.js and add the following code. We are going to import our new wrap-root-element file and export it again from each file.
import { wrapRootElement as wrap } from './wrap-root-element';
export const wrapRootElement = wrap;
That's our basic setup done for Gatsby. We’ll be adding some node code soon to dynamically create our blog post pages from the data in Statamic.
For now, let's take a closer look at Statamic and how we can organize our blog posts before creating and styling our Gatsby frontend.
3. Setting up the Statamic GUI
Before we can enter our Statamic project, we’ll need to create a new user to log in with.
From the command line, run the following (amazingly intuitive) code, and then follow the on-terminal prompts:
php please make:userTo start with our Statamic project, open the Laragon GUI and hit the “Start All” button in the bottom left corner. This will spin up an Apache server running our project.
Then, navigate to the URL that is our project name with .test and possibly the port number. In my case, it was http://statamic-gatsby.test:81
This will bring up a login page. Log in with the user details you just created, and once logged into the home page, click the control panel. It's now time to create our first blog post, but before that, let's quickly go over some of the stuff we can do.

On the left of the page, you’ll see a menu with “Content”, “Fields”, “Tools”, and “Users”. The “Content” section holds stuff that will be displayed on the site. One of the options here, “Collections”, is where we will be spending most of our time.
(Screenshot of the page w/ menu)
But I first want to direct you towards the “Fields” section and the “Blueprints” option. A blueprint acts as a template for a collection entity. When creating or editing a blueprint, we can change what fields are expected when creating a collections entity through adding or creating widgets, such as text areas, images or markdown content areas.
4. Adding a new collection
Go ahead and click on the “Collections” tab on the left and then click the blue “Create collection” button. Call the new collection “Posts” and hit “Create”.
You should now see a dashboard. Click “Create entity” and add some arbitrary name like “My First Post”. This will be our first test post. Add some text to the markdown content box, whatever you like, and hit save and publish. This new collection and entity within that collection will now be available to pull into our Gatsby site.
But what if we wanted to add more data to our post? An image perhaps, or a date picker or contact form? Fear not, young padawan, because that's where the blueprints come into play.
Now that we have created our new collection, we can create a blueprint for each of the new entities created under that collection. Head over to the blueprints section and click on the newly created “Posts” collection. From here, you can choose to either add or link fields. I won’t cover the second option, but adding new fields simply enables you to access more fields when creating your collection entities.
Add an “images” field so that each of our blog posts can have a hero image. The default settings will do for us.
If you navigate back to the “Posts” collection and click on the first entity created, “My First Post”, you should now be able to add a hero image. Pick an image from your filesystem or download one.
Add some super informative text to the markdown content area (or just lorem ipsum it up). You can then create a few more posts, each with its title, content and image.
4.1 Inserting images into blog posts
Let's add visuals to the content of our blog post.
Images are stored as assets in Statamic. You can store them on the local file system, a serverless bucket, S3, or in your scanner, ready to upload at a moment’s notice. Whatever way you choose to store them, you'll want to create a container for them first.
On the left menu, click the “Assets” option then the blue “Create Container” button.
Give the container a relevant title and choose “local” for the file driver (where the images are being pulled from.) You can leave the rest of the options as default.
Now, when we create our blog posts, we can upload an image for each post from our local file system.
5. Using Statamic to feed the Gatsby blog
When we left our Gatsby site, all we had was a measly package.json, a config file, and some scripts. Let's add some meat to those bones!
Inside our index.jsadd the following:
import React from 'react';
import {
Flex,
Container,
Link,
Text,
UnorderedList,
ListItem,
} from '@chakra-ui/core';
import { graphql, Link as GatsbyLink } from 'gatsby';
const Index = ({ data }) => {
const posts = data.allCollectionPosts.nodes;
return (
<Container h="100vh" centerContent>
<Flex
direction="column"
h="100%"
w="100%"
align="center"
justify="center"
>
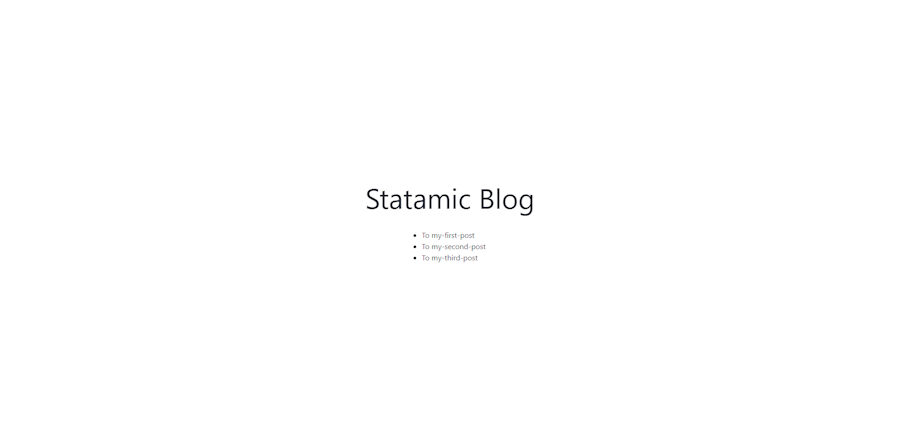
<Text as="h1" fontSize="6xl" mb={6}>
Statamic Blog
</Text>
<UnorderedList>
{posts.map((post) => (
<ListItem>
<Link as={GatsbyLink} to={post.slug}>
To {post.slug}
</Link>
</ListItem>
))}
</UnorderedList>
</Flex>
</Container>
);
};
export default Index;
export const query = graphql`
query IndexQuery {
allCollectionPosts(sort: { fields: [title], order: ASC }) {
nodes {
slug
}
}
}
`;Yeah, I know, that's quite a lot to digest all of a sudden. Let's break this command down nicely:
Components we use from Chakra are imported. (Notice that we import a Link component.)
Imports from Gatsby: the GraphQL function and the Gatsby Link, which we rename as we’ll be using the Chakra Link instead (for its default styling and accessibility.)
The page accepts a data object, which we destructure.
We pull out the posts array from the data object.
The main bulk of the component is a simple flex container that renders an h1 and a list of internal links to blog posts.
An exported GraphQL query. It's exported so that our page can pick it up on render. It asks for the post slug, which we use for the URL to navigate to.
6. Handling the data from Statamic
If you run yarn dev, then you should see our title and one post underneath it. Clicking this will just throw an error as we haven't told Gatsby what to do with this information yet. Let's do that now.
Create a gatsby-node.js file at the projects root:
const path = require(`path`);
// create the pages from the statamic md content
exports.createPages = ({ actions, graphql }) => {
  const { createPage } = actions;
  // Our blog post layout template. Used to layout all out posts
  const postLayoutTemplate = path.resolve('src/templates/post-layout.js');
  return graphql(`
    {
      allCollectionPosts {
        nodes {
          slug
          title
          content
          images {
            permalink
          }
        }
      }
    }
  `).then((result) => {
    // If we get any errors throw them back at'cha
    if (result.errors) {
      throw result.errors;
    }
    // Grab the posts array
    const posts = result.data.allCollectionPosts.nodes;
    // Loop through the posts and create the post pages
    posts.forEach((post, index) => {
      // Get the previous and next posts so that we can navigate between them
      const previous = index === post.length - 1 ? null : posts[index + 1];
      const next = index === 0 ? null : posts[index - 1];
      // Create the page using the slug
      createPage({
        path: post.slug,
        component: postLayoutTemplate,
        context: {
          slug: post.slug,
          previous,
          next,
        },
      });
    });
  });
};
Again, it’s a lot to unfold. Let's break it down:
We use the
createPagesAPI, where we destructure thecreatePageand GraphQL functions.We create a new post layout template at an as-yet-uncreated path.
Much like our query in the
index.jsfile, we request some data from Statamic. This time we want the posts title, its slug, the actual markdown content and an image.As it's a promise, we first see what is returned. If it's an error, we just throw that back to the user (which is you). Otherwise we get the posts and loop over them. For each post in the array, we create a page using our post’s layout page (which we shall soon create). Our post layout can accept a page context, so we use that to pass the slug, as well as the “Previous” and “Next” index of any other posts that might exist.
7. Creating the post layout
Now that Gatsby knows what to do with our data let's create the post layout template. It will allow our blog posts to be rendered on their own awesome pages.
Create a new folder inside of the src folder called templates. Inside this new folder, create a file called post-layout.js.
The file’s content:
import React from 'react';
import { graphql, Link as GatsbyLink } from 'gatsby';
import { Container, Text, Image, Link, Flex } from '@chakra-ui/core';
import ReactMarkdown from 'react-markdown/with-html';
const PostLayout = ({ data, pageContext }) => {
const { title, content, images } = data.collectionPosts;
const { permalink } = images[0];
const { previous, next } = pageContext;
return (
<Container maxW="100ch" centerContent>
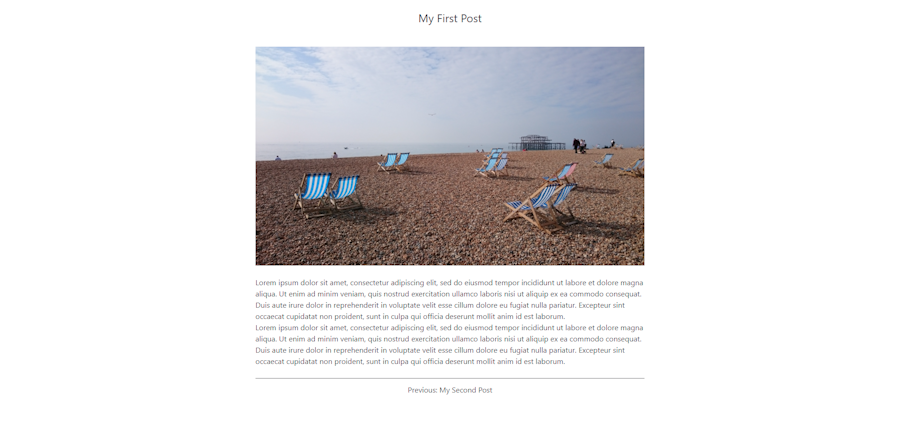
<Text as="h1" fontSize="2xl" my={5}>
{title}
</Text>
<Image my={6} src={permalink} alt={title} />
<Text as="p" dangerouslySetInnerHTML={{ __html: content }} />
<Flex mt={6} w="100%" borderTop="solid 1px" p={3}>
<Flex w="100ch" justify="space-evenly">
{previous && (
<Link as={GatsbyLink} to={`/${previous.slug}`}>
Previous: {previous.title}
</Link>
)}
{next && (
<Link as={GatsbyLink} to={`/${next.slug}`}>
Next: {next.title}
</Link>
)}
</Flex>
</Flex>
</Container>
);
};
export default PostLayout;
export const query = graphql`
query PostBySlug($slug: String!) {
collectionPosts(slug: { eq: $slug }) {
content
title
slug
images {
permalink
}
}
}
`;This is the meat and bones of our blog. It's our actual blog content.
This component does quite a lot. I’ll try my best to make it understandable:
We destructure the GraphQL data and the page context (which we passed into the page when we used the createPage function in gatsby-node.js). From there, we grab our posts data; the title, content and image.
From the page context, we take the “Previous” and “Next” indexes, which we’ll use as navigation slugs. Our image is rendered using the “Image” component from Chakra.
We also use dangerouslySetInnerHTML to set our blog’s content on the page. This isn’t really recommended, though. I’ll cover this in more detail in just a second.
Moving down the component, we conditionally render either the next or previous post links depending on whether they actually exist. If either does exist, we use the Chakra link and pass it in the Gatsby link. This is because the Chakra link component has some nice accessible defaults. We then simply set the to prop (where this link is pointing to) with the indexes slug. Our query accepts the slug and pulls the post's data that matches the passed in the slug.
Using dangerouslySetInnerHTML to set the content’s HTML is a bit silly honestly. Especially when there are other, better ways of doing this.
The markdown content that Statamic returns to us is parsed into pure HTML. It's a bunch of paragraph tags literally wrapping our text. If you just render the content to the page (like so: {content}), then you’ll see these tags.
Instead of directly placing that HTML into the DOM, thus bypassing React*, we can use the react-markdown package, which will parse the HTML for us and insert it into the page without using dangerouslySetInnerHTML.
It doesn't care if it's there or not. In fact, it will bypass it entirely as React compares the difference with the virtual DOM, and it doesn't exist there.
The command to fire up the package:
yarn add react-markdownWe can now simply replace our dangerouslySetInnerHTML with the react-markdown component, setting its source to our content.
We are parsing the HTML, rendering it to the page. We pass the escapeHtml flag as “false”, meaning that we’ll render the HTML. It also means that we trust its source, which we do because we wrote it.
// Other imports
import ReactMarkdown from 'react-markdown/with-html';
// Component stuff
<ReactMarkdown source={content} escapeHtml={false} />;
Live demo & GitHub repo

Try the live demo here.
See the GitHub repo here.
Closing thoughts
I had never used Statamic before. Indeed, I had never even coded with PHP yet!
To be honest, I had been somewhat apprehensive as to how this was going to go. The learning curve ahead was a bit scary at the start. Add to the mix the fact that I'm a Windows dev (BOO! HISS!!), and I thought I would be in for a long ride.
However, I was pleasantly surprised at how easy it was to get things up and running using Statamic as a headless CMS. Once I ironed out the creases in setup, I found the actual application really pleasant to work with. The menus are very intuitive, and if there was anything that I couldn't find, I was happy to see that the documentation was on point. And the community? Very helpful.
I did end up using a pre-made Gatsby plugin to bring in my data (why re-invent the wheel?), but the Statamic’s Content API documentation is pretty clear. Using this with other frameworks like Next.js should be a breeze too; pulling your data in via REST endpoints. Through the grapevine, I heard that the Statamic team is currently working on a GraphQL layer, which would be awesome.
I'm definitely going to be trying out Statamic again. Most likely with Next.js and with a more complex use case.
Hit me up with your thoughts on Statamic and any feedback you might have in the comments below!
If you've enjoyed this post, please take a second to share it on Twitter. Got comments, questions? Hit the section below!


